 4D Makers
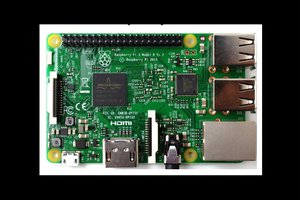
The Raspberry Pi Internet Weather Station project displays the weather information such as temperature, humidity and successive weather forecasts. This project uses 4D Systems’ 4DPi-35-II. 4DPi-35-II acts as the primary display of this RPi Project.

The 4DPi-35-II is a 3.5" 480x320 Primary Display for the Raspberry Pi, which plugs directly on top of a Raspberry Pi and displays the primary output which is normally sent to the HDMI or Composite output. It features an integrated Resistive Touch panel, enabling the 4DPi-35-II to function with the Raspberry Pi without the need for a mouse.
Communication between the 4DPi-35-II and the Raspberry Pi is interfaced with a high speed 48Mhz SPI connection, which utilises an on-board processor for direct command interpretation and SPI communication compression, and features a customised DMA enabled kernel.

The 4DPi-35-II is designed to work with the Raspbian Operating System running on the Raspberry Pi, as that is the official Raspberry Pi operating system. It also supports the new PIXEL addition to Raspbian.
Read more.


 Sophi Kravitz
 Arya
Arya
Not to belittle your project, but how is a 75$ device better than an old cellphone pointed to a weather website?