Close
0%
0%

Acrylic speakers

2-way speaker with an enclosure made out of acrylic. The acrylic parts were laser cutted

Similar projects worth following
I made a pair of 2-way stereo speakers (woofer and tweeter). I also made the crossover (see my other project). The speaker box was built by laser cutting cast acrylic (PMMA), 1/4 in thick.The speaker box is ported, meaning that it has a tube to let air come out. The advantage of using a ported box is that you get more bass response, the disadvantage is that the box is bigger. The overall dimensions of the box are 9x6x6 inches (0.19 square feet), the size of the port is 1.5 in of diameter and a length of 4 in. The volume of the box is the one recomended by the specs of the woofer, and the port size can be calculated using the following link (http://www.mobileinformationlabs.com/HowTo-1Woofer-Box-CAL%20Port%20lenth%201.htm).

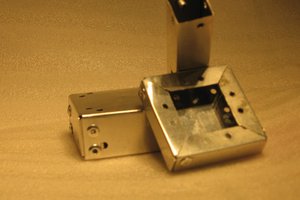
The speaker box is formed by 7 different pieces. The corners (8 of them), front face, back face, 2 sides (one with Aladdin Sane's lightning bolt engraved, yes, I am a Bowie fan; and the other has an eight note engraved), top, and bottom.

I painted black the inner face of the 2 sides, top, and bottom, and I glued these four parts with epoxy based glue.  The reason why I painted them, instead of keeping the parts translucent, is because I would put foam in all the inner faces, except the front face,and if the faces were clear it would look weird. In retrospect, I should have painted the back face too. I tapped a M3 thread on the holes of the corners, and glued the corners as well to the box (4 corners in the corners of the front face, and four in the corners of the back face). Once glued, I applied glue with a glue gun on the joints to ensure a good sealing (you could use silicone too).

The front and back face are screwed to the box, this is why I tapped the threads on the corners. I also used acrylic double tape or gasketing tape to have a better seal between the front face and the box, and the back face and the box.

Overall, the most critical parts of this project are the tolerances during the design and manufacturing. So first, know how much material the laser beam eats (around 0.1-0.2 mm, but depends on the cutter); second, do not cut the parts before measuring the thickness and size of your acrylic sheet, and all the components (especially the port tube and the tweeter, since they are press fitted into the box), then adjust the design to this measurements. Painting can be a critical part if you are not an expert painting; make sure to protect the edges with tape so that you won't paint the outer face. Finally when gluing, be careful not using excessive glue, if you have some glue on the exterior of the speakers you can remove that with ethanol (DO NOT use acetone).

The drawings that I posted are corrected after measuring, and taking into account the tolerances and the 0.2 mm that the laser beam eats when cutting. The acrylic sheet I ordered turned out to be 1/4 of an inch shorter, so the box, instead of being 6x6x9 in, it ended up being 5-7/8x6x9 in. Also, I made the holes for the screws on the front and back side bigger than 3 mm (around 4-5 mm) to have some play and flexibility to place all the parts and screws. The holes in the corner pieces are smaller than 2.5 mm (size of a hole to tap a M3), this is because, as I have stated before, the laser beam eats material, so If I would have draw a 2.5 mm hole, the final hole would have been 2.8-2.9 mm and then the M3 thread would be very bad. If you don't have an M3 tap you can buy M3 threaded inserts for plastic (or any other bolt size that you prefer, I always tend to use M3).

Also, you can use this link to design the speaker box https://www.diyaudioandvideo.com/Calculator/SpeakerBoxEnclosure/ . This website has other helpful calculators and explanations, like the crossover calculator.

I picked the size of the box based on the specs of the woofer. Then I designed the pot using the following link http://www.mobileinformationlabs.com/HowTo-1Woofer-Box-CAL%20Port%20lenth%201.htm. The advantages of using a ported Box instead of a sealed box is that you can reach lower frequencies (even lower that the minimum frequency in the specs of the woofer). The disadvantage, however, is that the ported boxes are bigger (twice the volume than a sealed box).

plain - 956.00 bytes - 07/06/2018 at 06:18

Download

schematic.jpg

Schematic of the crossover

JPEG Image - 147.68 kB - 12/31/2017 at 02:33

Preview
Download

Adobe Portable Document Format - 189.07 kB - 12/31/2017 at 02:29

Preview
Download

Adobe Portable Document Format - 191.51 kB - 12/31/2017 at 02:29

Preview
Download

Adobe Portable Document Format - 185.76 kB - 12/31/2017 at 02:29

Preview
Download

View all 10 files

  • 1 × Peerless by Tymphany TC9FD18-08 3-1/2" Full Range Paper Cone Woofer woofer
  • 1 × Dayton Audio ND16FA-6 5/8" Soft Dome Neodymium Tweeter tweeter
  • 1 × Dayton Audio 0.30mH 20 AWG Air Core Inductor Crossover Coil Tweeter inductor (Lt) for the crossover
  • 1 × Parts express Red Perforated Large Hole Crossover Board Pair 3.5" x 5"
  • 1 × 24x12 in grey cast acrylic 1/4 in thick Acrylic sheet for the cavinets

View all 15 components

  • 1
    Design

    If you want to use other drivers, you will need to find out the volume of the box (you might find the recommended volume on the specs of the woofer or use https://www.diyaudioandvideo.com/Calculator/SpeakerBoxEnclosure/). Then pick the size of the port http://www.mobileinformationlabs.com/HowTo-1Woofer-Box-CAL%20Port%20lenth%201.htm, and finally design the crossover (https://hackaday.io/project/28864-crossover-design or https://www.diyaudioandvideo.com/Calculator/SpeakerCrossover/)

  • 2
    Measuring and correcting dimensions

    Find out how much material the laser beam eats. To do so, I cut a square of specific dimensions (e.g. 20x20mm) with a hole inside (of 4mm diameter), from an acrylic sheet with the same thickness, hence, I use the same power, frequency and speed of cutting. Then, I measure the part, thus, I find out how much material melts or evaporates during the process of cutting.

    Measure all the parts, size and thickness of the sheet, diameter of the port tube, dimater of the tweeter, make sure that the dimensions of the speakers are correct.

    Adjust the dimensions of the drawings accordingly. If your port tube has a diameter of 40.5 mm, and the laser eats 0.2mm, draw a circle of 40.9mm (40.5 +2x0.2mm) or slightly smaller since we want to have a snug fit. Same with the holes in the corner pieces, if the laser eats 0.2mm, draw circles of 2.1 mm.

  • 3
    Cutting and painting

    Laser cut the parts. I am using cast acrylic because it laser cuts very nicely. 

    If you want to paint them, before doing it, put painters tape on all the corners and protect the outer face. I recomend using spray paint that has both primer and paint.

View all 6 instructions

Enjoy this project?

Share

Discussions

Similar Projects

Does this project spark your interest?

Become a member to follow this project and never miss any updates