On my LED matrix I could display the outside temperature/humidity data thanks to OpenWeatherMap API, it simply reads a sensor somewhere near my location which I trust to be correct and calibrated. However, I have never been able to get the conditions inside the apartment. The way this project was designed allows the RPi to be connected yet to another sensor/service and display the data on the LED matrix without modifying it or its firmware.
I was able to get my hands on an SHT31 development module. It's a small board, powered by a coin cell, containing the SHT31 temperature/humidity sensor, a screen displaying the data and, perhaps most importantly, a Bluetooth LE module which can be used to retrieve data over the air.
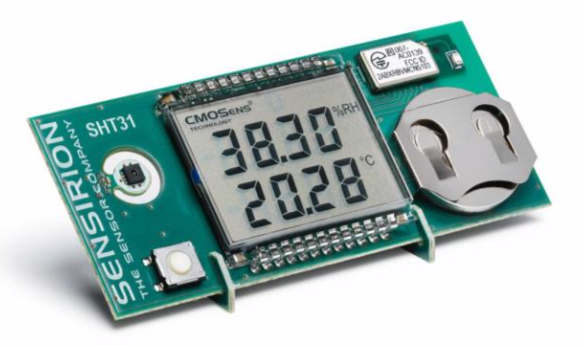
There are some temperature/humidity sensors that use the ESP8266 to convey the data directly over WiFi, I have some as well, the issue with the ESP8266 is its power consumption and the proximity to the sensor, the local heating tends to bias the sensor values. Therefore, Bluetooth LE is a perfect candidate for more accurate readings, for an over-the-air, battery-powered device. On the image above you can see the trouble the PCB designer went though to make sure the sensor is affected as little as possible by the other electronics, by making a cutout around the sensor.
I set myself to get the the SHT31 development board connected to the RPi server and interface it with Node-RED. First, I replaced my RPi 2 server with a RPi 3B+ to have access to the integrated Bluetooth. Then I found this nice project on GitHub that did exactly want I wanted: get the data out of the SHT31 development module using GATT.
Next hurdles were to figure out how to:
- Connect to the module to the RPi
- Install the SHT31 module dependancies
- Customise the output script for my module
- Integrate it to Node-RED
Pairing and connect to the SHT31 module
The first step was to connect the module to the RPi 3B+, this was relatively straight forward, but needed some trial and error. These are the minimum steps to get the SHT31 development module to pair and connect to the RPi.
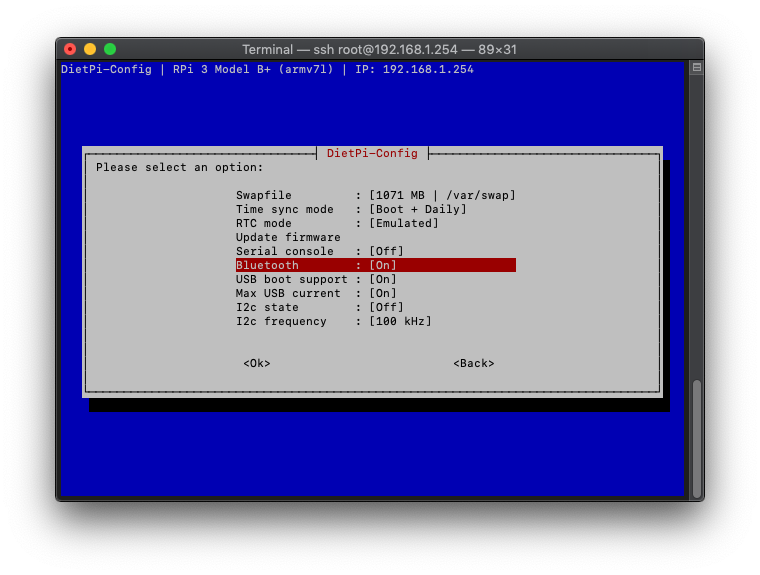
The Bluetooth needs to be enabled on the RPi, in my case it was a matter of calling dietpi-config, go into Advanced Options and turn on Bluetooth:
At this point it's useful to have the SHT31 Bluetooth off, so that you can distinguish it from other Bluetooth devices around. The SHT31 Bluetooth is switched by holding down the button on the board.
- Call "bluetoothctl" in the terminal, it'll open the Bluetooth controller from which you'll pair and connect to the SHT31.
- Type "scan on", this will start scanning all the Bluetooth devices and shows their MAC address. Enable the SHT31 Bluetooth and wait for it to show up. In my case it was FB:52:05:5E:F9:92.
- Type "scan off" to stop the device enumeration.
- Type "pair <MAC>", in my case it was "pair FB:52:05:5E:F9:92". Wait for the pairing to succeed (might take a couple of seconds).
- Finally type "connect <MAC>" to connect to the device. In my case it was "connect FB:52:05:5E:F9:92".
- Type "exit" to quit the bluetoothctl tool.
SmartGadget-GATT
The SmartGaget GATT project on GitHub explains what to install, but here's the quick list of commands to get this done:
apt install -y python3-pip
pip3 install gatt
apt install -y python3-dbus
apt install -y python3-gi
apt install -y git
git clone https://github.com/albertosottile/SmartGadget-gatt.git /home/nodered/SmartGadget-gatt
cd /home/nodered/SmartGadget-gatt
cp example.py sht31.py
Customise the Python script
The example script that comes with the needs to be adjusted, the MAC address of the module needs configuration and the output is not quite suited for Node-RED.
Edit the copied example file with your preferred command-line editor: nano sht31.py, and modify the MAC address and output type:
import smartgadget
import json
sm = smartgadget.SmartGadget(adapter_name='hci0', device_mac='FB:52:05:5E:F9:92')
data = {"temperature": sm.temperature(), "humidity": sm.humidity(), "dew": sm.dew()}
print(json.dumps(data))
At this point you should be all set to get the data from the SHT31 module, try it out with:
python3 sht31.py
You might need to wait for a couple of seconds for the reply to arrive. Then you'll see something like this:
{"dew": 9.7, "temperature": 24.8, "humidity": 39.0}
Node-RED integration
Node-RED provides a nice module to execute a command named "exec". This module is going to call the modified script and wait for the response.

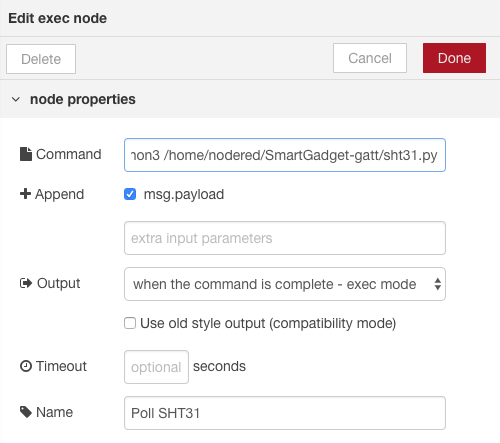
The command entry must be the following:
python3 /home/nodered/SmartGadget-gatt/sht31.py
The script has been modified to output JSON data, but that's a string, in order to get a usable object for the flow it needs to be parsed. Add a JSON node to the output of the "exec" node, name it "Parse JSON" for example.
This is not enough though, Bluetooth is kind of a hardware thing, which requires more privileges than Node-RED usually has. Node-RED needs to be added to the "bluetooth" group with the following command:
usermod -a -G bluetooth nodered
After modifying groups a reboot is required, simply type "reboot".
Finally, when you hit the "Request" button in Node-RED you'll be greeted with the up-to-date SHT31 sensor values and can do whatever you want with them, such as displaying them on a RGB LED matrix.
Conclusion
My LED matrix is now displaying the temperature and humidity conditions outside and inside the apartment.

Discussions
Become a Hackaday.io Member
Create an account to leave a comment. Already have an account? Log In.