Close
0%
0%

Another Candle

An attempt to mimic a real candle. Another digression based on the work of many people, plus a PIC10F320

Similar projects worth following
Christmas lightnings around houses are not my favorite, however I like the atmosphere of warm little candles put on the bottom borders of the windows. That’s the starting point of a long and lazy digression.Instead of burning continuously paraffin wax, could we make a reusable electronic one ? Of course, there is tons of cheap products available. But they are somehow not really convincing me. And I’m not the first one to look on that subject.
This page is basically a copy of the blog entry I made before : https://pierremuth.wordpress.com/2018/01/04/another-candle/
It tries to summarize what I’ve found and what I’ve enjoyed to do. Sources and drawings can be found in this github repository: https://github.com/pierre-muth/another-candle

You can spend a lot of time completely lost on internet as I did, by just googling ‘led candle’ or ‘flickering led’ or ‘micro controller candle’ etc…

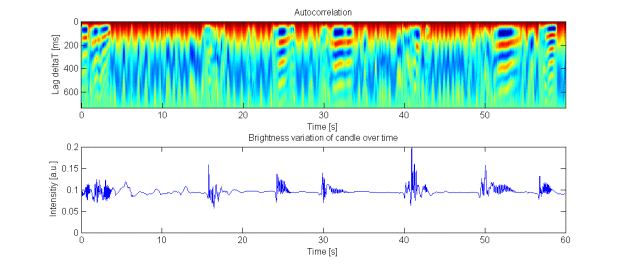
I’ve found a nice Tim’s blog post about the reverse engineering of a flickering led. It is really worth a read, he details everything from measurements to analysis, and reproduce the algorithm. This is followed by another post which really interested me. How a real candle flame behave.

Courtesy cpldcpu.wordpress.com

To summarize, and as probably everyone knows, the candle flame brightness has two types of behavior. Usually it is rather constant, and it happens some time that the brightness starts to oscillate for one or two seconds. One thing I can add to that is the flame is gently moving, from one side to another one.

Another property of the flame is its light spectrum. And here as well, a lot of people studied this. It is a very warm light with plenty of red / infra-red. We can find some measurements from 1000 to 2000K of color temperature.

Start the Project:

We roughly know what to mimic, so let’s choose some components according these constraints.

For the LED, I looked for the warmest white on the range of 10-20 mA. My ‘local’ provider is Farnell, so after some sorting and filtering I end up with a Wurth warm white led, €0.18.

medium-pic10f320-sot-23-6
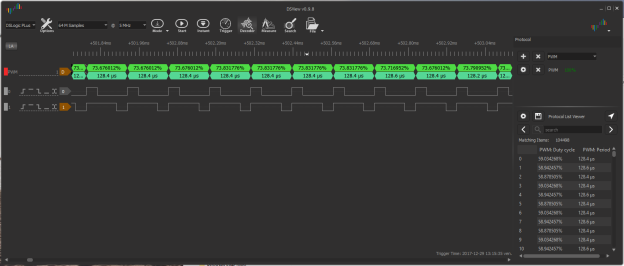
To add a bit of challenge I choose a very small micro-controller, but still accessible with my tools and knowledge. The PIC10F320 has only 6 pins, 64 bytes of RAM and 256 bytes of program memory. But it has 2 PWM output and an ADC, all for €0.42

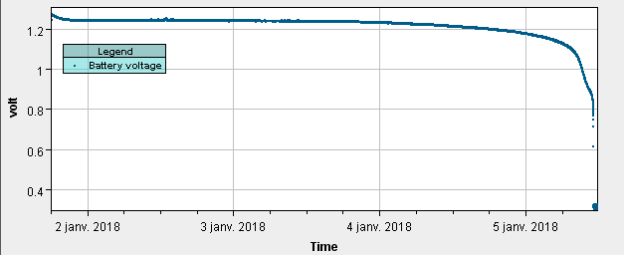
To power everything from an AA battery I choose to use a step up converter. The €0.38 MCP1624 is able to output 50mA at 3.3V from a single AA battery, and is working down to 0.35V.

From this point we can control and power two led and read an analogue value such as the ambiant luminosity (using a photo-resistor for example). It is possible to mimic the flame swing by balancing the brightness of the two LED, plus the random oscillations with the total brightness. We can switch off the LEDs when the day is too bright as well.

  • 1 × U1: MCP1624 Power Management ICs / Switching Regulators and Controllers
  • 2 × D1 & D2: Warm White LED 0805 equivalent LED
  • 1 × Cin: 4.7uF 0805 ceramic capacitor
  • 1 × Cout: 10uF 0805 ceramic capacitor
  • 1 × L: 4.7uH 0805 inductor

View all 10 components

  • Final result

    Muth01/04/2018 at 18:16 0 comments

    IMG_5299

    IMG_5306

    It is rather hard to catch the effect on a video, as the aim was to create a LED candle as quiet as a real candle could be.

    candle

  • Life-time

    Muth01/04/2018 at 18:15 0 comments

    I don’t own yet a nice multimeter, so the current measurement I did with my actual (too) cheap one is rather approximate. I got around 12mA with the LEDs on, and around 4mA in sleep mode, drawn from the battery. Maybe the current of the sleep mode is still high due to the step-up circuit, which runs all the time…

    However it stays on at least 3 consecutive days on a single AA Ni-MH rechargeable battery. I logged the battery voltage of one candle with my raspberry-pi logging station. It start with a fully charge single AA Ni-MH battery and I remove the sleeping mode:

    Using the 'day sleep' it's approximately 5 days one ~2Ah battery.

  • Soldering and programming

    Muth01/04/2018 at 18:15 0 comments

    And the boards crossed the Atlantic ocean and arrived in the mailbox! It’s always a pleasure to solder components on these high quality boards (even 0805 with a soldering iron).

    IMG_5298

    IMG_5296

    To program the PIC, I forgot to order some 1.27mm spacing pin headers. However, there is a solution with two 2.54mm ones:

    IMG_5302

  • Less serious with the 3D shape

    Muth01/04/2018 at 18:14 0 comments

    It is time to think how to hold everything together. I applied for the free student Fusion360 licence. I have to say the program is very nice to handle and to learn.

    candleV1 v20

    The idea is to hold the battery on the PCB with the three part threads. Just screw them together and it should light-up. The only compromise is the ground wire that goes from the PCB to the bottom part along the battery body.

    I also made a join part to be able to have some versions with two AA battery stacked, making it taller and with a longer battery life.

    candle_mechanical_draw

    Then I removed the dust of my M3D micro printer, far from the best printer nowadays, but the cheapest when it went out.

    IMG_5275IMG_5271IMG_5270

  • Getting serious with a PCB

    Muth01/04/2018 at 18:14 0 comments

    Let’s startup Kicad, do the schematics and play a bit with the PCB drawing. I have in mind a design for a 3D printed case, we’ll see that later.

    schema

    pcb_kicad

    Several times now I ordered PCB from OSHPark, and never been disappointed. I could use their manufacturing precision to down size the board area up to 17x17mm, giving $2.45 for 3. I let an option for a push button, we never know…

    pcb_oshpark

  • Code contraints and Prototyping

    Muth01/04/2018 at 18:13 0 comments

    After some soldering I manage to put the components on a small development boards and start coding.

    IMG_5267

    IMG_5268

    I used the Microchip IDE and their XC8 C compiler. The challenge here is that the compiler is in ‘free’ mode, so the compiled code is rather large. I didn’t want to use assembly mainly because I’m not quite confident to prototype with it. But I admit it is the preferable way to do something with only 256 bytes of program available. It’s perfectly legit to argue that an ATtiny10 would at least do the job better. I should invest time to the AVR side one day !candle_XC8

    After many iteration to reduce the program size, I end up with only 4 free bytes. Wow. Some C operations give more compact program for the same function (for example initialisation to 0 or an arbitrary value).

    The code uses the famous Linear feedback shift register as random generator. The flame position, the speed to go from one to the other position, the oscillations occurrence and their period number are random. The two LEDs are dimmed with the build in PWM, and the speed of change with the Timer0.

    It is still open to more complex code as I can use the PIC10F322 with 512 bytes of program space (or even ATtiny10 which seems to be almost pin compatible).

    I acquired the two LEDs PWM signal with my recently acquired DSLogic :

    candlePWM

    And plot them with a quick and dirty Java program:

    candlePWMchart2

    You can notice the oscillation mode on the chart after 4th second, and the flame swing mode surrounding it. For the oscillations, the total brightness is changing while otherwise it stays constant at 50% (the sum of the two led brightness).

    The PIC code is on this github repositoy : https://github.com/pierre-muth/another-candle/blob/master/candle01.X/main.c

View all 6 project logs

Enjoy this project?

Share

Discussions

oshpark wrote 01/06/2018 at 04:14 point

Well done!

  Are you sure? yes | no

Muth wrote 03/02/2018 at 22:41 point

Thanks a lot !  (bit late sorry)

  Are you sure? yes | no

Similar Projects

Does this project spark your interest?

Become a member to follow this project and never miss any updates