msraynsford
- It's slow when you're trying to go large distances.
- You have to be right at the top menu before you can enter Z mode, but the top menu and the one below it are both identical so you end up pressing escape before hand just to make sure.
- Once in Z mode pressing escape does not get you out of Z mode, only pressing Z again does.
- Holding the Up/Down button for 3 seconds switches to a faster speed but this typically occurs once you reach the exact spot you wanted to be in and the Z zooms out of the desired position.
- You can't adjust the Z axis while the program is paused, meaning you have to stop, adjust and restart whereby you double cut a series of lines.
- If you don't datum the Z axis, which it doesn't do automatically, the Z doesn't even run continuously. Check the end of the video to see what I mean.
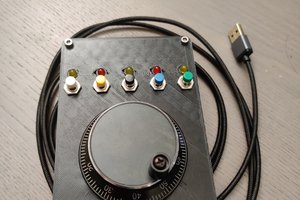
So with all of these little niggles I thought it was time to replace the controller with my own controller. I picked the Arduino Pro mini as the controller for the job because you get the full use of the Arduino libraries and you can pick them up for <£2 a time meaning you can plug them in and forget about them. I wanted a few features from my new control system.
- Fast and Slow adjustment in either direction from separate buttons
- End stop detection, so I don't case any damage to the Z axis.
- Zero Datum (run to end stop) in both top and bottom directions
 sporkius
 Andy
Andy
 AltMarcxs