Close
0%
0%

DC Current Transformer

Investigating fluxgate current sensors (DC capable) with detours into analog electronics and switched mode power supplies.

jbbjbb
Similar projects worth following
Current transformers are very useful but don't work at DC. Shunt resistors are fantastic at low currents, but don't offer isolation and get large / expensive / hot when higher currents are involved.

The DC Current Transformer (DCCT) is a type of DC-capable 'current transformer,' which produces an output current proportional to the input current - all the way down to DC.

This technology is commerically available, and offers amazing accuracy: DC offset and gain accuracies of 10 ppm or better (that's 0.001%). Applications include precision power measurement and current control for the Large Hadron Collider magnets.

Along the way, we will have a look at:
1) what is a fluxgate?
2) single-core and double-core fluxgates
3) pulse generation circuitry
4) differential amplifiers and demodulators
5) a switchmode (class D) power amplifier
6) how to fix your broken switchmode amplifier
7) switch mode power supply design (optional)
8) bandwidth extension using a 'vanilla' current

How can we sense currents?

There are 2 practical methods: shunt resistors and magnetic methods.

Shunt resistors are OK for low currents (10A or less) but do not provide isolation between your control circuit and power circuit (not so good for 400 V AC).

----

Magnetic methods can be scaled up to ferociously large currents (100 000 A +) and provide electrical isolation between the primary current (which you want to measure) and the secondary.  Additionally, you can set a turns ratio (or equivalent) so that you output only a fraction of the primary current.

----

Various magnetic methods exist, most notably the Hall Effect sensor.  These sensors produce an output voltage proportional to the applied magnetic field, so all you have to do is cut a ferrite ring in half, stick in a Hall effect sensor, and you're done, right?

Yes and no; cutting ferrite is seriously difficult as it tends to shatter.  (My colleagure had some success with commercial water jet cutting, but he broke a lot of ferrite first!)  Additionally, Hall Effect sensors are not super-accurate.  Finally, you can just buy one from DigiKey / Mouser / Farnell etc.  Where's the fun in that?

---

Enter the fluxgate.  This is a magnetic field sensor which relies on <i>deliberately</i> saturating a ferrite (or other material) core.  This is attractive because it means no ferrite cutting is required!

The first part of the project will consist of some explanation and experimentation with a single-core fluxgate.  Things will get fancier from there...

I intend to deisgn and build a DCCT using SPICE simulations, repeatable measurements, PCB design and (somewhat) hacker friendly components.  At present, I am thinking about a unit with 25A input / 1A output, and a maximum uncertainty of around 100 mA (0.4%).

  • Care and Feeding of MOSFET Bridges

    jbb07/13/2014 at 22:27 0 comments

    In this entry we'll look at how to deploy MOSFETs in bridge circuits. (This is also applicable to IGBTs.)

    Switch mode electronics are great - they are usually smaller and more efficient than similar linear circuits. However, there are some limitations that we must obey.  This log is about how to drive a switch mode MOSFET driver stage.

    Read more »

  • A Class D Power Amplifier - and Why it Won't Work

    jbb07/07/2014 at 04:22 1 comment

    First up, apologies for the long drought.  I've been super busy at work putting together a MW (yes, MegaWatt) class prototype power converter at work, and it has been eating my life.  Now I'm on holiday and finally have a moment to do an update.

    So, this entry will be about using a Class D - i.e. switchmode - power amplifier as a controlled current source.  Let's have a look at the basic features:

    So, V1 is a +15V supply.  Q1 and Q2 are small power MOSFETs (driven with synthetic PWM by V2 and V3).  L1 and Cf filter the square wave signals at Vx into a pretty smooth voltage at Vy, which feeds our load resistor (RL) via the feedback windings (Lf, actually 1 winding through 3 stacked cores).

    The SPICE parameter E is used to adjust the average voltage applied to L1 / Cf / Lf.  I have used a .step command here to try several values.  I also cheated a bit and forced the initial conditions (IC) of the inductors to avoid long settling times.  We get a bit of oscillation between L1 and Cf - this is not a surprise, because we have carefully chosen low resistance MOSFETs, inductors and (presumably) capacitors.  Welcome to the wonderful world of power electronics :-)

    So we see here that we can achieve controlled currents of 0.2A to 1.0A.  However, we actually wanted a +- 1A supply, so this circuit won't work.


    Let's have a look at a bipolar version:

    So, we now use +- 15V supplies, which means that the MOSFETs now have to block 30V - I've swapped to 55V types.  I also added an initial condition (IC) to Cf to cut down on that oscillation, and changed the duty cycle calculation a little.

    The duty cycle has 2 changes.  Firstly, 0% duty now corresponds to an average of -15V at Vx.  100% duty still corresponds to 15V at Vx.  Thus the 0% to 100% gain is now 30V / 100% (where it was previously 15), and there is an offset; 0V occurrs at 50% duty cycle.

    The waveforms look promising:

    However, there is a subtle and really important problem with the circuit.  Let's have a look at the currents into supplies V1 and V4 (i.e. the main suplies).  These are equivalent to the drain currents of Q1 and Q2 (bottom).

    So, the average current through Q1 is 545mA, and the average current through Q2 is -435 mA.  What does this mean?

    Well, positive current through Q1 corresponds to real power (8.20W) being drawn out of V1.  This is what we expect.  Negative current through Q2 corresponds to real power (6.52W) being pushed into V2.  This is fine in SPICE, where the voltage source is perfect.  However, a normal power supply cannot absorb power.  This means that energy will build up in the filter capacitors, increasing their voltage until something A) stops working or B) blows up.

    I personally prefer option A, so I like to put proteciton in place.  Got some spare ADC channels?  Add software overvoltage protection.  Got no ADC channels?  Add comparators.  Your hacking time is valuable, people!  Don't spending it fixing avoidable mistakes when you could be making new and exciting mistakes.

    Note: negative current through a MOSFET is absolutely possible.  Firstly, all enhancement mode (the normal type) MOSFETS, be they N ot P channel, have a built in body diode.  Secondly, if you apply gate voltage, the channels do turn on and conduct. This is called synchronous rectification and is often used by power supply designers to improve efficiency.


    What about negative current, you ask?  Well, re-running the sim yields:

    I(Q1) = -471 mA average (7.07W pushed into V1)
    I(Q2) = 536 mA average (8.04W supplied by V4).

    So, we have a mirror image of the same problem.  V1 blows up instead of V4.  This is an inherent problem with the circuit.  I have done the paper anaylsis too (but didn't want to bore you all with the maths - let me know if you're interested) and this is exactly the case.  For a non-zero output current we have inconvenient...

    Read more »

  • Pulse Generation Circuits

    jbb03/31/2014 at 10:48 0 comments

    In the last posts we saw how a fluxgate works in simulation.  Simulations are all good when you can just add a pulsed voltage source - everything is perfect.  In the real world, we have some challenges:

    1) We need very low DC offset to avoid adding DC offset to the sensor.

    2) We need a modest power capability to excite the fluxgates.  I'm looking at around ±12V @ 250 mA, which requires some care.

    3) Because the ferrite cores of the fluxgates are not identical, I would like a way to adjust the voltage level and timing of the outputs.


    DC offset

    This one's easy: add a DC blocking capacitor.  I did some sims and found that a 10 uF cap seems to be OK.  Given that this cap will have a bit of ripple current (max 250 mA RMS) and could see negative voltage, I would use film or chip ceramic types here - not electrolytic.

    This is not to say that an appropriate electrolytic wouldn't work, but it must be chosen carefully.


    Power capacity

    There are 3 options here: 2A) high power op amp, 2B) opamp with external buffer, 2C) MOSFET driver stage.

    2A) we can just buy a high power op amp.  However, these critters can be expensive, unavailable, or only come in inconvenient packages.  Cooling could also be an issue.

    2B) An opamp with an output buffer a good option.

    We can take a common op amp (here a TL071) and add a pair of Bipolar Junction Transistors (BJTs) as an output buffer.

    So, what are the components doing?

    • U1 is a TL071 opamp and functions as a voltage amplifier.
    • Q1, Q2 form a complimentary emitter follower (current amplifier).
    • R1 limits base current into the BJTs and should (hopefully) help keep things stable.
    • Rf and Rb provide voltage feedback to the opamp.  Note that Rf is connected to the output Vo, so the voltage drops in Q1 and Q2 are automatically compensated.
    • C1 provides negative feedback at high frequency to provide stable operation of the opamp.
    • V3 is the pulse source.

    Success!  Note that we will dissipate some power in Q1 and Q2 - we need to consider this later.

    Let's have a look at what C1 does.  Below is a plot of the rising edge at t = 0.5ms with varying values of C1 (10pF (green), 20pF, 50pF, 100pF, 200pF, 500pF (grey)).  As the value of C1 goes up, things slow down.  We also see a 'bump' around 501us - this is caused by the output voltage rising above 0V, which means the output current changes from negative to positive, and therefore we must transfer the current from Q2 to Q1.  This is crossover distortion, and is a big deal if you want a HiFi amp, but probably not a problem here.

    Note: we could use a single +30V supply rail and rely on the output coupling cap (not shown here) to give us 0V DC.  However, I expect to need ±15V rails later in the game.

    2C) A MOSFET driver looks like a good option.  We would get a good square output with low power losses (especially as we will have a switching frequency around 4kHz -> basically no switching losses!).  As an added bonuse, we have a

    Have a look at the LT website to get an idea of what's involved.  I'm not going to bother simulating this because there's a problem... we can only control the amplitude of the pulse by adjusting the DC supply rails.  This means extra DC-DC converters (or linear regulators) which is a pain.


    Time / Voltage Trimming

    The two ferrite cores used for the fluxgates will not be identical.  Hopefully they will come from the same batch and be similar, but identical is too much to hope for.  Therefore we should be able to adjust the voltage levels and pulse timing independently for each channel.

    Adjusting the timing of the pulses is pretty similar for option 2B and 2C.

    Adjusting the voltage levels of the pulses is not.  For option 2B, we can simply use a couple of Digital to Analog Converters (DACs) to our system controller.  For option 2C, we would need separate, independently regulated power supplies.  This is a pain.

    Therefore I am going with option 2B; opamps...

    Read more »

  • Closed Loop Fluxgate (v0)

    jbb03/11/2014 at 12:25 1 comment

    (Edited by jbb 21/3/14 for typos)

    As we saw in the previous two posts, we can use a fluxgate to measure an unknown primary current.  The use of two fluxgates provides (partial) cancellation of induced ripple Electro Motive Forces (EMFs) in the primary circuit.

    However, we also saw that the current range of the fluxgate sensor is limited to around half of Isat (see project log 1), i.e. about 3A.  We want a measurement range of around ±25A, so we have a problem - the sensor is only good for 10% of the desired range!

    Additionally, we want the induced voltage Ep to be as low as possible, which happens when Ip = 0 (see project log 2).

    The solution to both problems is closed loop control. We will add a third feedback winding with Nf turns.  This gives us a pair of 3 winding transformers as shown:

    We now have an extra degree of freedom to play with: the current through the feedback windings If. With a bit of closed loop control, we can adjust If such that:

    • NpIp + NfIf = 0 (approx)

    With a little manipulation:

    • If = Ip * Np / Nf
    • For Nf = 25, we need to drive If with between -1A and +1A.

    This will yield 0V output from the fluxgate current sensor, and 0V of induced voltage Ep.  The model is shown below:

    A few points:

    • We are using a 2A input current
    • I'm using ±5V for the analog stages as it's easier to get good opamps at this voltage level.
    • U1 (LTC1992) is a fully differential op amp. This means that it produces 2 output voltages - one 'positive' and the other 'negative' (this output has the circle to show negation).
    • I'm using an LT203 as the demodulator - note how it uses the 'positive' and 'negative' outputs of the opamp to do a multiplication by +1 or -1 (modlled here as voltage-controlled switches S1 and S2, also note the .model LT203 entry).
    • U2 is a low pass filter. Note that this opamp must have low bias current (which would cause voltage offset when passing through R5 and R6), low offset voltage and (hopefully) low noise.
    • U3 forms a PI controller.  R8, R9 and C7 set the parameters.  The maximum output voltage is fixed by the ±5V supply rails to approx. ±5V.
    • G1 is an ideal voltage-to-current converter. The gain of 0.2 means that 5V (maximum PI controller output) produces 1A (maximum required If). There will be a future post about how to actually build one of these.

    So, let's have a look at the waveforms:

    We see that:

    • Vz (output of the PI controller) is stable :-)
    • On the 2nd plot: the feedback current If (here -25*I(G1)) equals tracks the input current Ip * Np.  I didn't run the sim for long enough to fully settle, but it does.  This demonstrates that we do get Ip*Np = Is*Ns i.e. current transformer behaviour.
    • Current I(L1) shows the 'total' current applied to a ferrite core, i.e. NpIp + NeIe + NfIf.
    • The output of the fluxgate sensor + lowpass filter (Vy) settles to 0, as expected.
    • Not shown: Ep is nice and low.

    Fantastic, we have a working DC current sensor!  Now what about 50Hz AC?

    Well, after a few ms of transient behaviour at startup, we do get a sinusoidal current out.  However, we have quite a bit of phase shift (power measurements using this would be useless!).  In a future post we will talk about bandwidth extension with a third ferrite core functioning as a current transformer.

    Next post: practical excitation circuits for the fluxgate.

  • Two-core Fluxgate

    jbb03/10/2014 at 08:18 0 comments

    My last project entry described a single-core fluxgate, and showed that it can measure primary currents. It also showed that the fluxgate injects a few hundred mV of ripple into the primary circuit. This entry describes a two-core fluxgate which offers reduced ripple injection into the primary.

    First up, let's ask where this injected voltage (I'm calling it Ep, short for 'EMF injected into the primary' (EMF = Electro-Motive Force)) comes from. As we saw in the previous post, it is a funny-shaped waveform with a 5 kHz fundamental frequency. This is a dead giveaway; the only 5 kHz singal source around is the excitation supply. Therefore we deduce that Ep is caused by the transformer action of the fluxgate. We cannot avoid this action, because we have to excite the fluxgate in order to measure anything.
    But we can compensate for it. We can do this by adding an opposing EMF to the circuit. A good way to do this is to add a second fluxgate with opposite 'polarity' to the first as shown:
    We now have a vastly reduced Ep term - theoretically zero (we will have a look at component tolerances later). Also, we now have the opportunity to measure the difference between Vm1 and Vm2, which we see is (in principle) zero Volts at zero primary current:

    And if we have a 1A primary current Ip, we get some nonzero quantites: the voltage between Vm1 and Vm2 is nonzero and Ep is nonzero.

    If we sweep Ip over a -3A to +3A range (this is the X axis), and look at the average of Vx (i.e. output of a low pass filter) and the RMS value of Ep, things look pretty good:

    Our current to voltage gain has doubled, and Ep is vastly reduced compared to the original 320 mV RMS. In fact, it should go to zero when Ip = 0 (note that component tolerances are not yet considered). So, we have gotten both more output signal and less voltage injection into the primary circuit, which is most welcome.


    I must confess, I avoided one imporant issue in the first post: current measurement range. I mentioned in the project description that I was interested in a 25 A range. Let's simulate that...

    Oh ****. Our sensor is nice and linear in the -3A to +3A range, but all kinds of nonlinear outside that (not sure what the glitch around +12A is, but I don't like it). This is not going to work as desired.

    The solution: closed-loop current sensing.

    See you next time
    jbb

  • Single Core Fluxgate

    jbb03/09/2014 at 12:26 2 comments

    So, first entry.

    I normally write formal reports or academic papers, which are really dry and cannot contain pronouns (no really). Ahem: Under normal circumstances, the authors avoid the use of pronouns for stylistic reasons.

     Here I don't have to be so formal, but you may see some horrible academic-ese from time to time.  Sorry in advance.

    I'm not going to rehash how fluxgates work in detail, because there's some good informaiton online.  Usually it's about measurements of magnetic fields (see How a fluxgate works and DCCT Technology Review), but as we know, the current flowing through a primary conductor will generate a magnetic field, which we can then measure.  Excellent.


    The heart of a fluxgate is a saturable inductor.  All magetic materials (iron, iron powder, ferrite etc.) saturate, so I chose a material that: comes in a toroidial shape, has high permeability (i.e. magnetises easily) and can actually be ordered from a distributor.  This is the Epcos B64290L0618X038 (available from DigiKey).

    The basic parameters we will use for this toroid are:

    • AL : the inductance of one turn on the core : 5.086 uH
    • Hsat : the saturation Magneto Motive Force (MMF) : 100 A / m
    • le : the 'effective' length of the magnetic path around the toroid (a sort of 'average circumference'): 60.07mm

    From this we can work out how much current will saturate the core:

    • Isat = Hsat * le
    • Isat = 6.007 A

    This is valid for our one turn primary, but our secondary winding will have more than one turn.  Armed with a number of tunrs, we can calculate some useful values:

    • Ne : number of excitation turns : 50
    • Wire size: 0.315mm diameter
    • Le = Ne^2 * AL = 26.8 mH
    • Isat,exc = Isat / Ns = 120.1 mA
    • Re = 0.5 Ohm (approx, calculated from turn length of 36mm).
    • (11/3/2014: renamed Ns to Ne etc. for compatibility with future posts.)

    We can now do a bit of modelling with LTspice.  I thoroughly recommend this program - it's high quality, and freely available from Linear Technologies.  They don't even make you create an account to get it.  Here we go:

    V2 provides the excitation square wave.

    Rexc1, E1, V1, F1 and L1 model the 'excitation' winding.  V1,E1 and F1 are used to refer the excitation-side voltages and currents to L1 (not necessary here, but we'll need it later). L1 is a saturating inductor model (it's not perfect but should be good enough...).

    We see that the current through R1 has some sharp peaks.  These show that the core saturates as expected.  Also note that Ep - the equivalent primary voltage - is a bit spiky and nasty.  More on that later...

    What happens when we add some primary current?  I have added a current source Ip, and a .step param command to apply -3 to +3 A of primary current in 1 A steps.  It turns out that the average current is always 0 (because of C1) but the shape of the current waveform changes.

    The solution to this problem is to demodulate the measured voltage across R1.  We're using a square wave at the 2nd harmonic (i.e. 10 kHz) Vdem and multiplying it by the voltage across the sense resistor Vm1 to form a nasty complicated-looking waveform Vx. Fortunately, it looks like Vx has a DC component.

    By adding some .measure commands to the Spice file, we can plot the average (i.e. DC component) of Vx against the applied Ip.  This averaging can be implemented using a simple low pass filter.  We are now getting something like 1 V / A gain - excellent.  

    However, there's a problem: the induced voltage Ep.  We see here that we will induce about 320 mV (RMS, not a sine wave!) back into the primary circuit.  This is going to be a big problem if we're trying to do some measurements on a 12 V system.

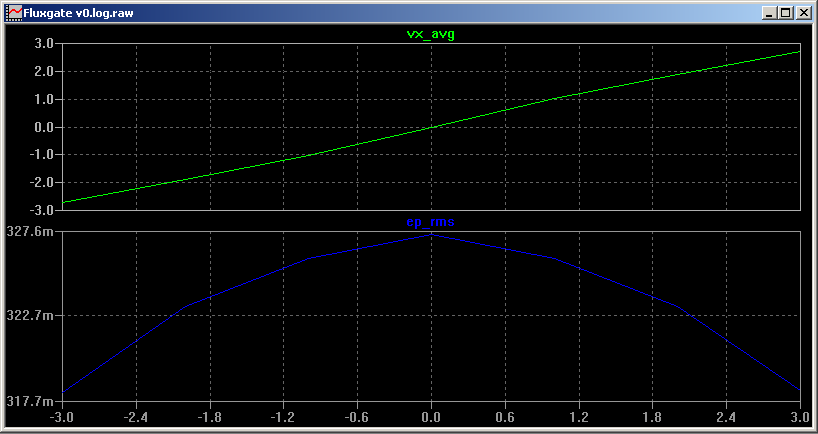
    Next time we will look at a double core fluxgate to show how we can reduce Ep significantly.

View all 6 project logs

Enjoy this project?

Share

Discussions

singatul wrote 10/01/2020 at 09:18 point

Which Current Transducers is better to use depends in most cases from location, accuracy, of value of course.  For 10A if You get shunt resistors 250 mOhm it  generate heat around 0.25W.  We used in a lot of cases IC from analogue device AD7400.  It has digital insulated (~3kV)  output.  For some high voltage place we used Li-ion battery preliminary charged as sorce of energy of IC. The battery activates with signal aplied from fiber when measurements started to save charge of battery.  The output of AD7400 - digital stream also insulated  by fiber.  I found good idea here from Mark (thank You)    translating energy to high voltage places trough fiber. We produced a lot such board for research. 

  Are you sure? yes | no

Mark wrote 01/11/2017 at 06:04 point

I don't know if this is a dead subject or if, like me, the author got busy with other things and didn't update his or her progress... that said, some musings I have regarding my own experience with DC current measurement.. There are other current measuring devices available that I have worked with that are particularly interesting. One is the Rogowski Coil, but that only works on AC. However, we do use OCT's (Optical Current Transducer) at my work extensively. One style is mainly used our high voltage capacitor banks, used for voltage stabilization at my power station, where a mostly-conventional CT is isolated from ground potential using fiber optics. 2 sets of fibers are used- one fiber transmits a high powered laser to transmit power from ground level to operate the electronics in the CT (separated by about 10-15 feet and about 20kV electrically), another fiber transmits the current reading from the CT back down to ground level. Generally these are used for lower current levels such as a few amps to maybe a few hundred amps.

The other type of OCT is actually a long donut shaped coil of optical fiber in a plastic housing about 12 inches in diameter with a central hole several inches in diameter through which an aluminum bus or heavy cable passes through (this would be the "single winding" of  like a 400 to 1 or whatever ratio CT might be. The optical winding would be something like the "400" part might be). The donut of fiber is isolated from ground by a glass or composite insulator. These OCT's work on the principle of a high DC current can actually slightly deflect light being transmitted through the coil of fiber enough to measure the distortion. We use these OCT's to measure DC current output of our HVDC Converter Station. This would be measuring somewhere in the neighborhood of several thousand amps, upwards of 3000 megawatts at 500kVDC.   

  Are you sure? yes | no

Austin wrote 03/28/2014 at 01:14 point
This is an awesome project, I love the detail you are putting into the descriptions. I can't wait for the next update!

  Are you sure? yes | no

jbb wrote 03/31/2014 at 09:58 point
Glad you like it. Sorry about the slow updates; I've been very busy at both work and home. (Today's job: manufacture 180 custom cables. I'll be spending a lot of quality time with a crimping tool. Ow my hand...)

  Are you sure? yes | no

Similar Projects

Does this project spark your interest?

Become a member to follow this project and never miss any updates