 suedbunker
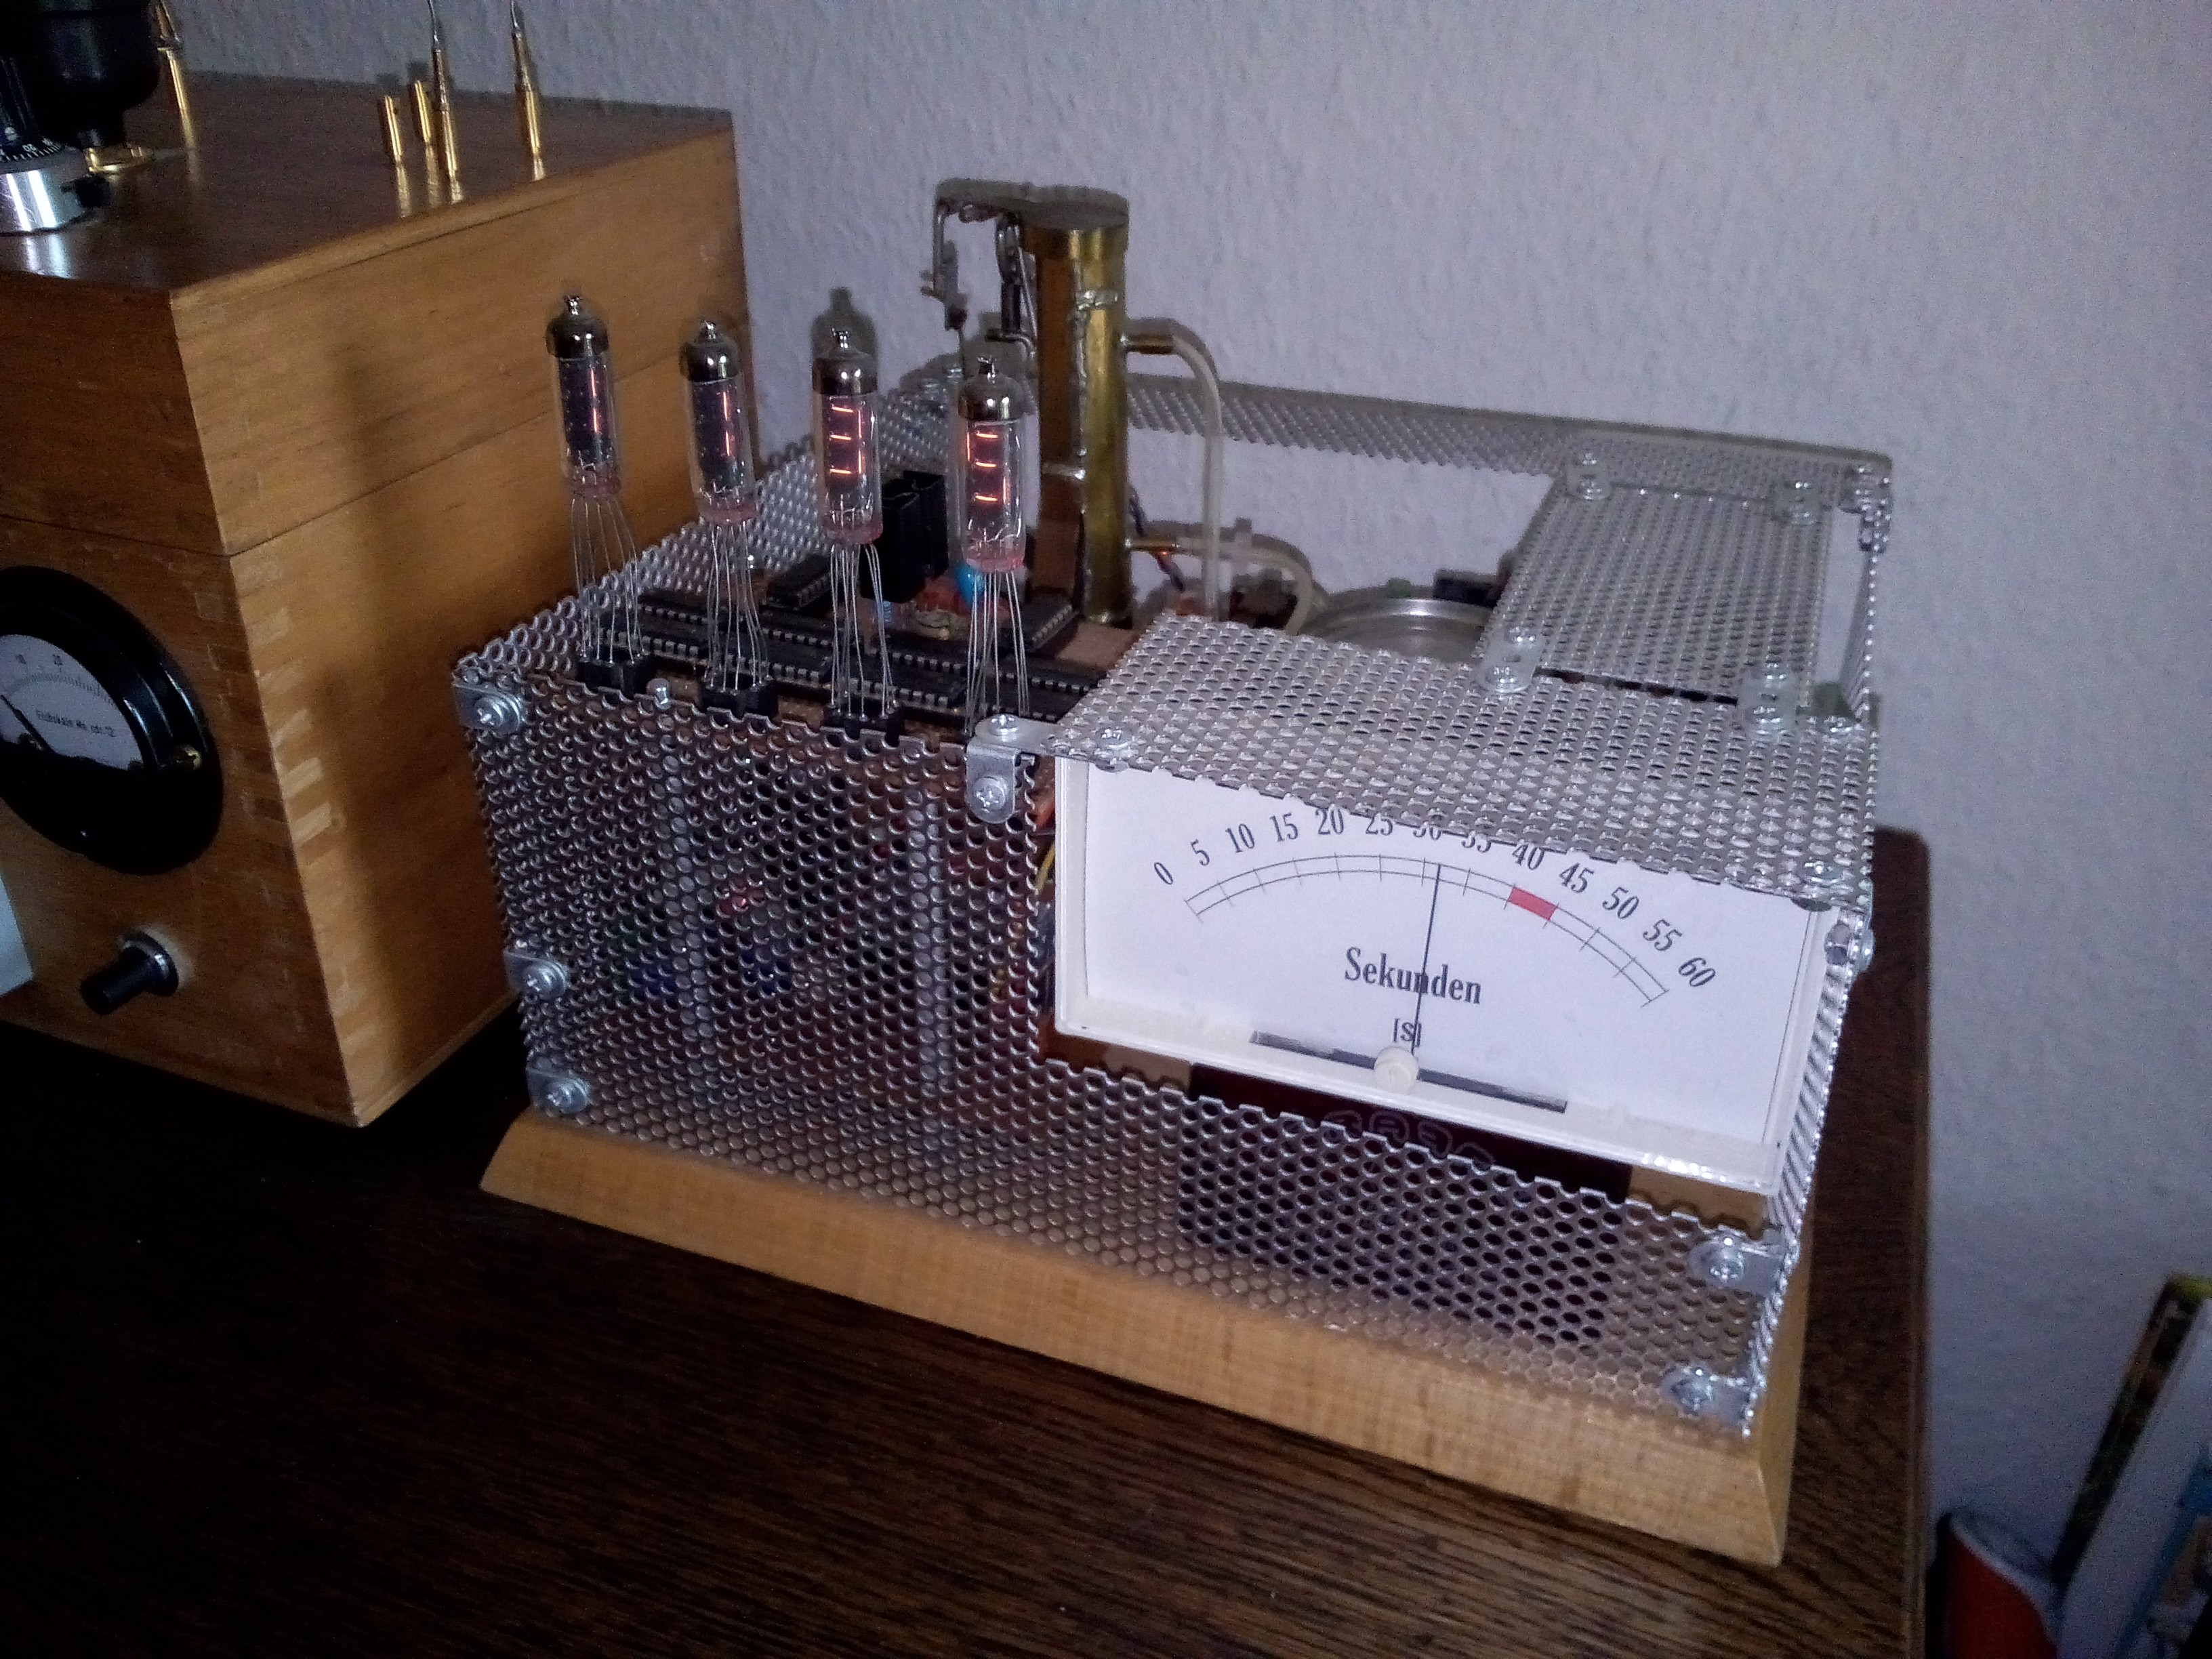
There are moments in the life of a tinker, hacker etc. when worlds are changing. One of these moments was my change from a basic based microcontroller to the big world of Arduino. I started the microcontroller programming around 1999 with the C-Control Unit from Conrad [ https://de.wikipedia.org/wiki/C-Control ], a German electronic distributor. A Motorola based microcontroller programmable with a visual programming language and also with a dialect of basic. This was my start. In this time I was thinking about building a new clock. I have built my first Nixie clock [ https://www.youtube.com/watch?v=nhuDD7Ie47c ] some month before and was infected by the idea to build directly another one, but not a Nixie. This was around 2011/12 and I decide to use this fancy Russian Numitron tubes. Simple filament vacuum tubes with eight “segments” made of tungsten wire. And this clock should be a bit different. There are many methods to remind the people what time it is like bells, electronic beeper, flashing lamps, vibration etc, but what about smelling the time? In addition to this I have build a lot of small steam punk boxes [ https://www.youtube.com/channel/UCzx2u1cLnMxc4V5s6bZg2zQ/videos?sort=dd&view=0&shelf_id=0 ] with different electronics, sensors, tubes and old displays and I want to build a “Steam Clock”.
Steam Clock YT link: https://www.youtube.com/watch?v=5RXw3Jb6DJg and wait for it!
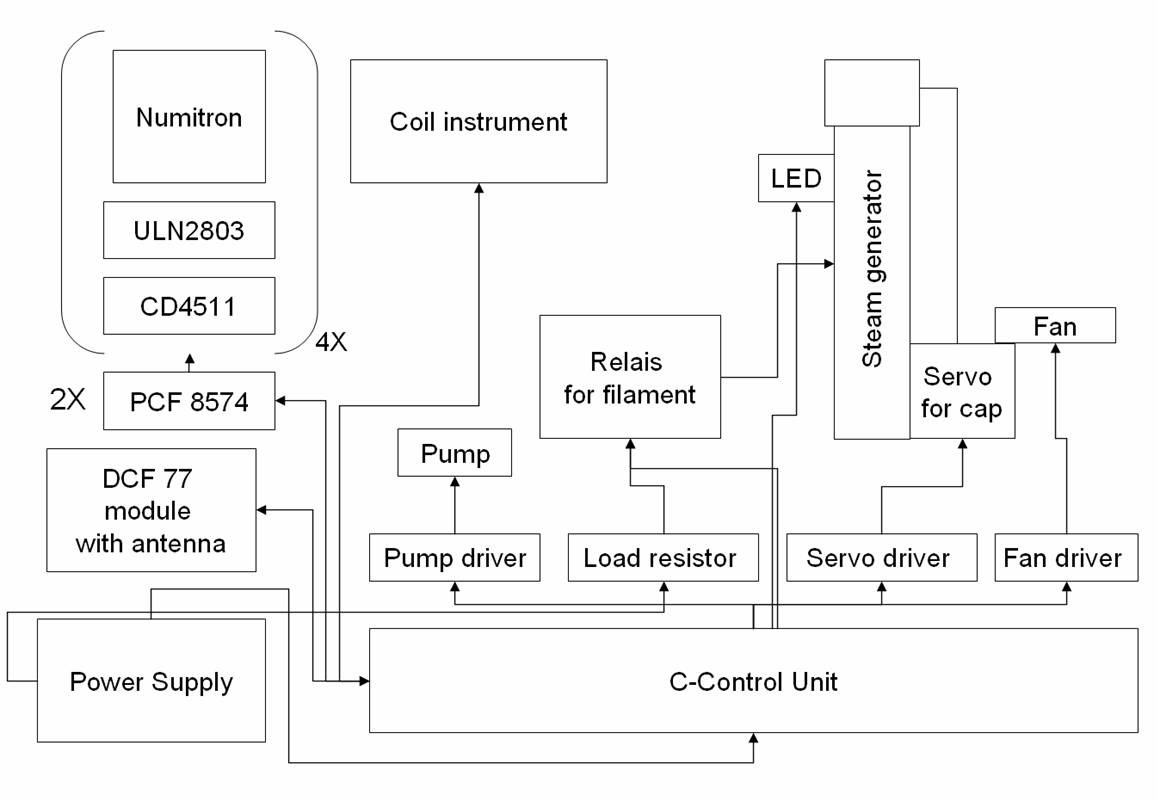
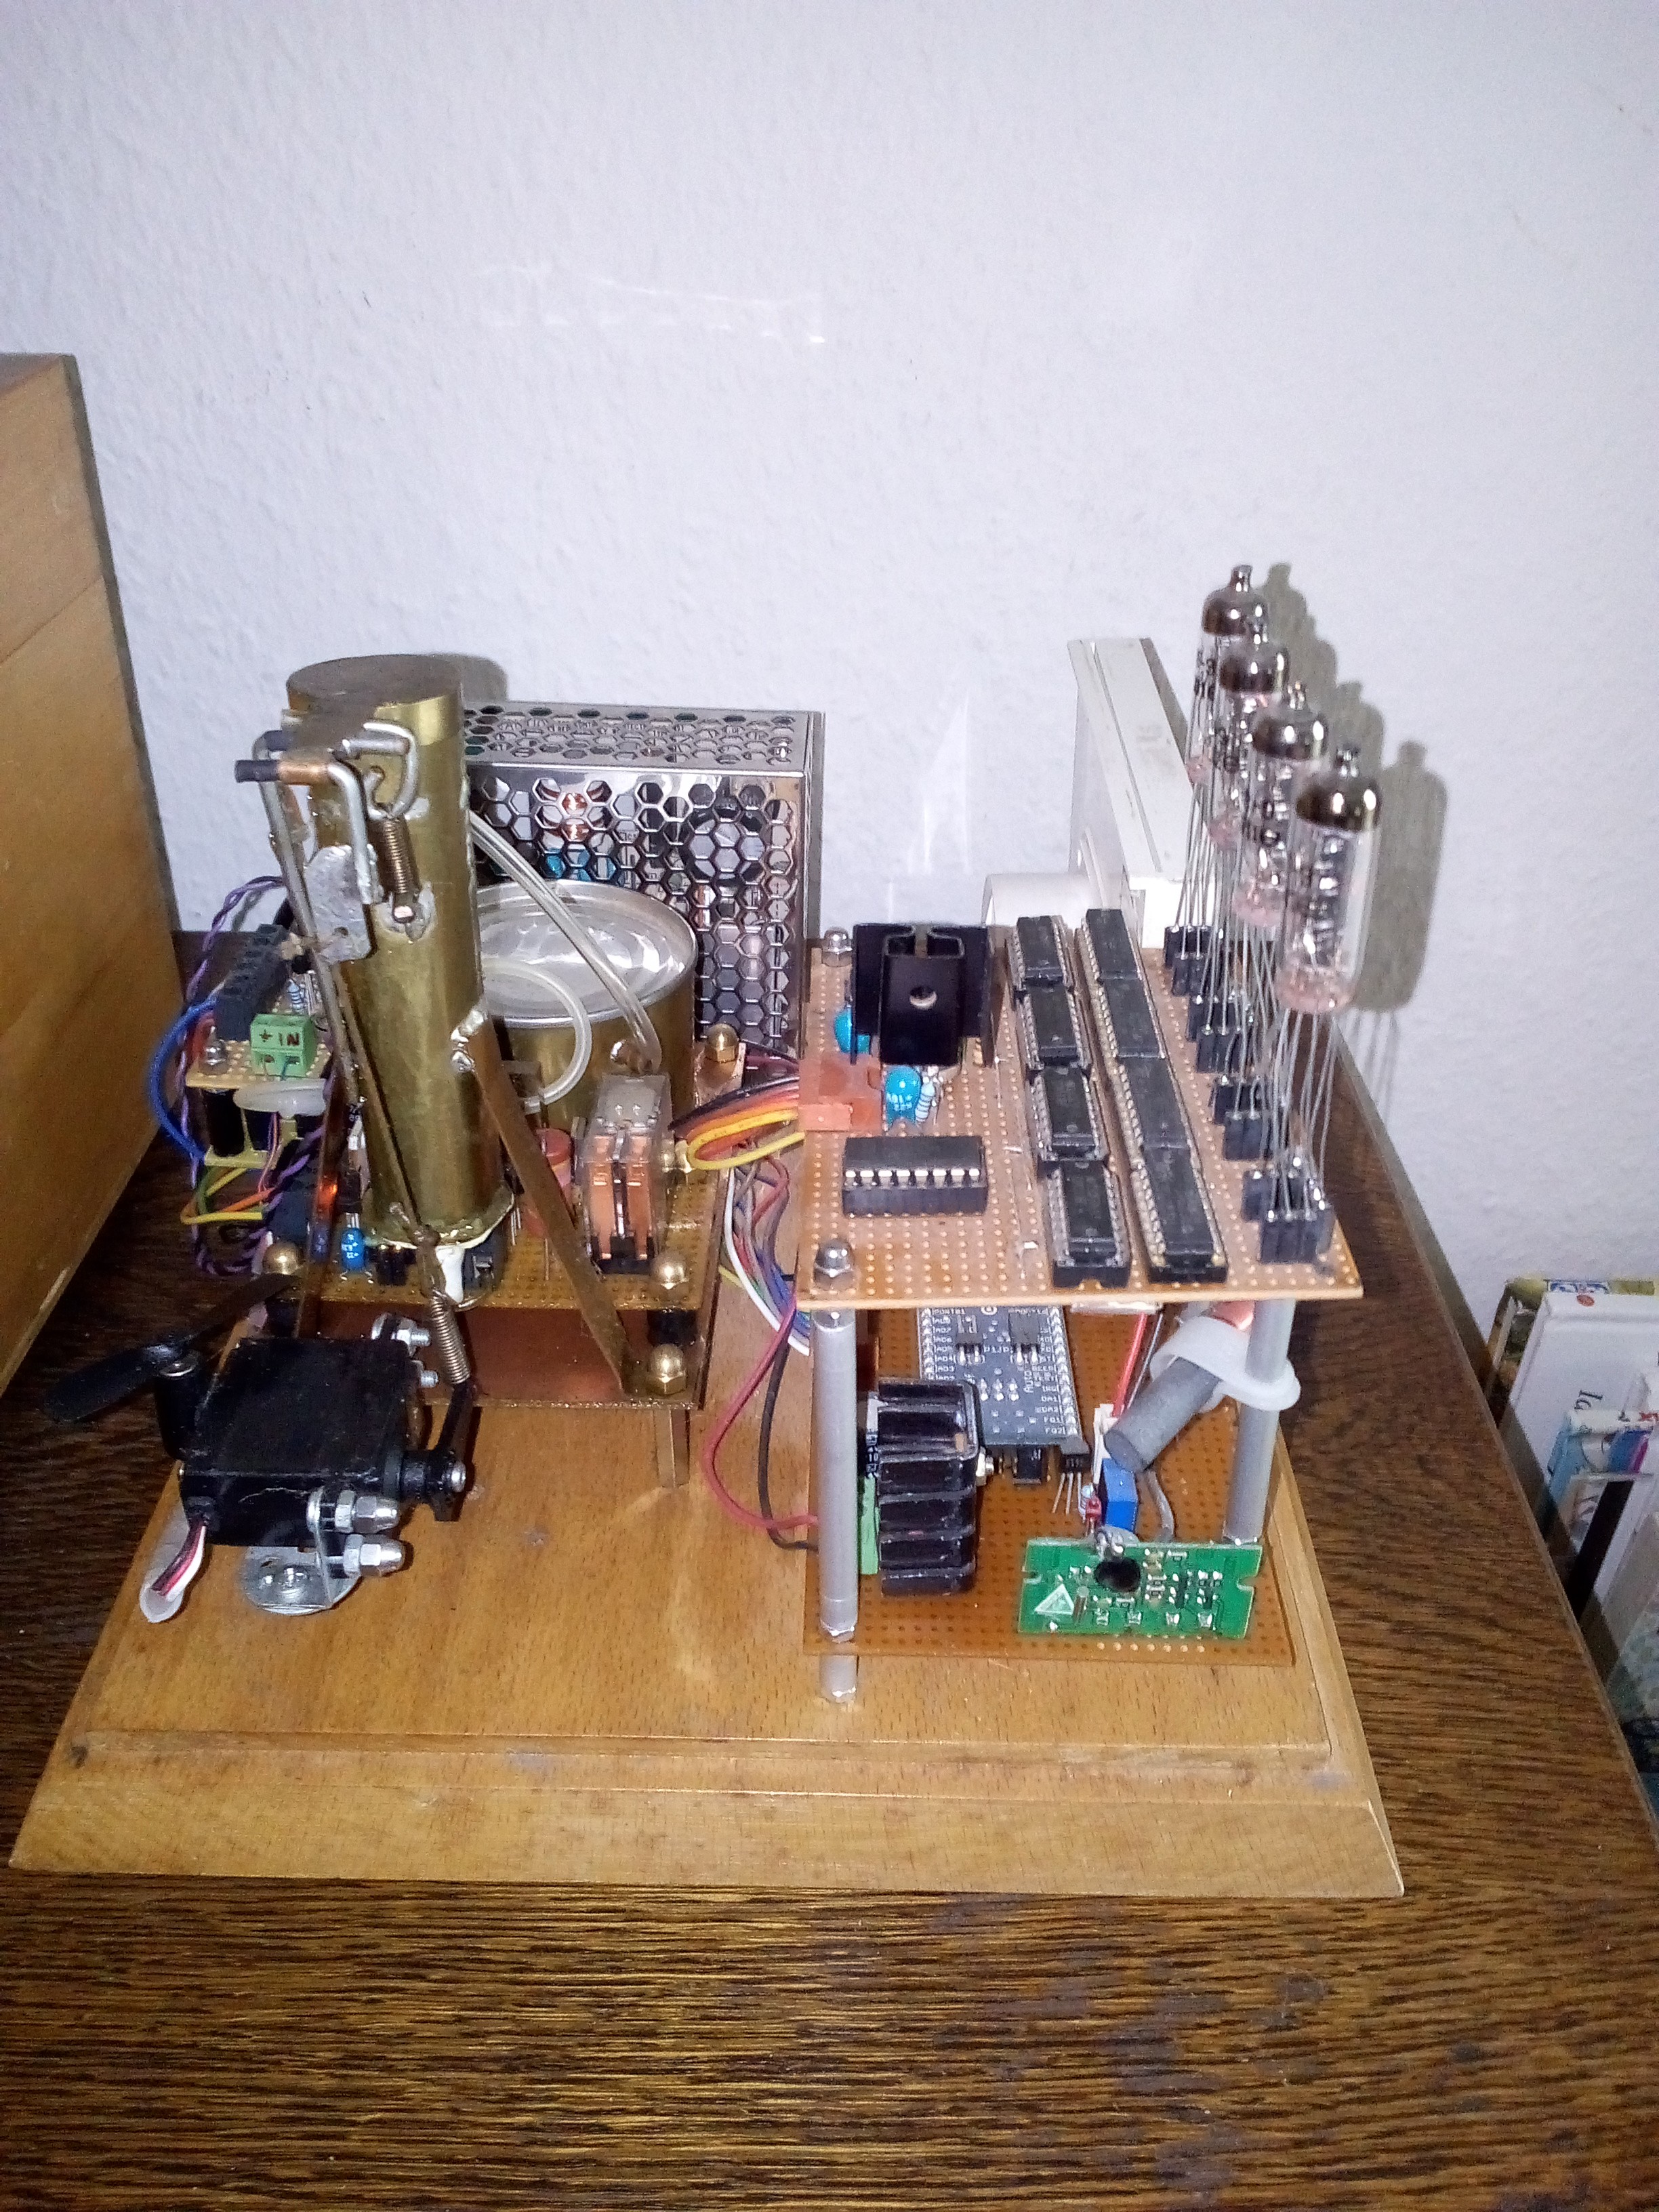
The Steam Clock consists out of 4 subsystems:
- Power supply from 230 V to 12 V with 3 amps.
- Steam generator with steam oil tank, small controllers for motors, servo etc., pump and mechanics.
- Microcontroller board C-Control Unit 2.0 with Numitron display for hours and minutes, DCF 77 receiver, port expander and BCD controllers with drivers for generating the numbers.
- Coil indicating instrument for the seconds.
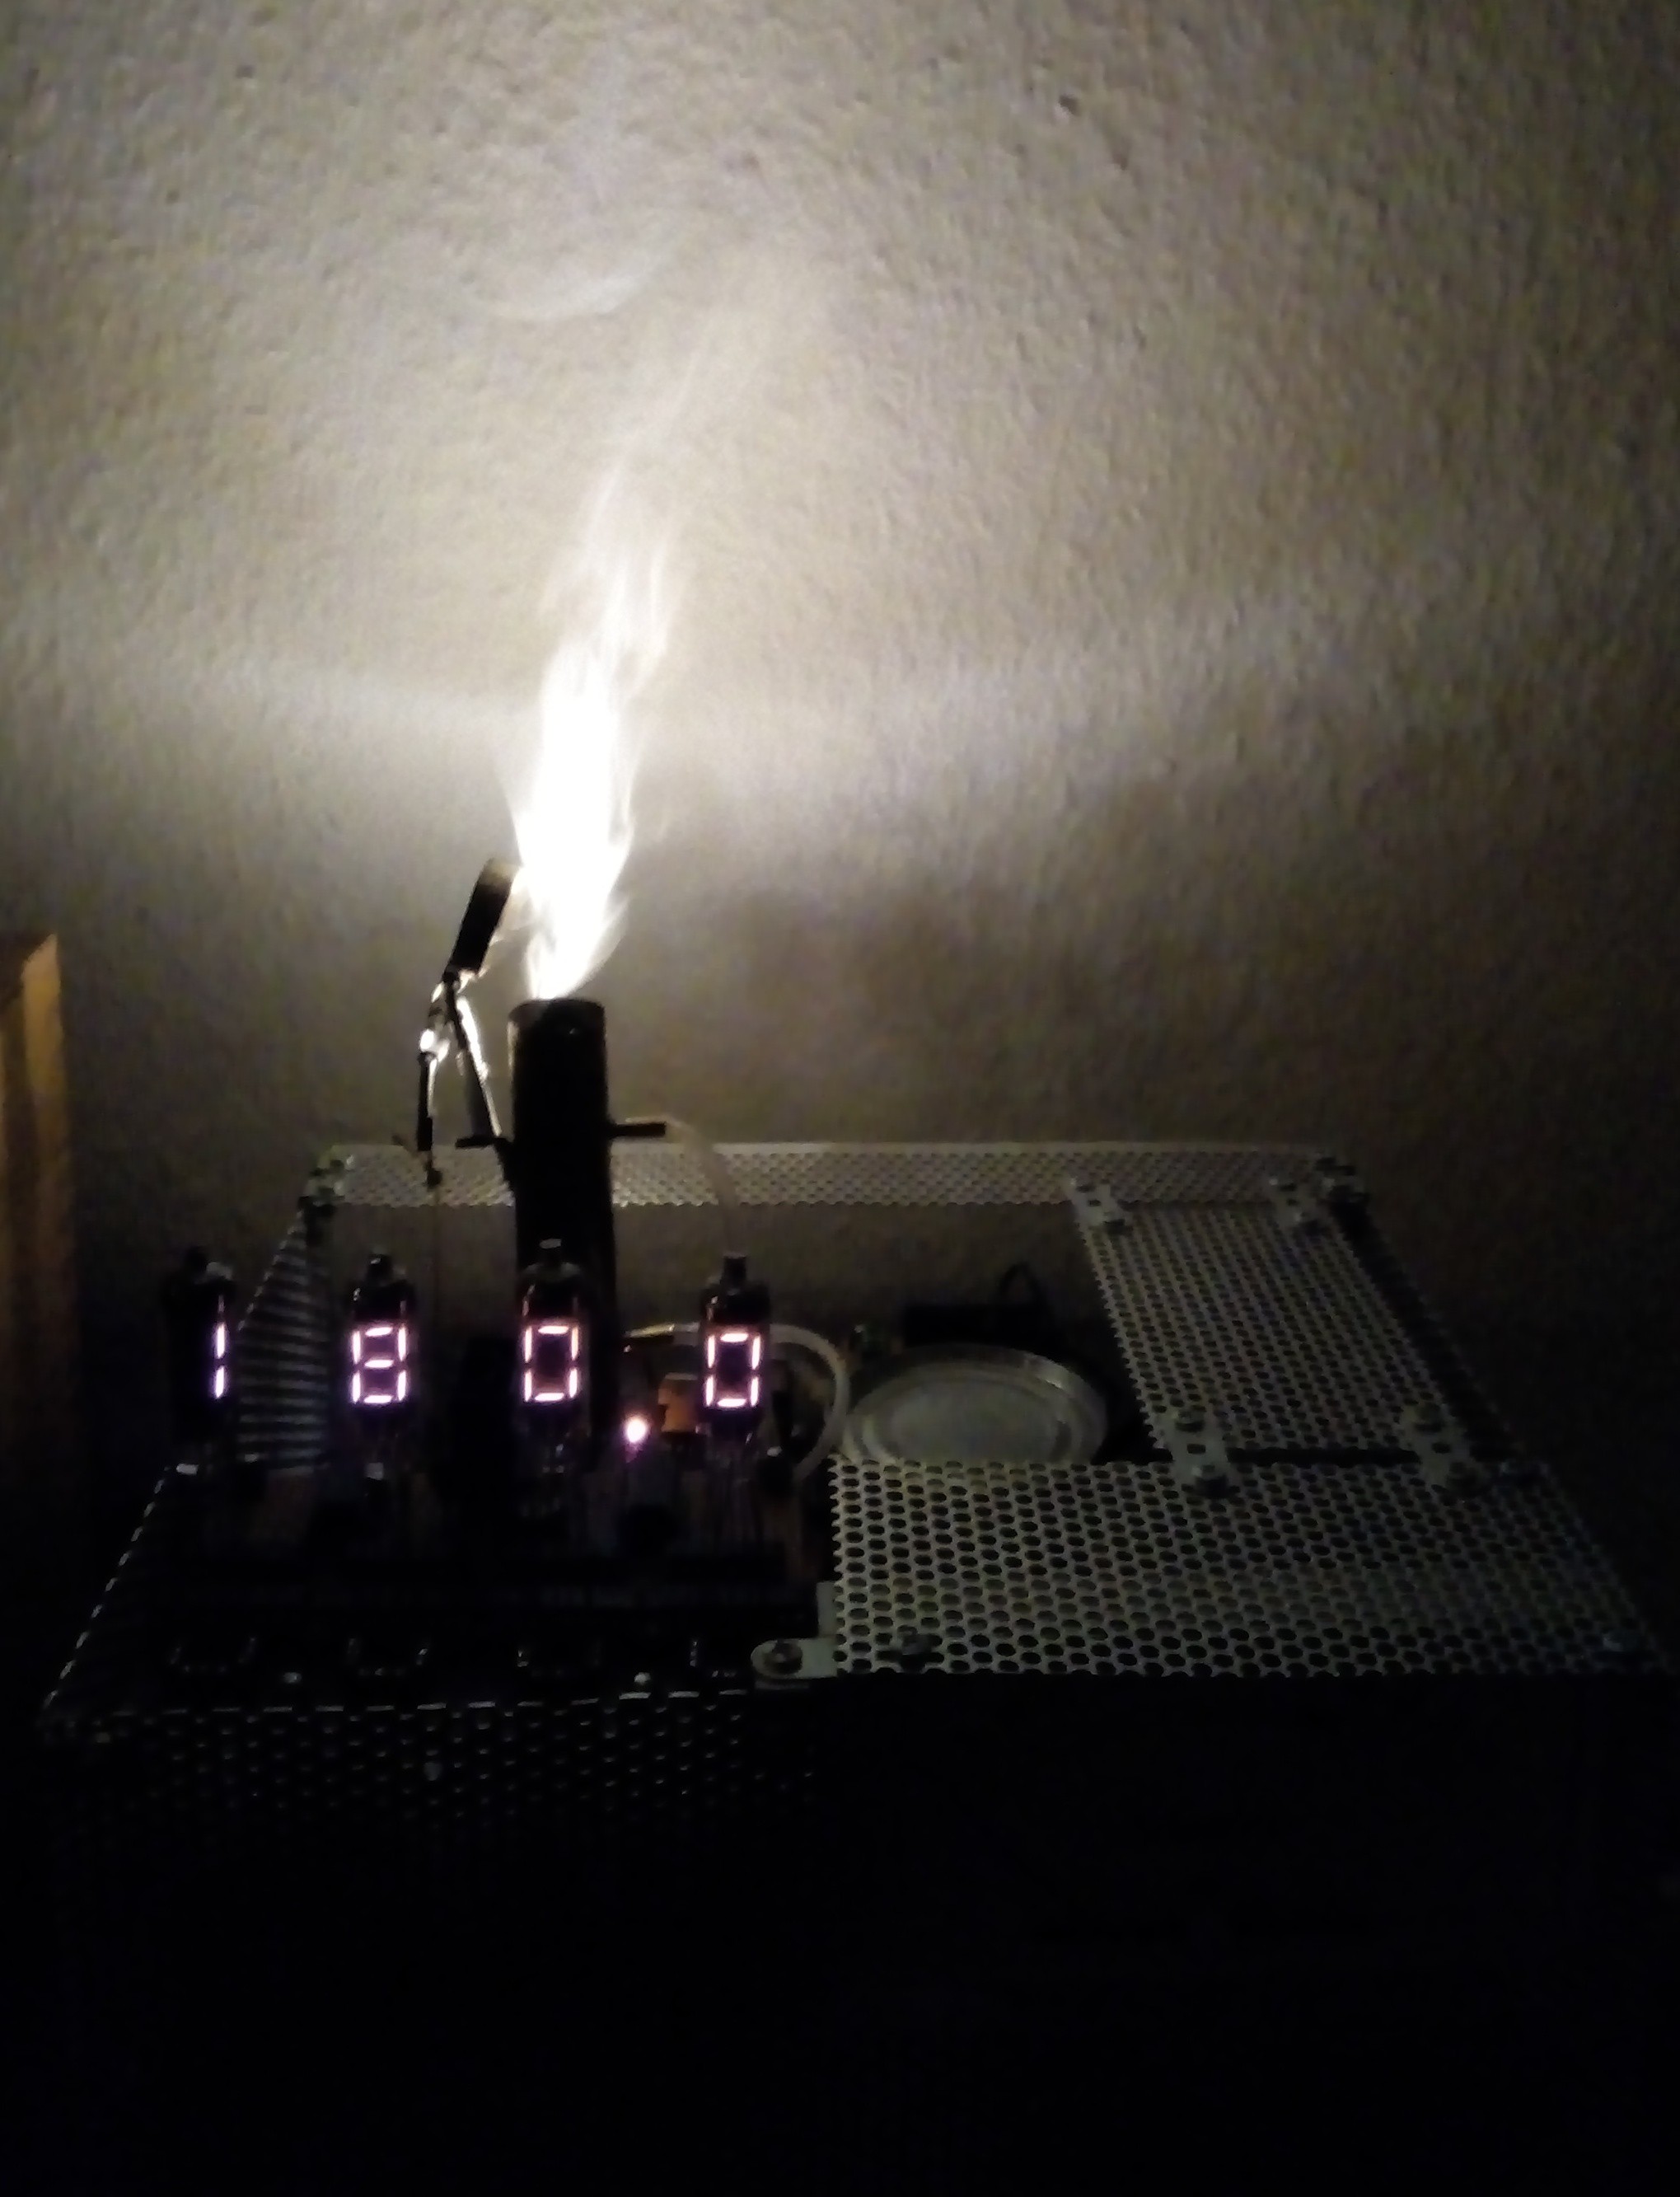
Simple overview about the Steam Clock
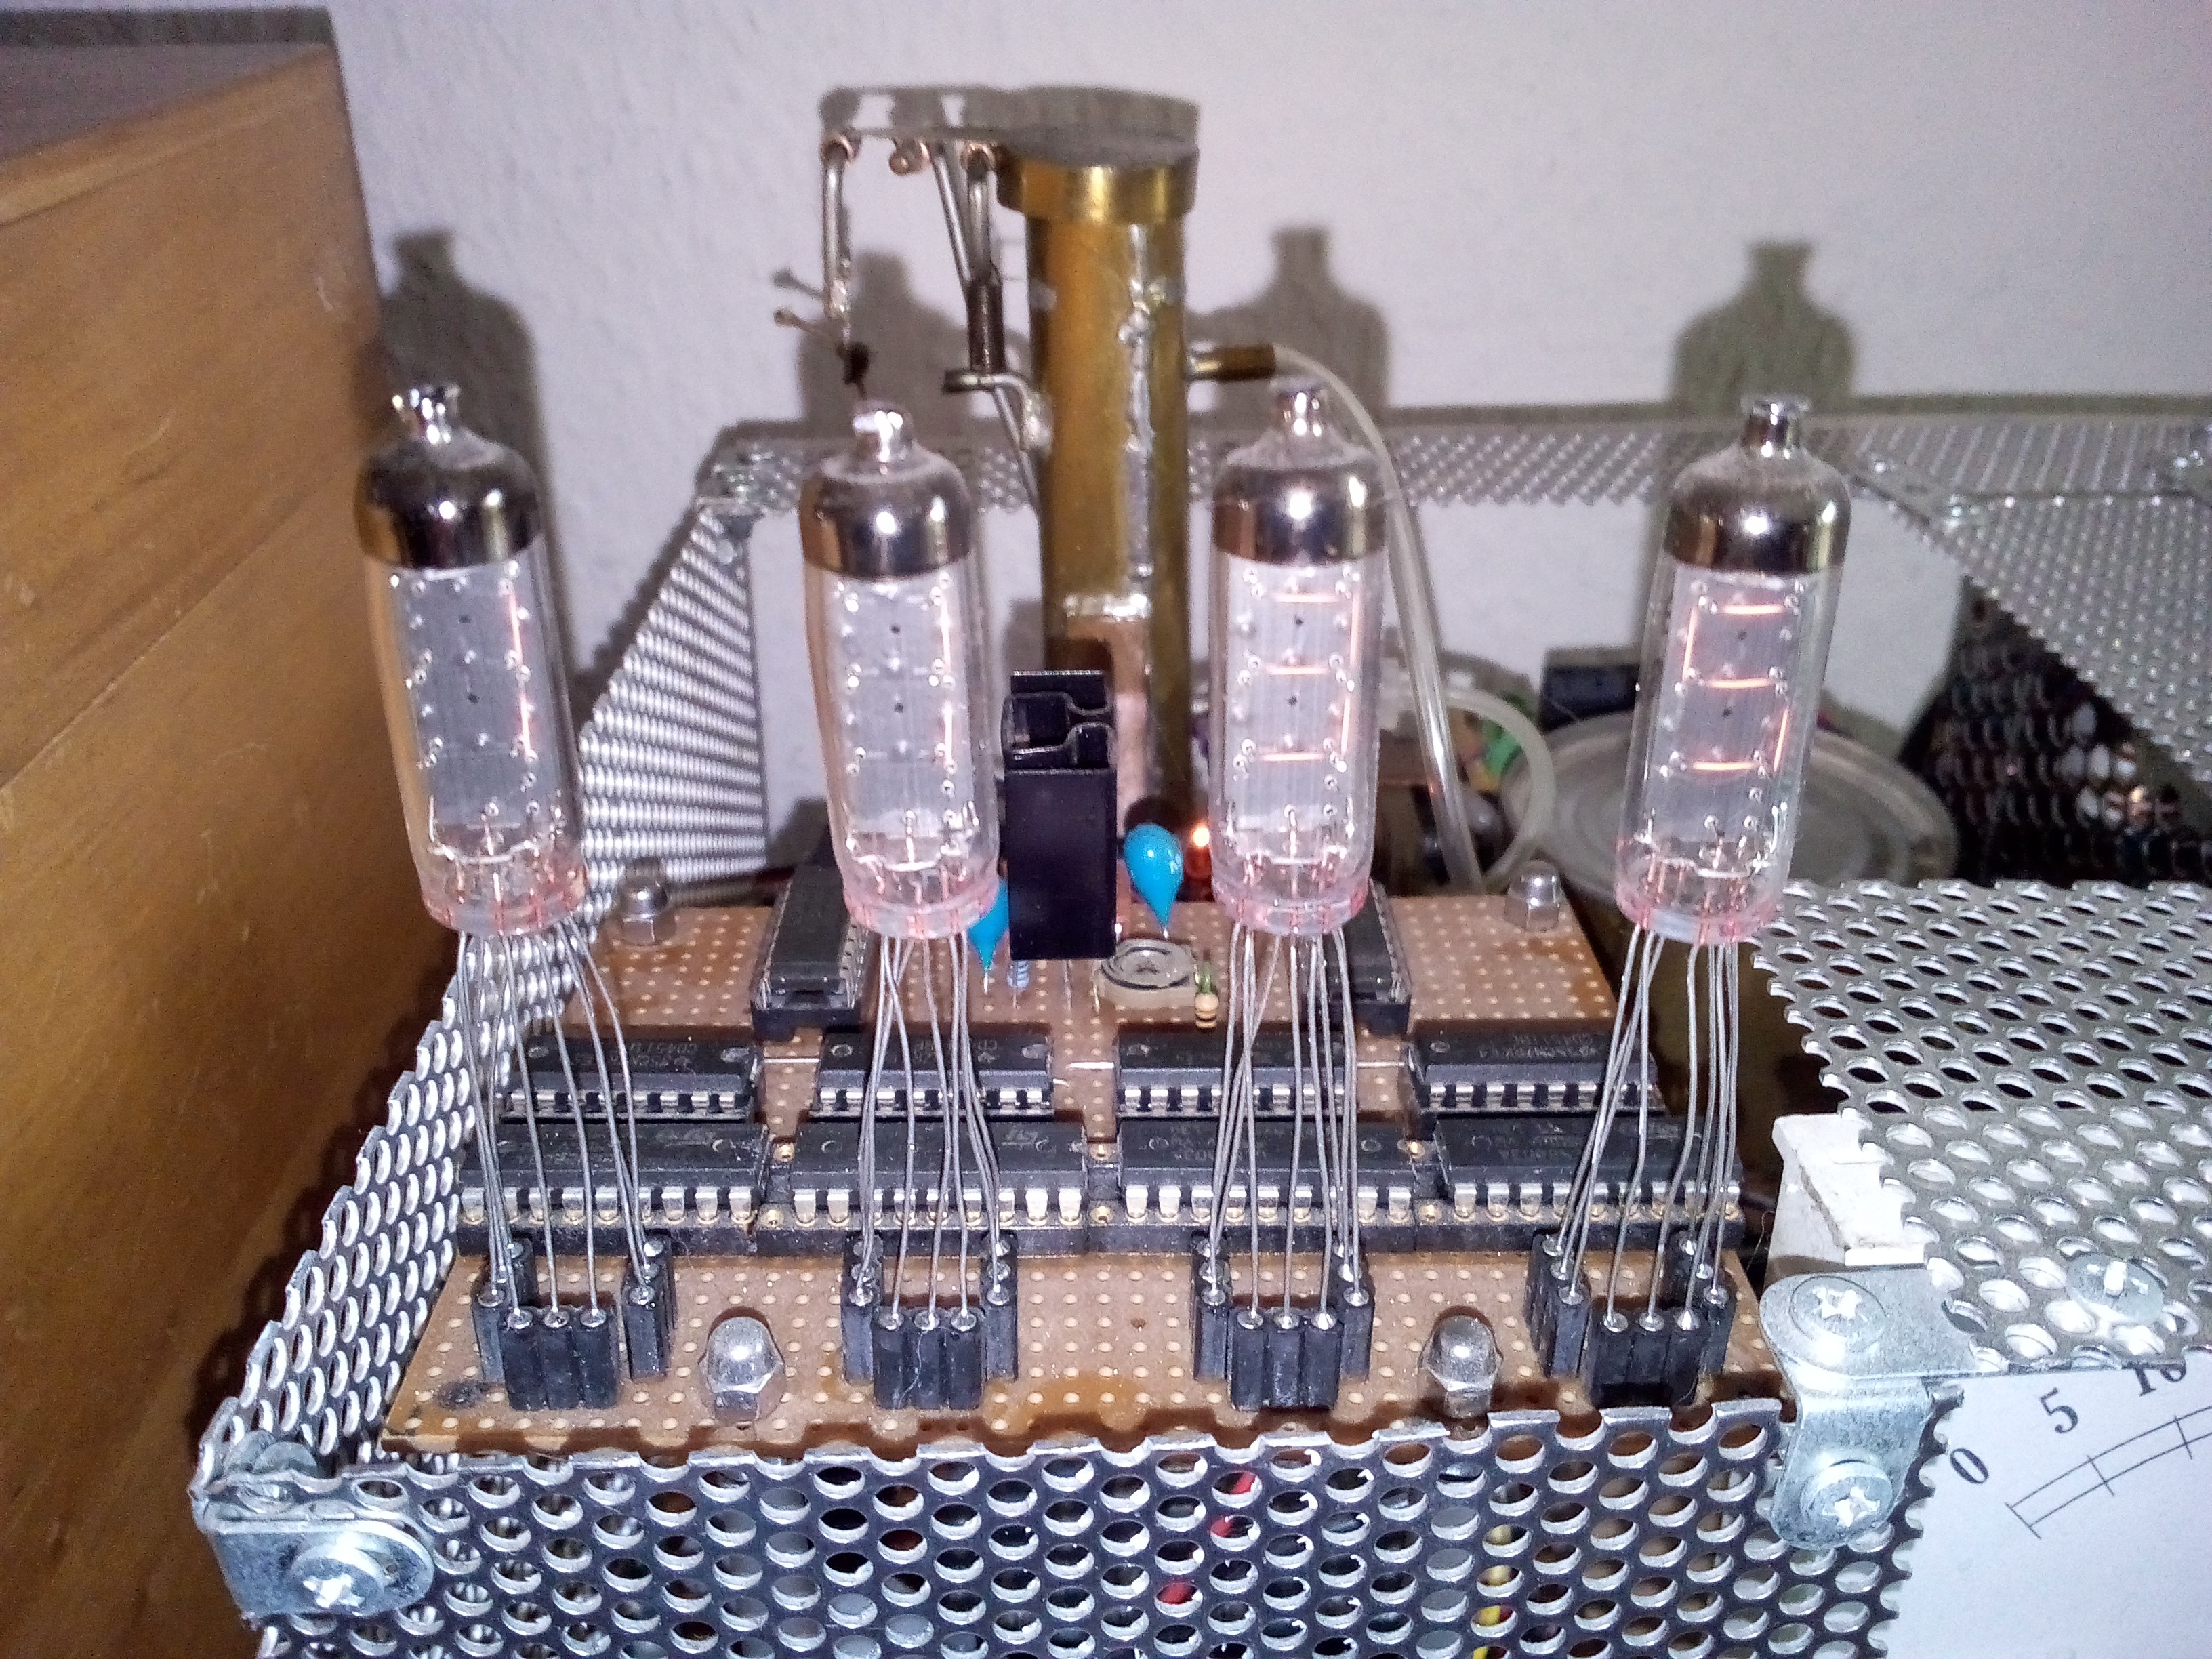
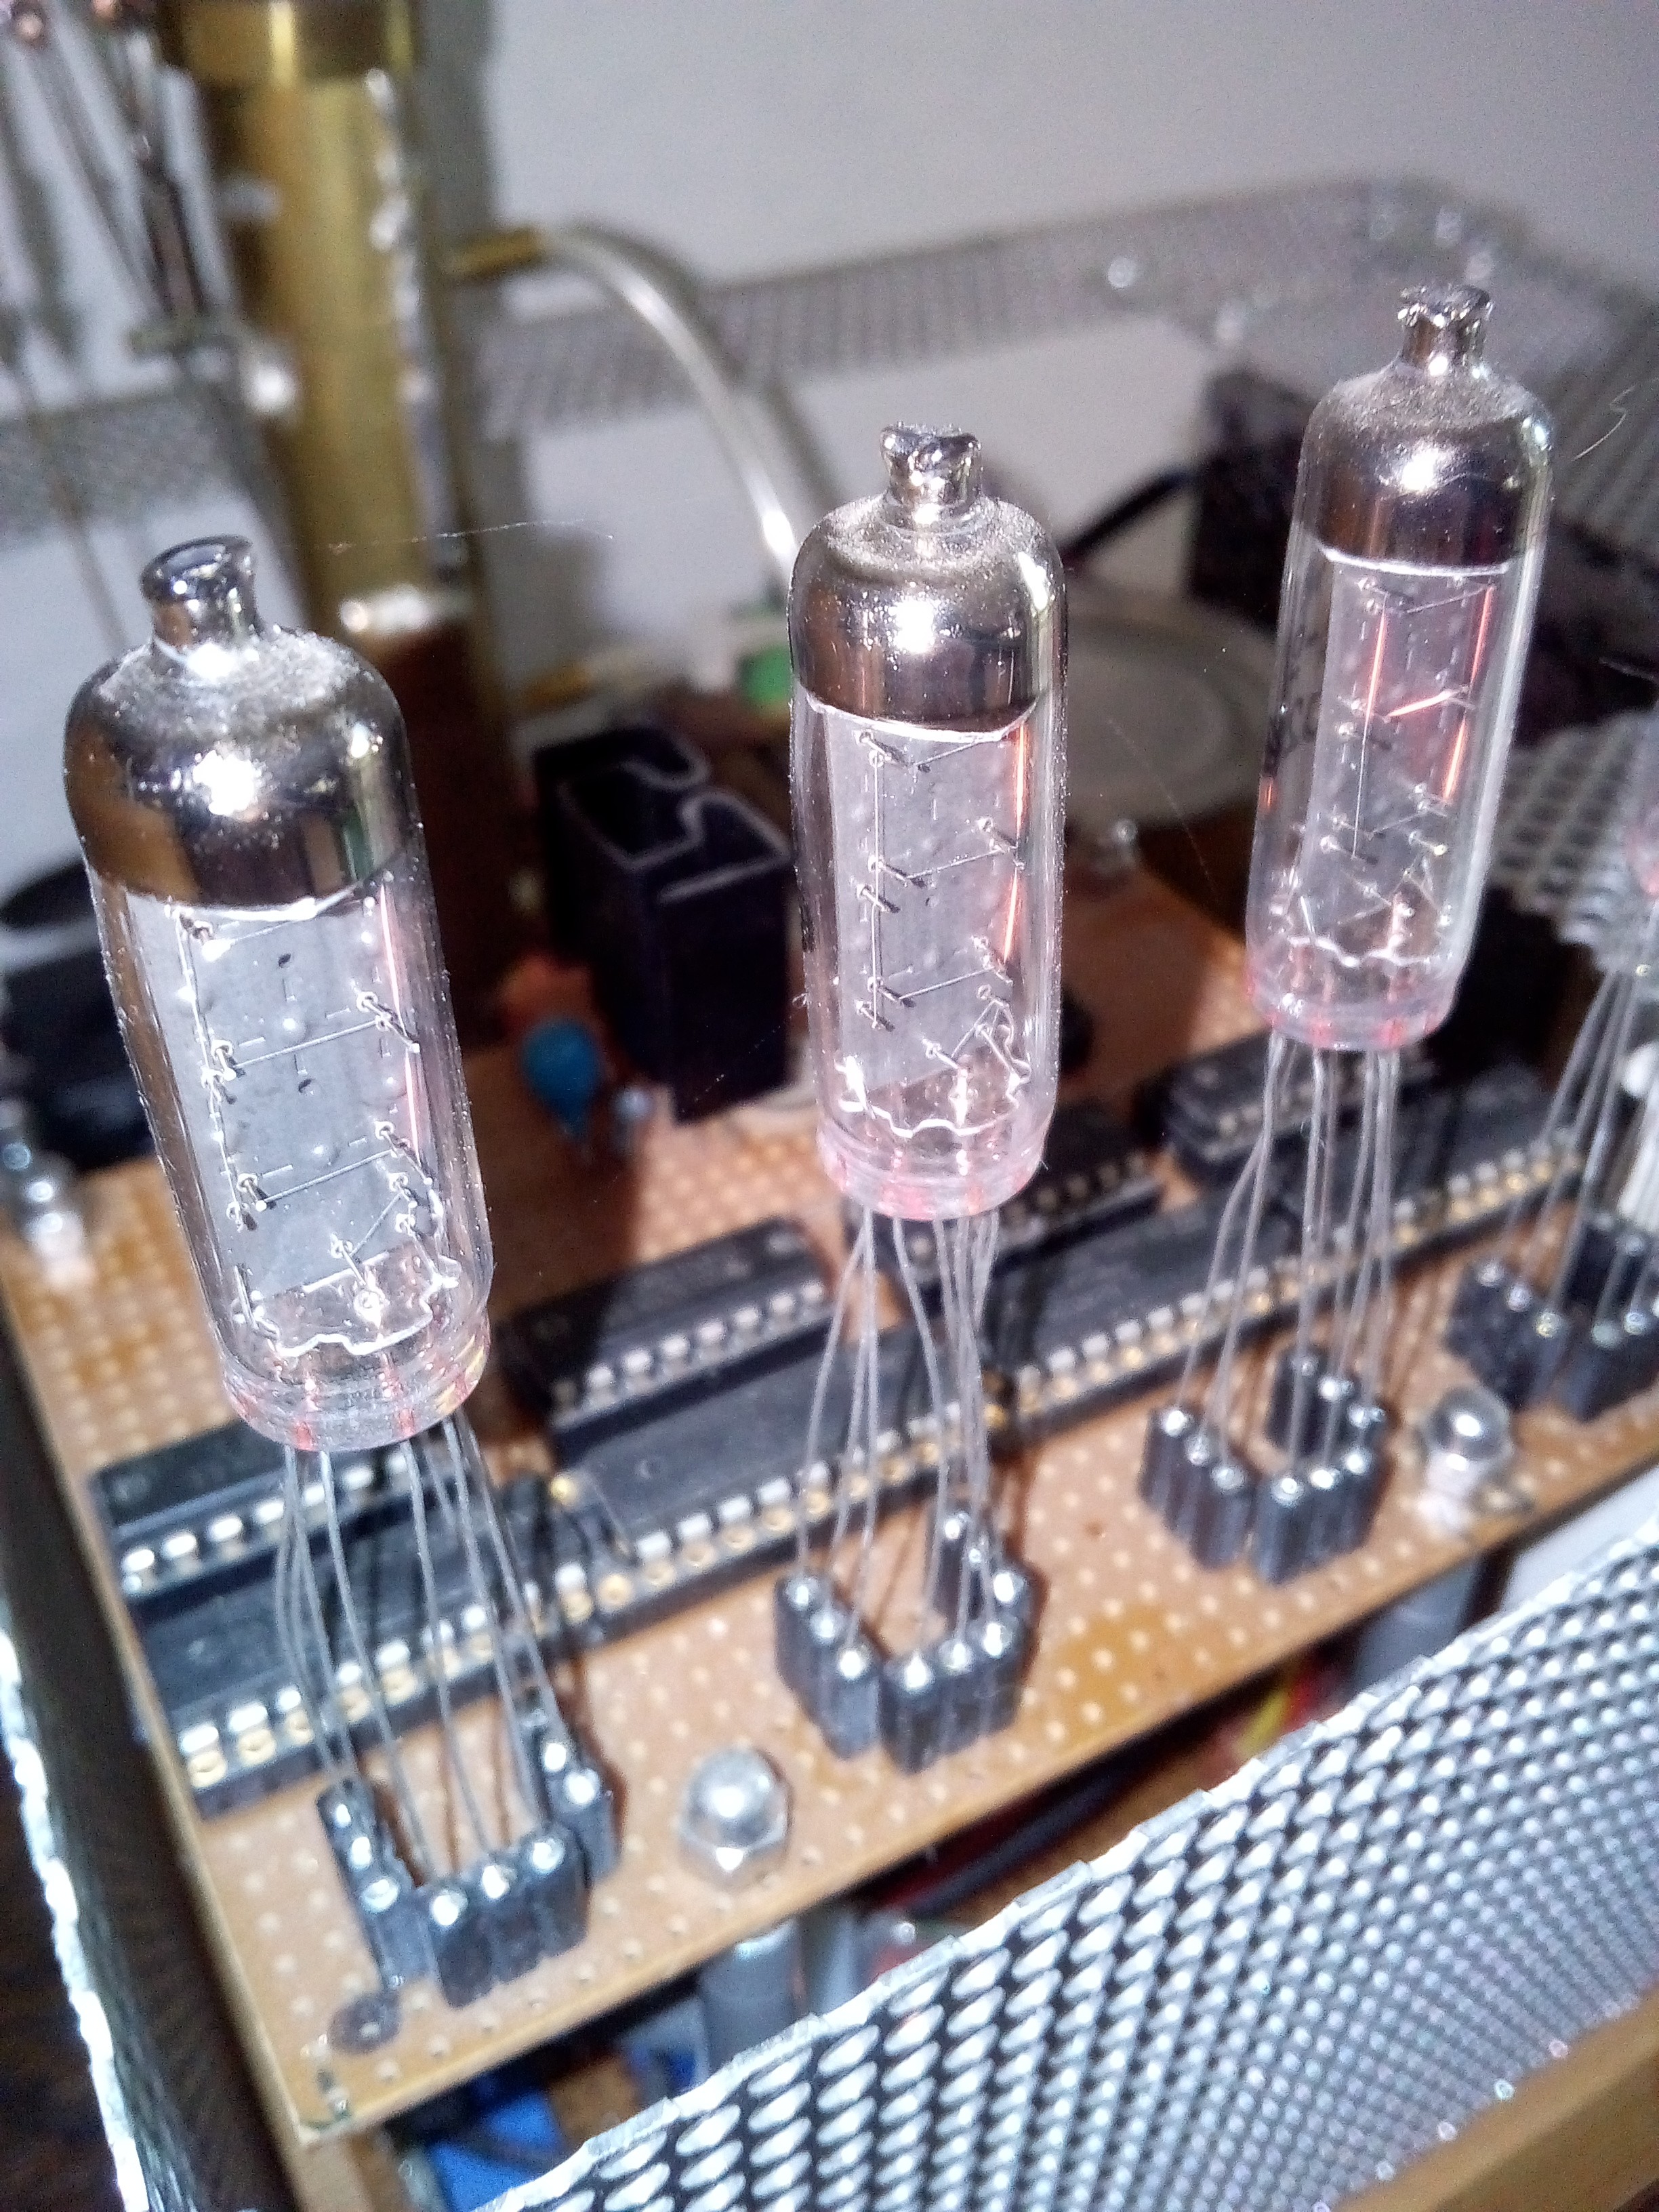
Numitron Display
To visualize the hour and the minute four Russian Numitron IV-9 tubes were used. Datasheet: http://www.tube-tester.com/sites/nixie/data/IV-9/iv-9.htm
Two PCF 8574 receiving data over I2C bus from the C-Control 2.0 Unit and split the most and least significant four bits for the most and least significant digit in the hour and minute part of the display. Datasheet: http://www.ti.com/lit/ds/symlink/pcf8574.pdf
After the two port expander each Numitron tube gets a BCD to seven segment controller like the CD 4511. Datasheet: http://www.ti.com/lit/ds/symlink/cd4511b.pdf
To drive the Numitron tubes I choosed the ULN2803. Datasheet: http://www.alldatasheet.com/datasheet-pdf/pdf/12687/ONSEMI/ULN2803.html
With this chip I was able to control the brightness of the tubes with a LM317 as voltage regulator. Datasheet: http://www.ti.com/lit/ds/symlink/lm317.pdf
To adjust the voltage a simple PCB mount potentiometer was used.
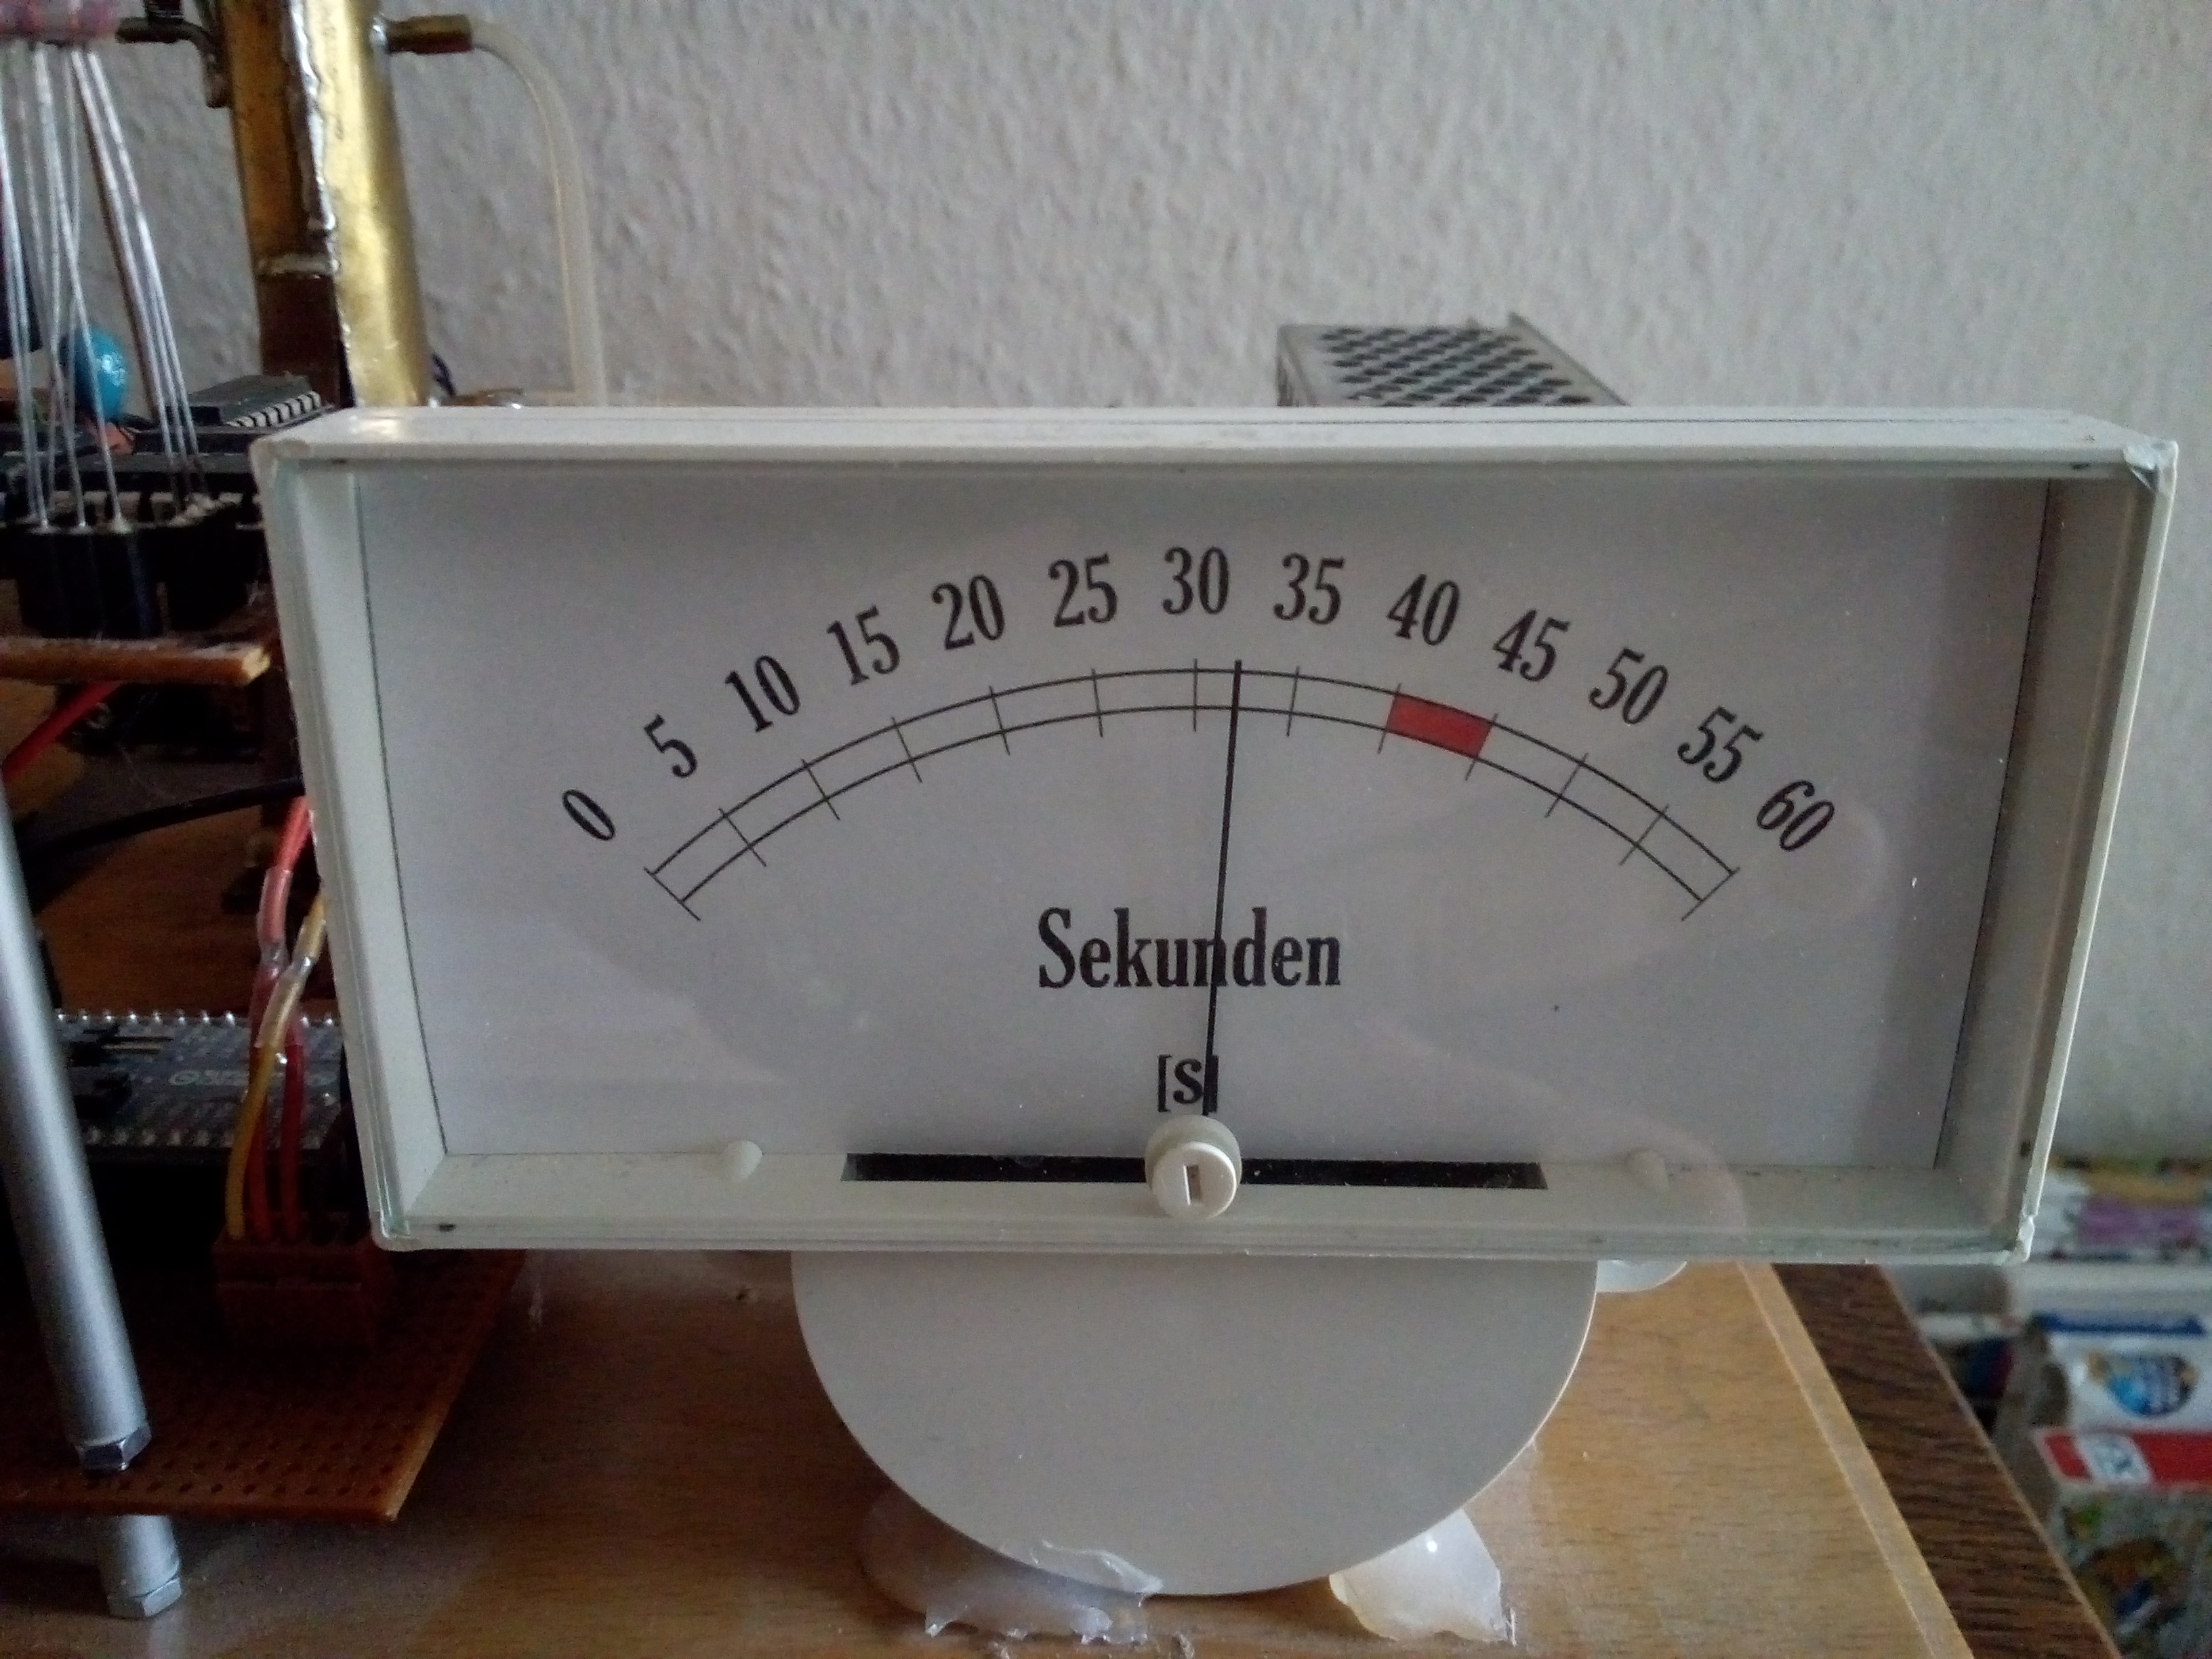
Coil indicating instrument
I love this old method to visualize currents, volts and other values. So I thought that it will be a good idea to use such a display for the seconds in a retrograde way. (A short time I was owner of a Wostok watch with a retrograde second hand but the caliber was crap so I gave it back.) A small potentiometer behind the coil instrument is used for the calibration of the action radius of the second hand. The voltage for the second hand was provided by the PWM of the C-Control Unit. For smoothen the movement of the second hand a 10 µF capacitor was installed in parallel to the coil of the instrument. The unit sheet inside the coil instrument was designed with Powerpoint and printed with a standard laser printer. The section between second 40 and 45 was coloured with a red marker pen. This section indicates the display of the date with day and month on the Numitron tubes.
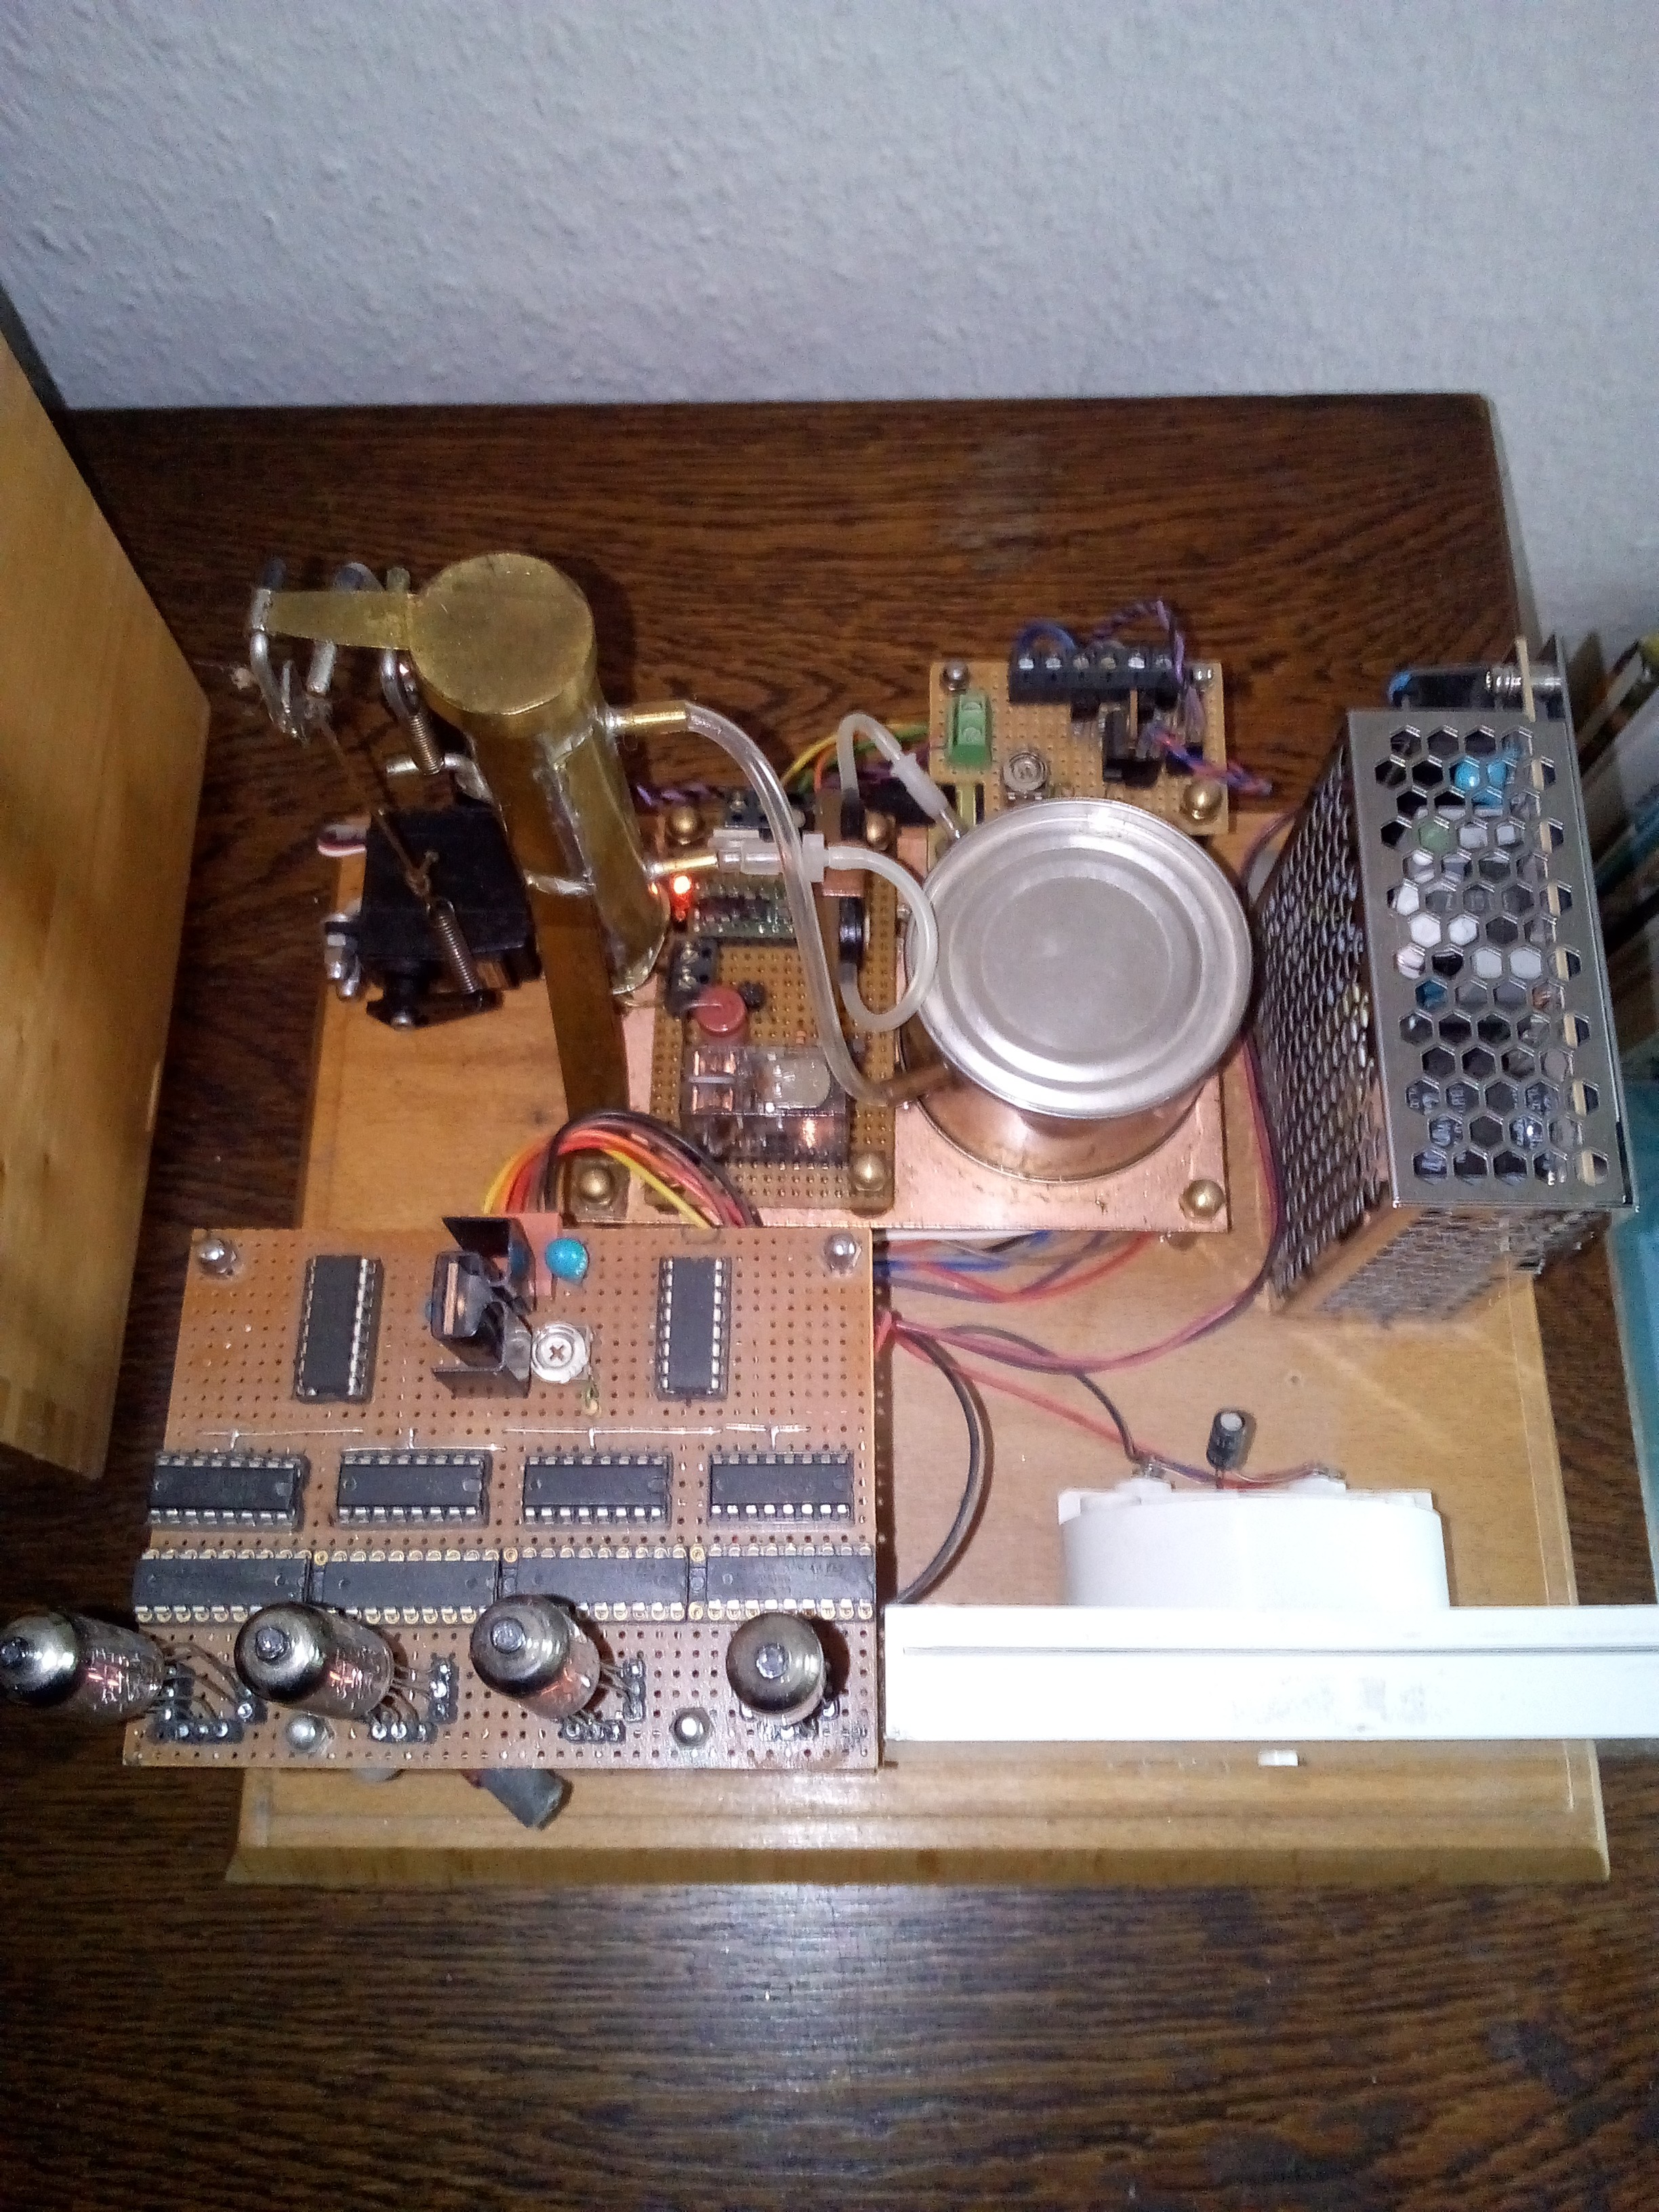
C-Control 2.0 and DCF 77 module
In front of the C-Control Unit a voltage regulator 7805 was installed to supply the electronics.
On the C-Control Unit a common DCF 77 Modul was connected.
Example: https://en.wikipedia.org/wiki/File:Low_cost_DCF77_receiver.jpg
The C-Control basic contains a lot of libraries for external modules and also the implementation of the DCF 77 module, for me, ten years ago, a simple method to build different clocks. The ferrite antenna was mounted with a plastic strap to an upright of the display.
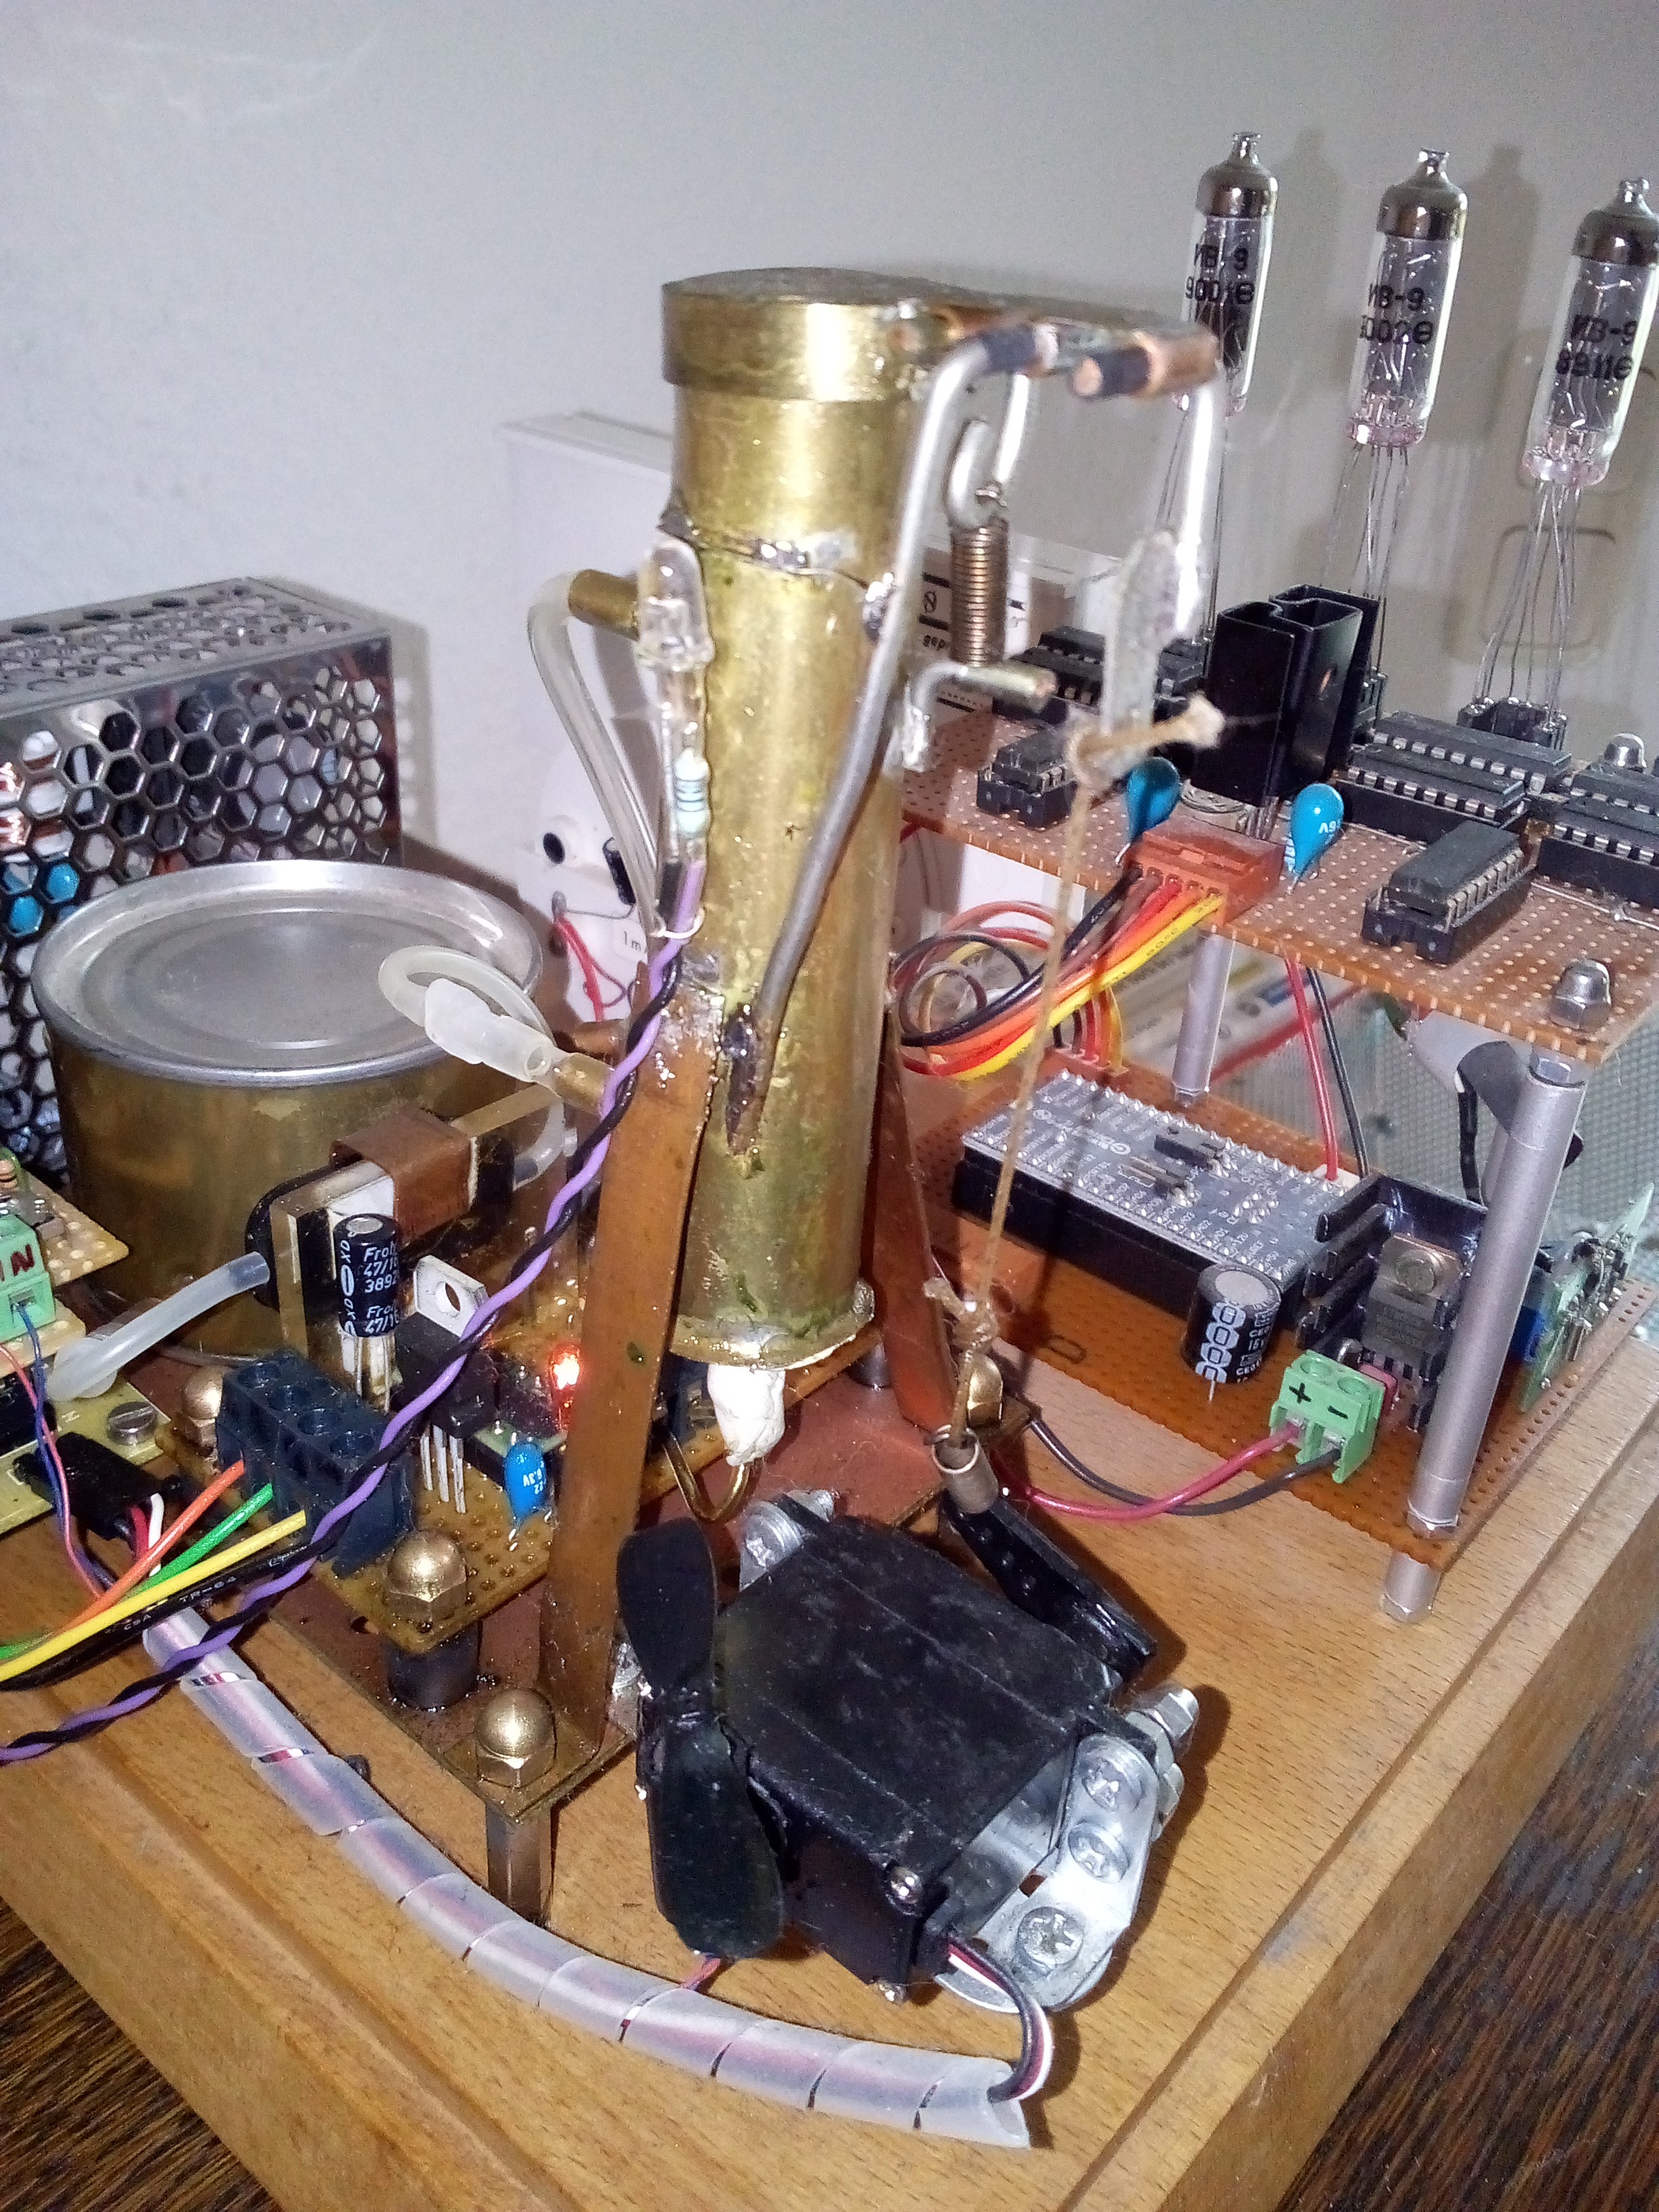
Steam Generator
When you browse the internet you will find some different steam generators for model making. But there have all a big detriment: there are designed for producing steam for a short time not for using it during weeks and month. So the solution was to build a system with a tank a pump and a steam generator in a cycle.
I used some thin brass sheets for soldering a tube with a simple stand. It was more a quick and dirty experiment if it is possible to build a steam generator from the scratch. First a found some resistor wire with some ohm per centimetre. I formed it in a raceway like shape and used two glass capillary to separate the wires to prevent a shortcut. After soldering the tube and bottom of the steam generator I drilled a small hole in the bottom and used a lot of a two component glue to seal the bottom. To prevent a dry heating of the filament I chose to insert two brass tubes in the lower and upper part of the steam generator. So I pump in the lower part of the generator and every excess amount of steam oil will flow back into the tank. With this principle I can spare a special sensor system for the filling level. I have just to program a long pump time that in the case that the generator is empty the time will be sufficient to fill the whole generator tube with steam oil. Also in the case that the steam oil tank is empty (the pump sound then is annoying as f…) the filament will not overheat directly and is protected for some days (own tests verify this). The Filament is driven directly on the power supply with a load resistor. I checked the best balance between amount of steam and temperature of the filament and it was 7 V with 1 A. For controlling the filament via the C-Control Unit a simple relay (12V from Omron) with a transistor driver (BC 547) was used. Example: http://electronicsdrive.blogspot.de/2015/03/how-to-calculate-base-resistance.html
To illuminate the steam during the dark time at night a cold white LED was mounted beside the steam generator and was switched via a C-Control Unit I/O port.
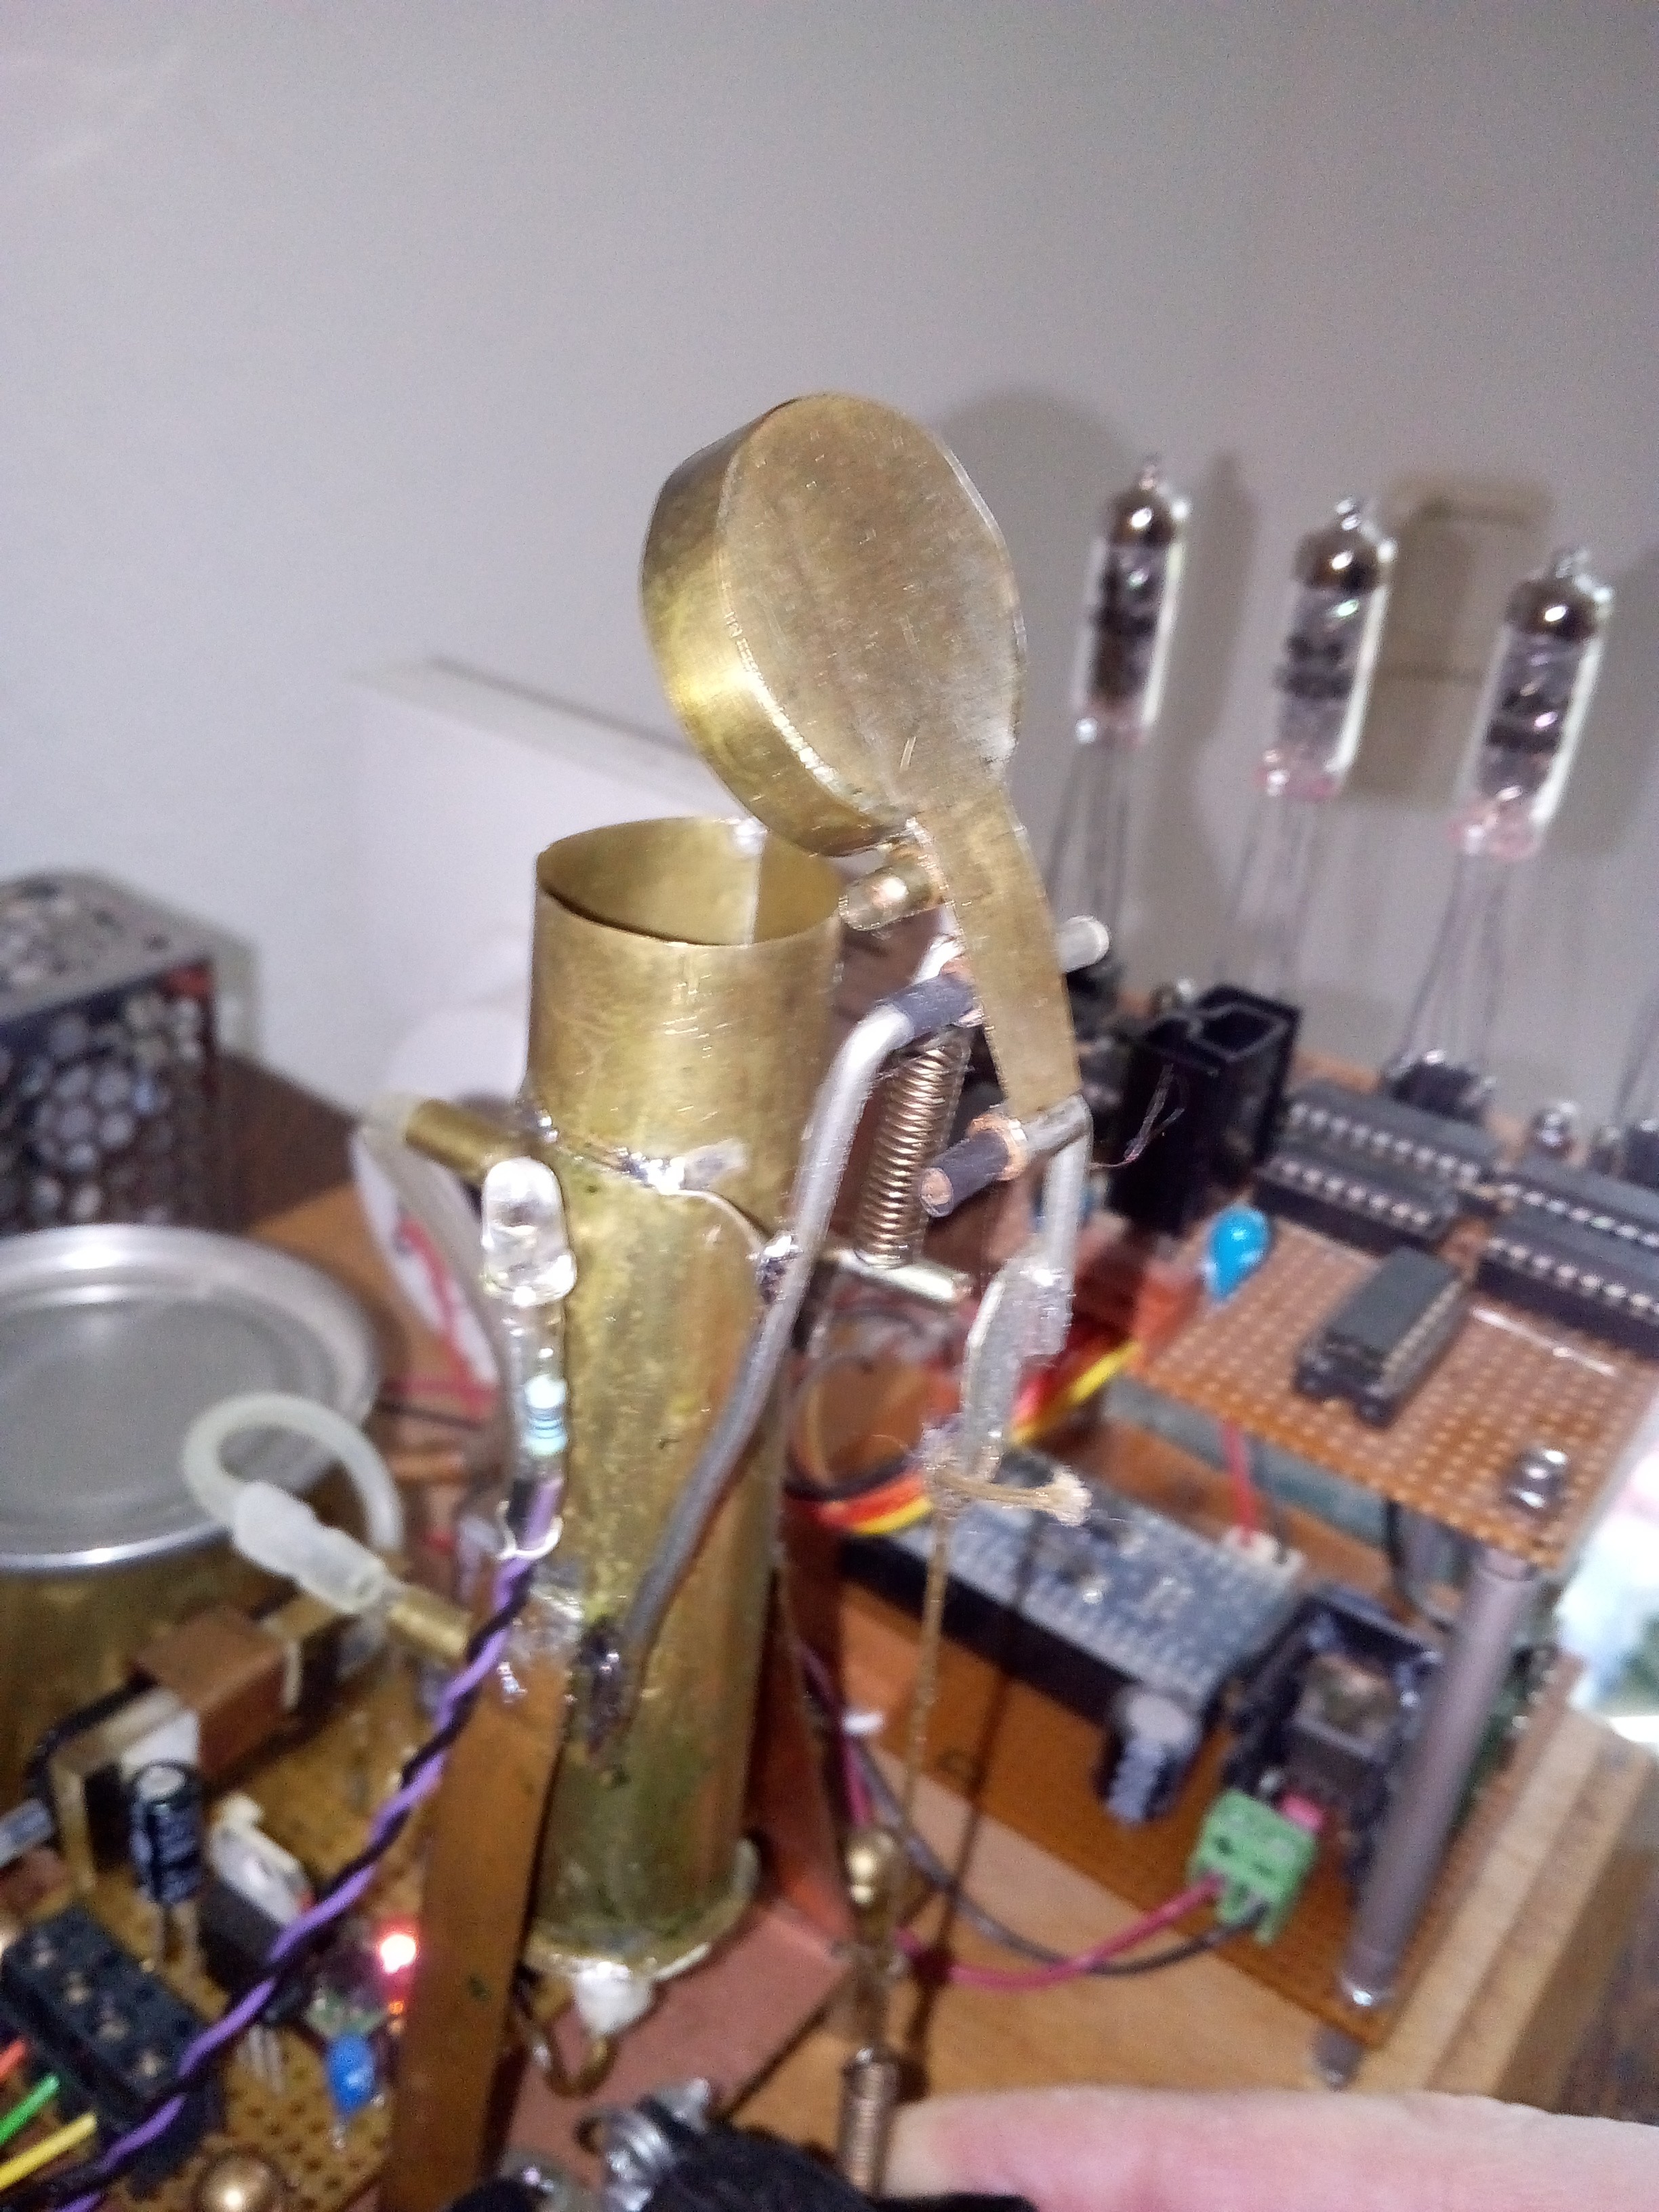
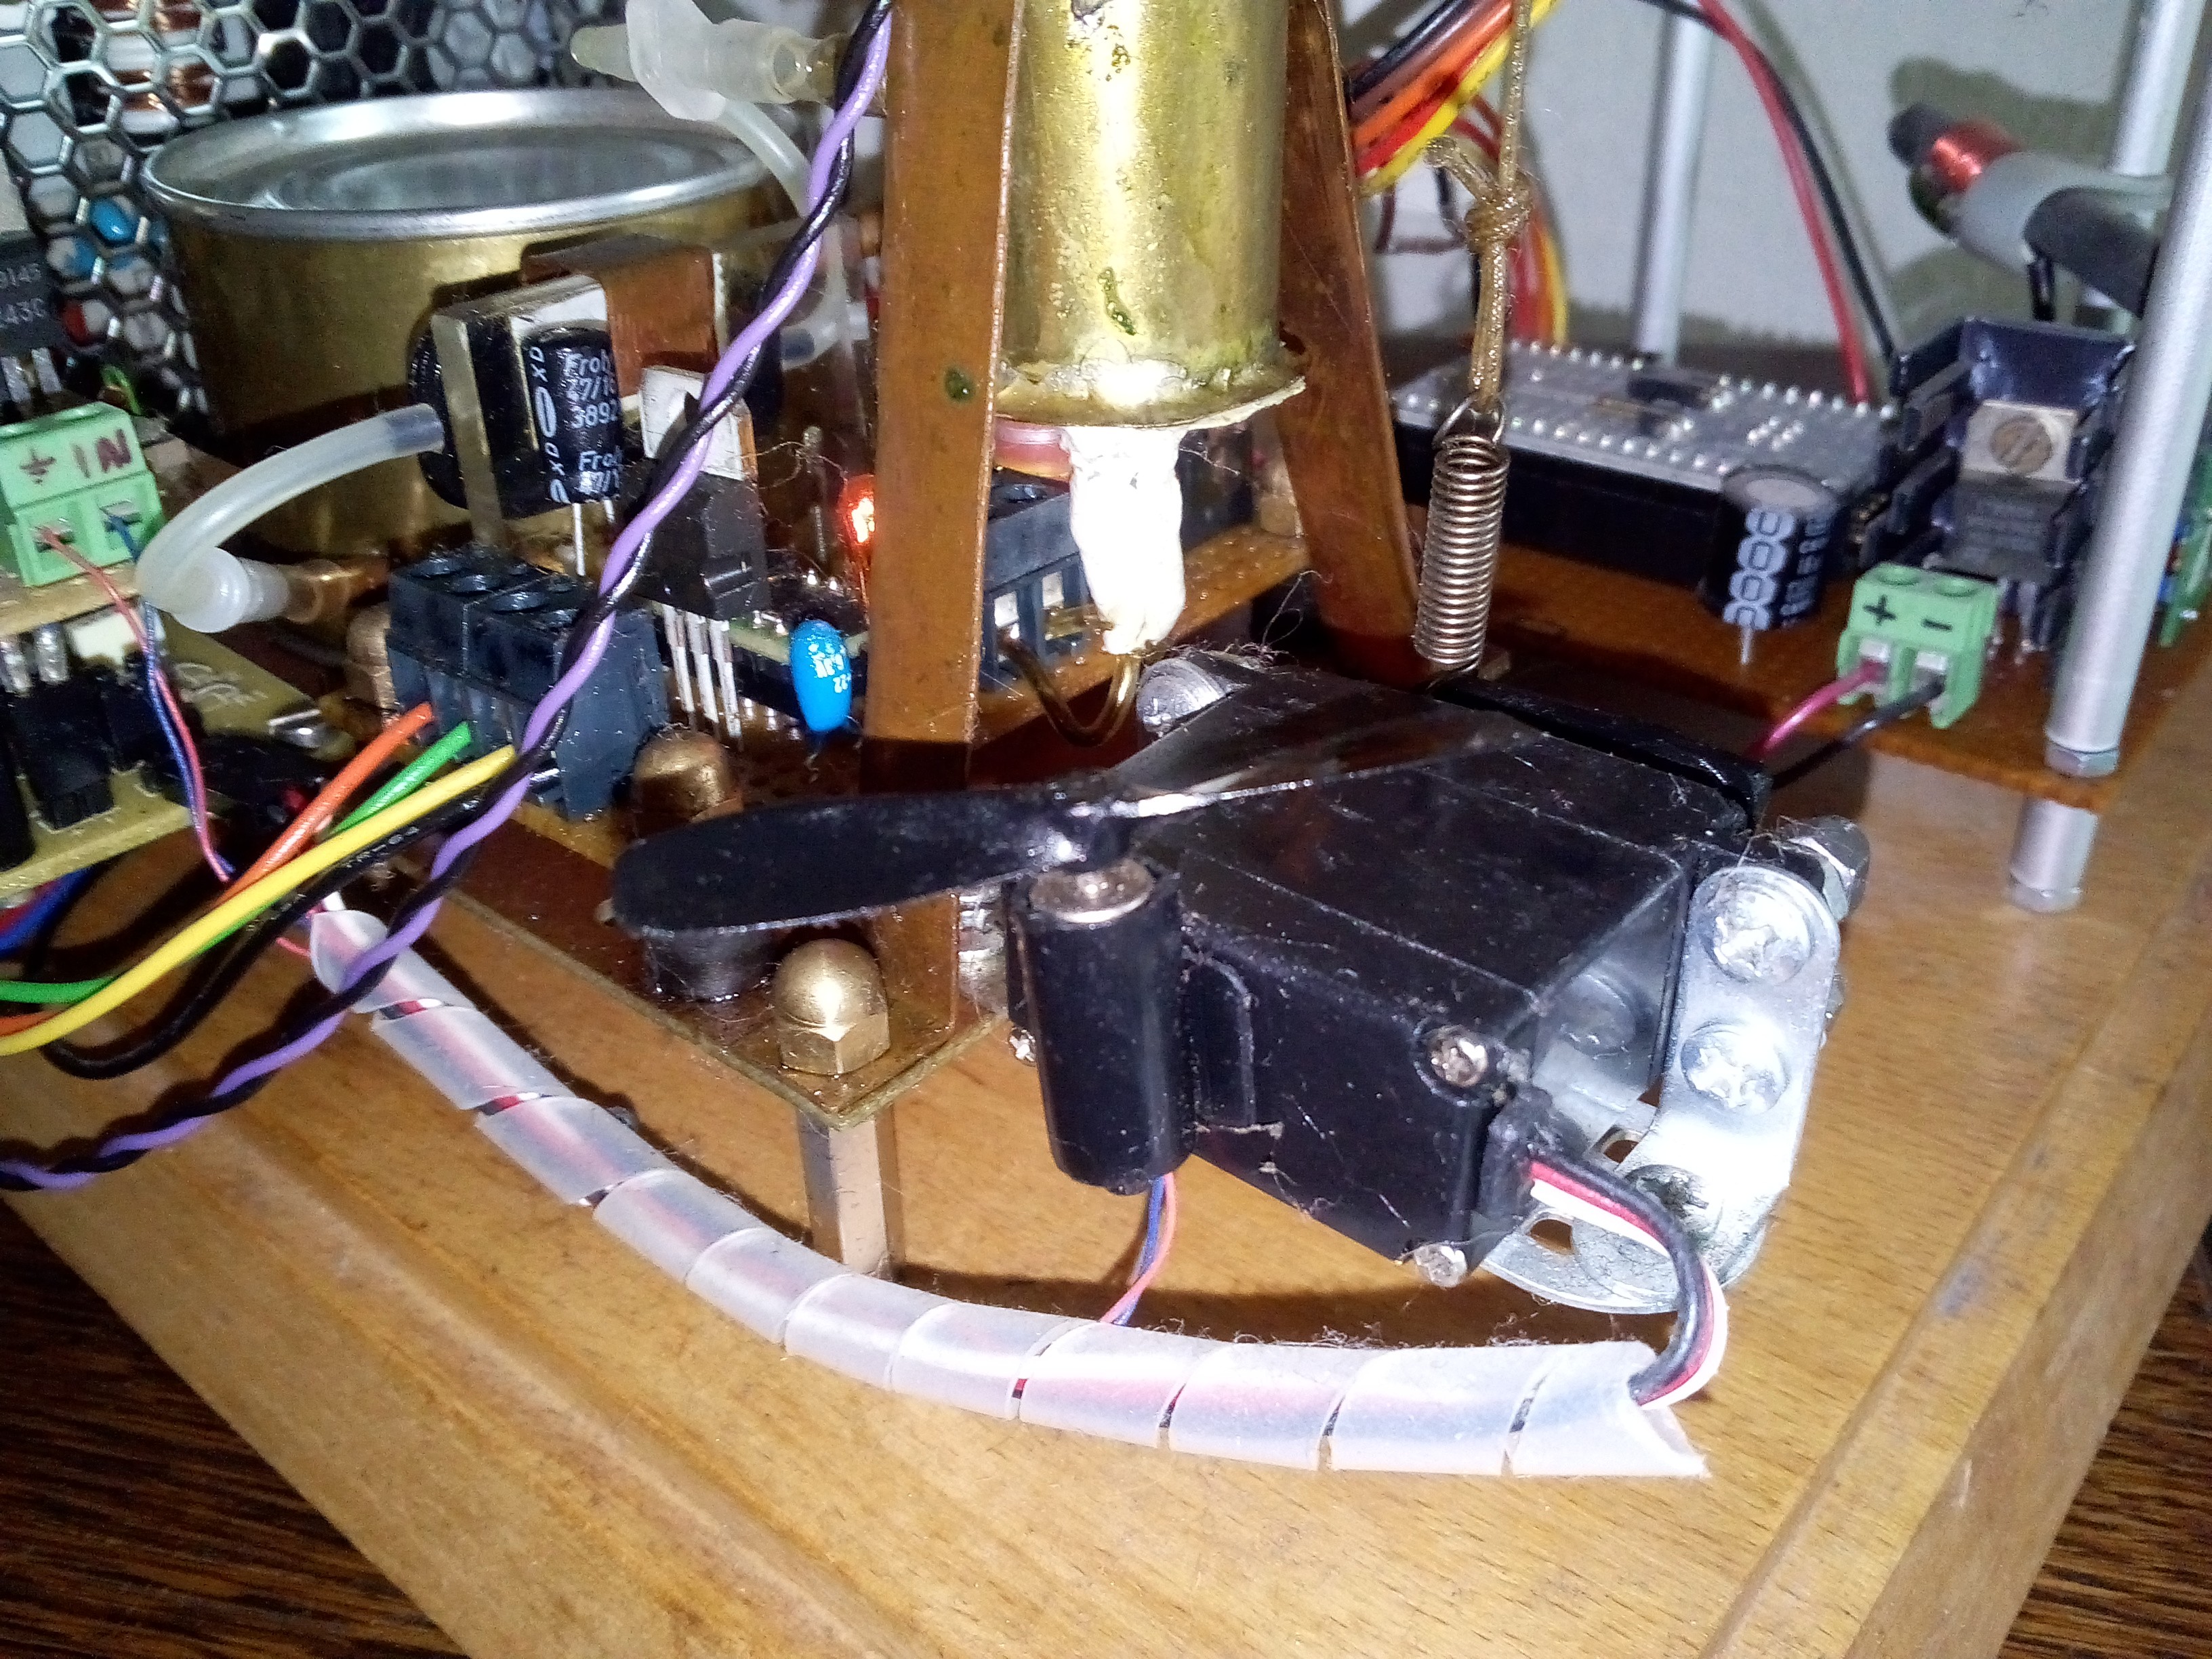
Servo lid and vent
Over the testing time I found out that the steam oil is a bit volatile and disappears over days out of the steam generator. So a servo driven lid was necessary. I solder a lid with some thin brass sheet and also a quick and dirty lever construction. On the bottom a servo with arm connected over a spring and a thin string to the lid. As antagonist another spring was installed on top to close the lid after the servo was switched off. The first steam was produced and with the lid the steam was trapped. So an additional vent was installed. I found these little propeller from an old IR helicopter. It is connected over a transistor (BC 547) to the C-Control Unit.
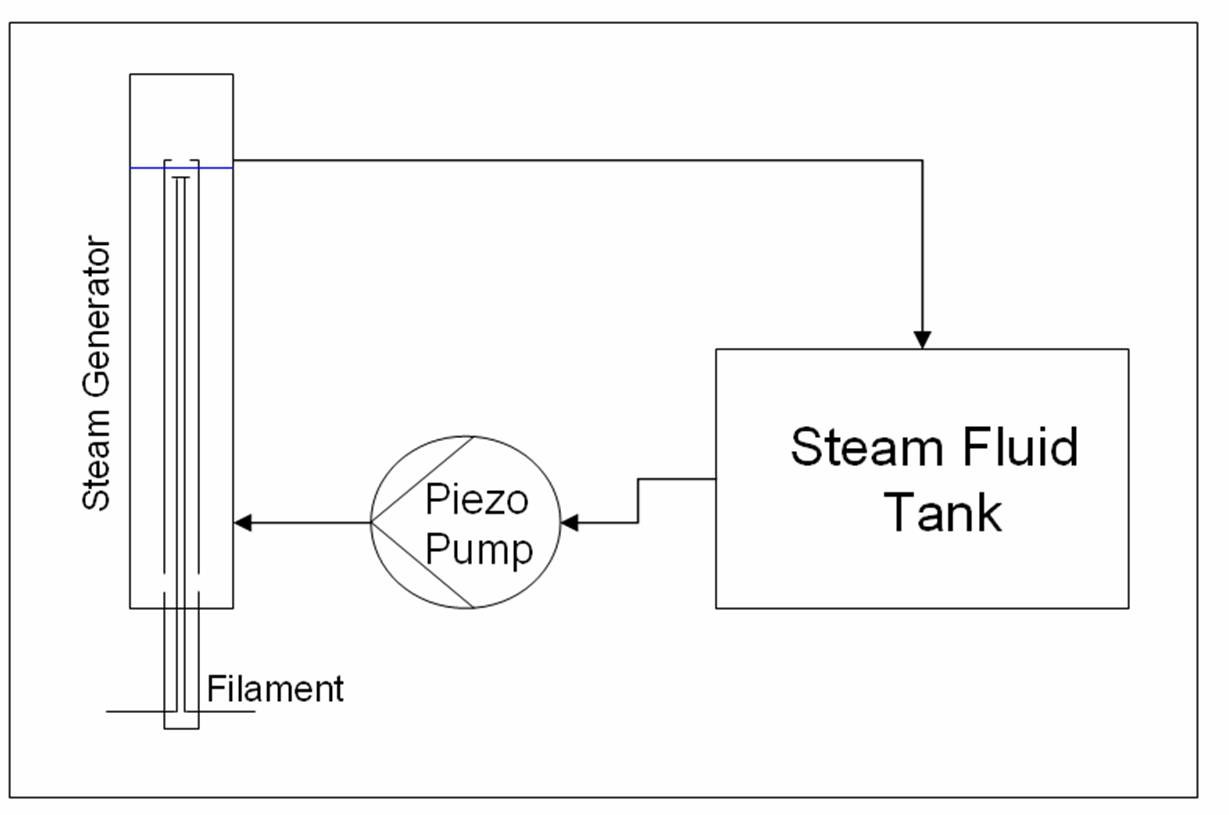 Fluid cycle of the Steam Clock. The blue line indicates the level of the steam oil (fluid).
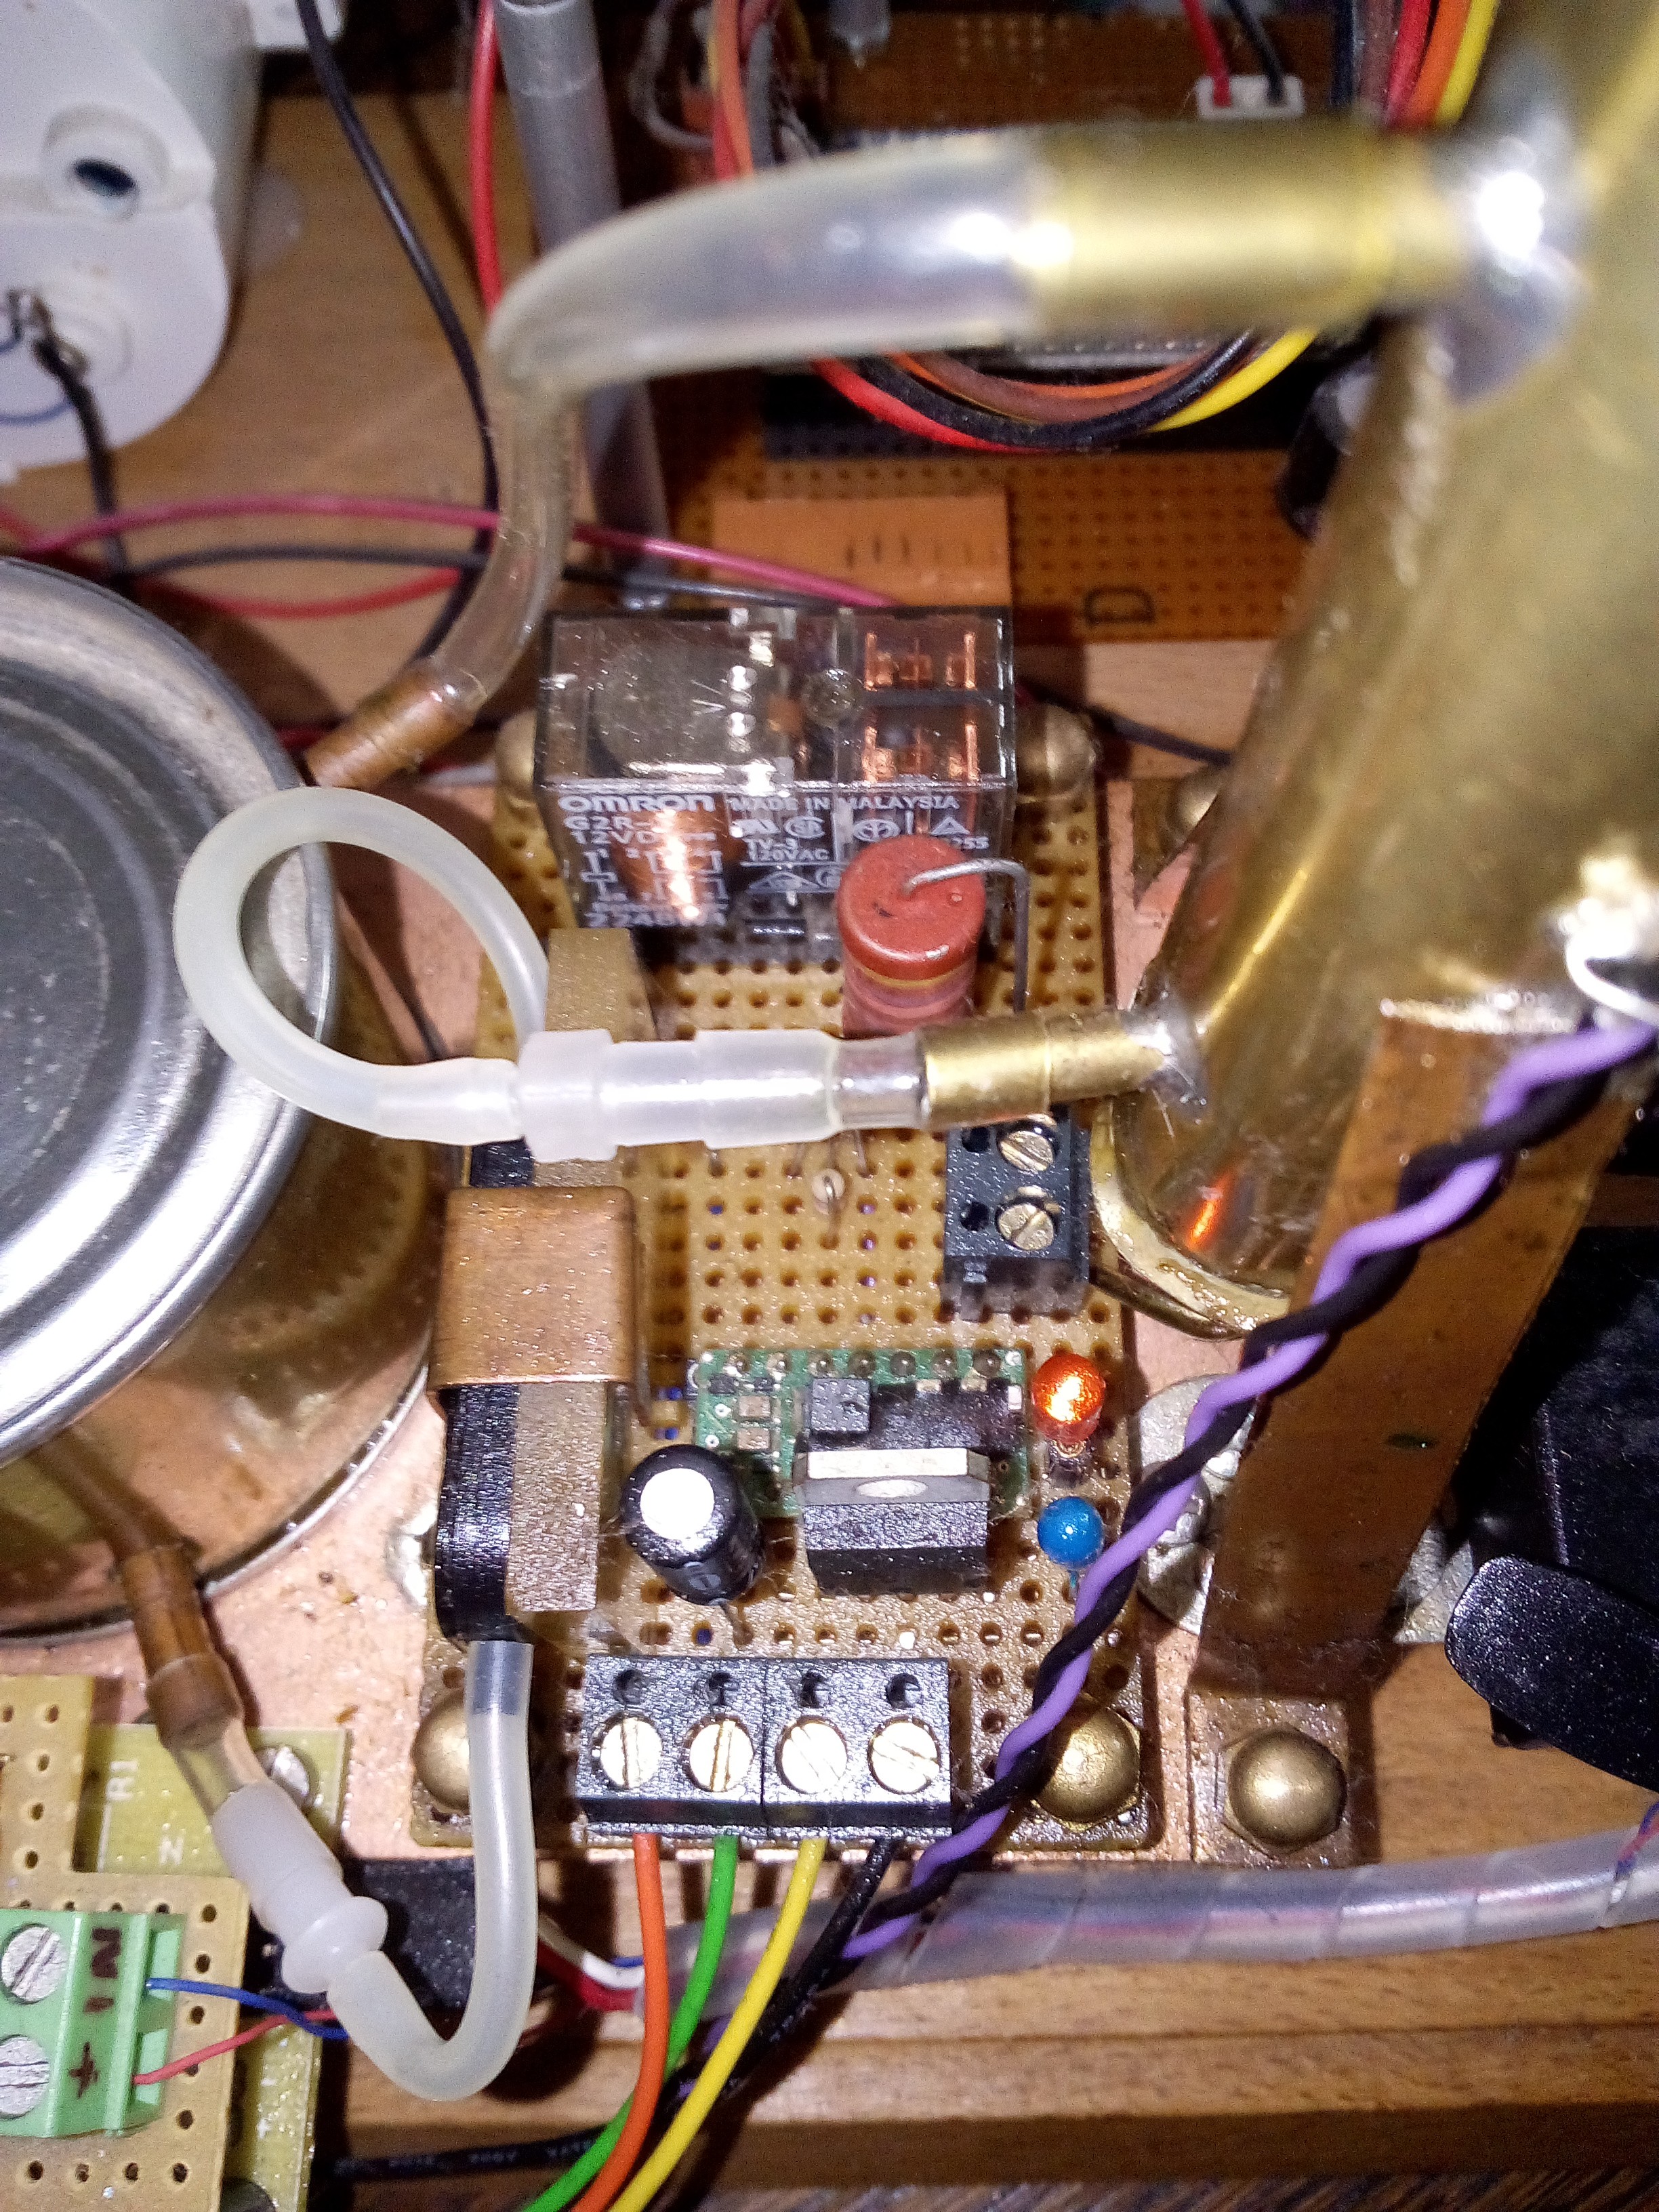
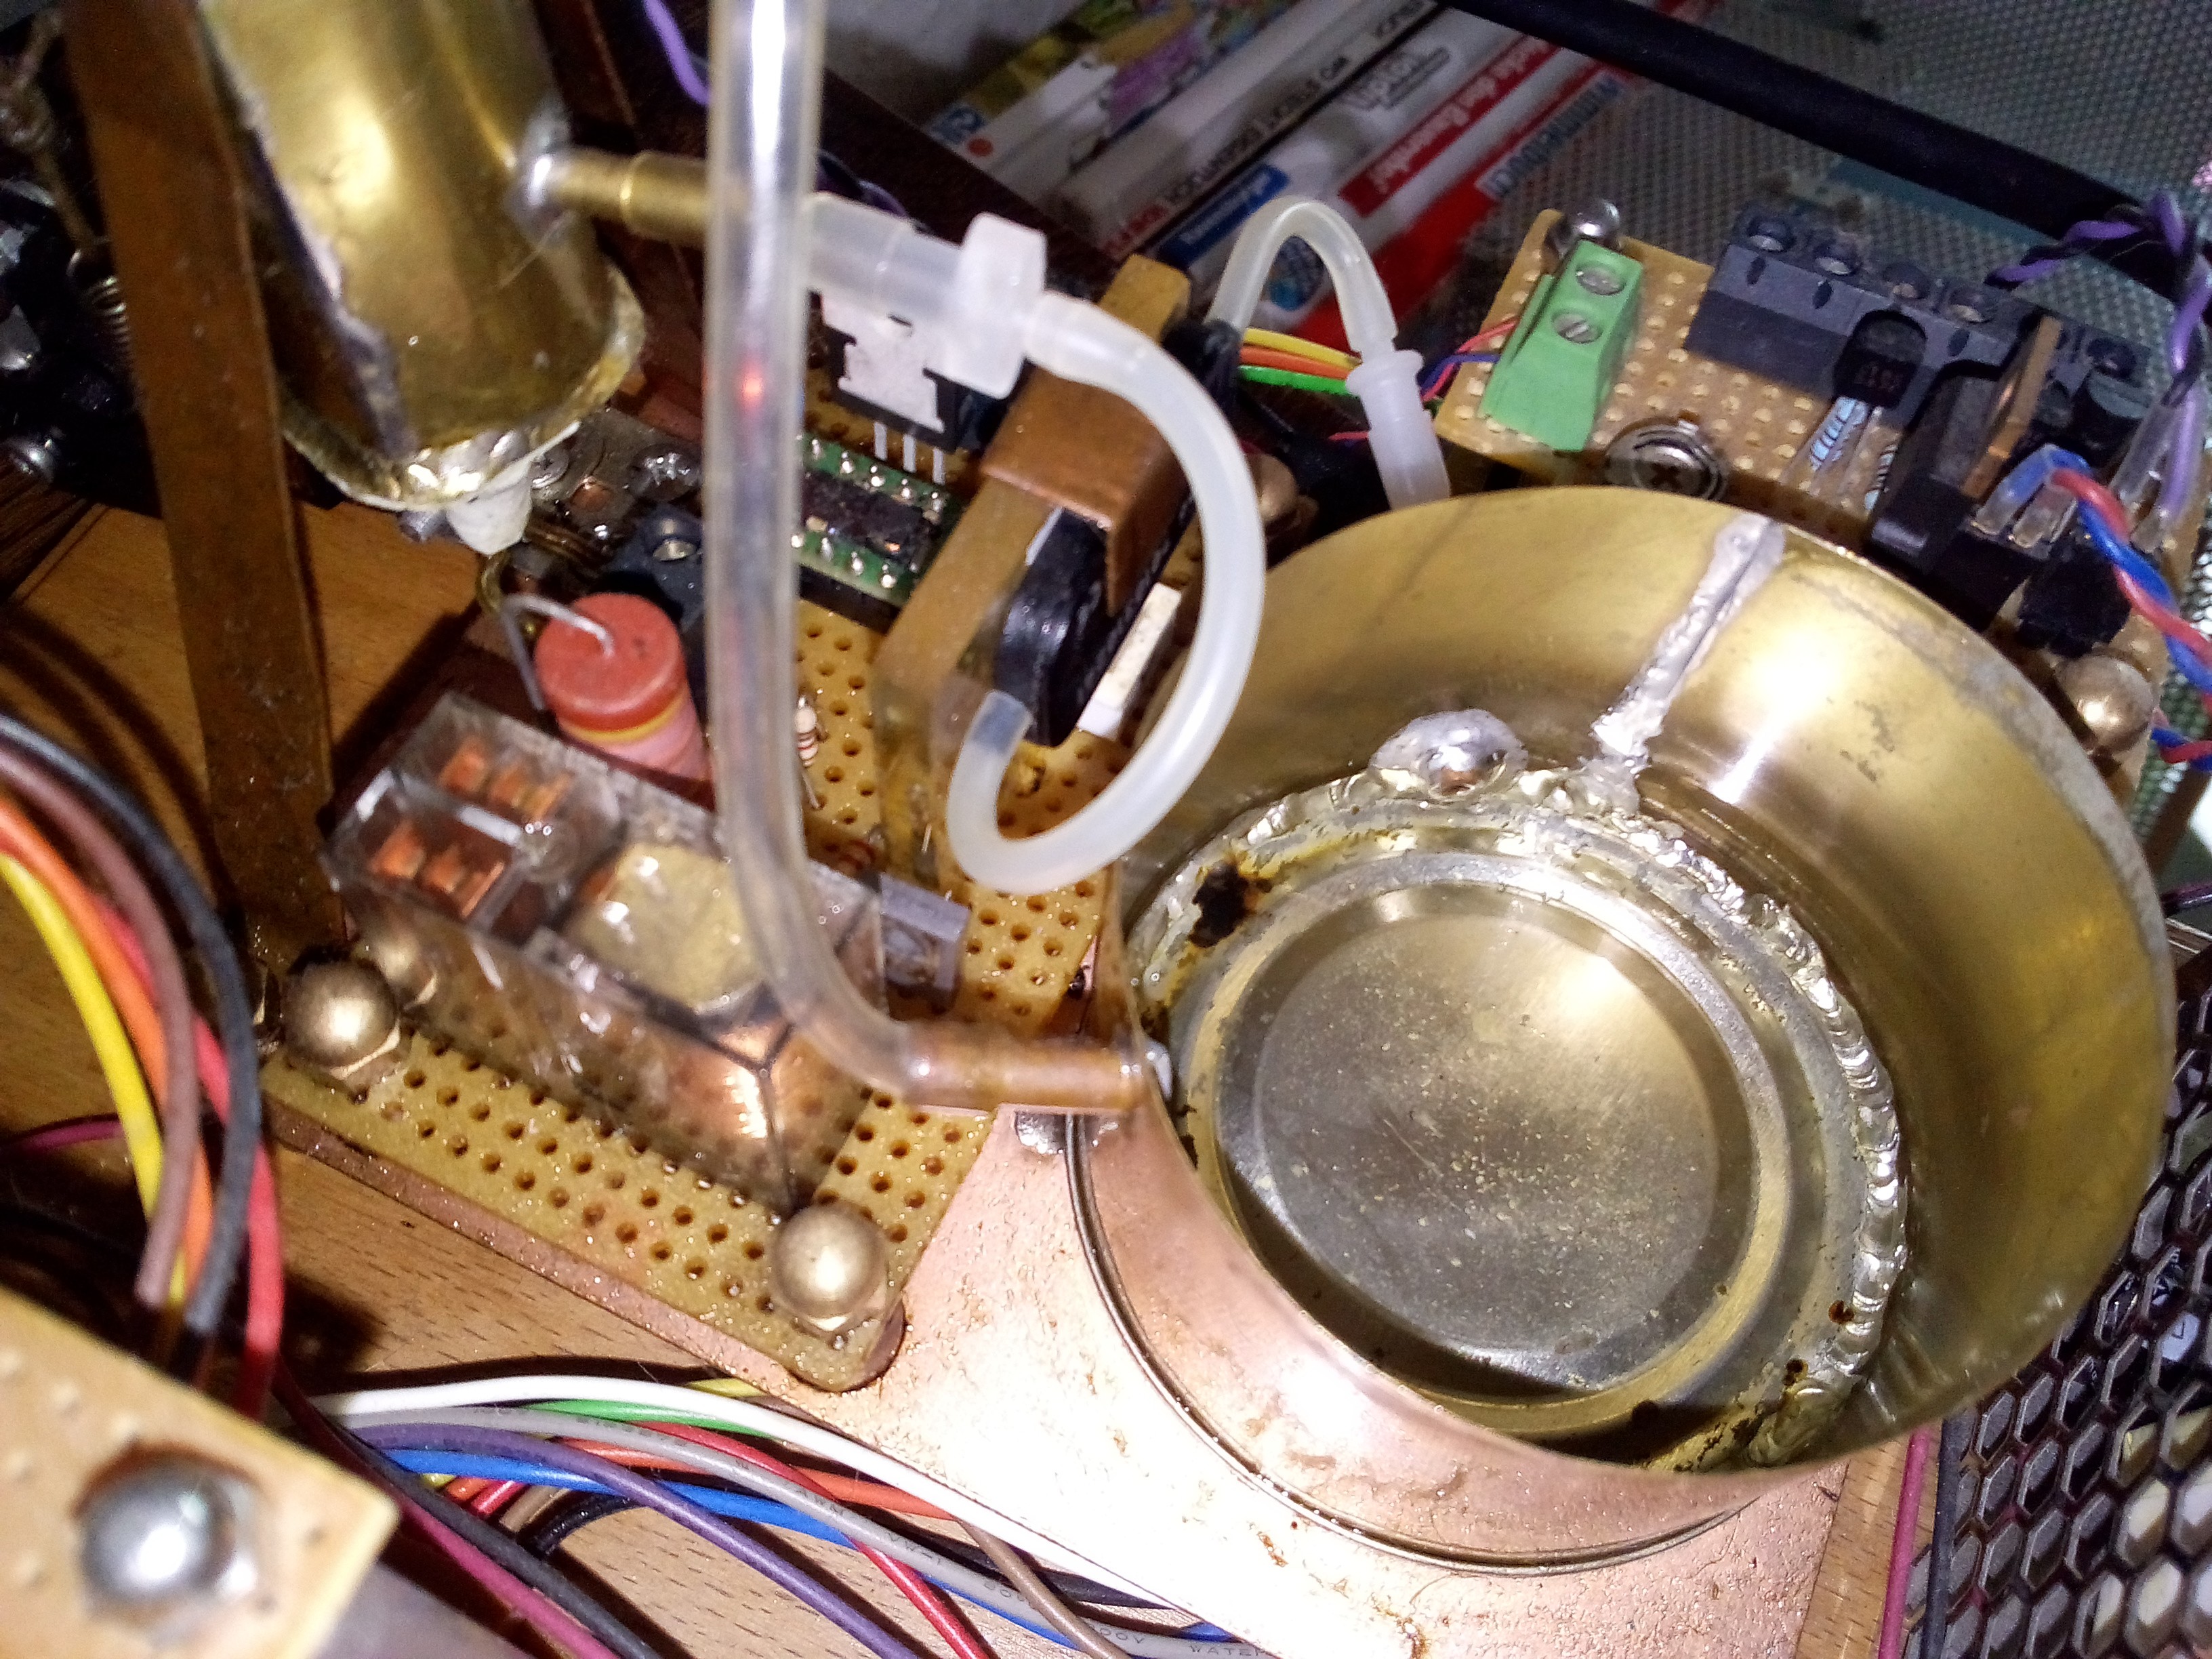
Fluid tank and Fluid pump
Some words on the fluid tank. It was Sunday in the morning when our family made breakfast and we bake some of these canned bread rolls. [https://www.knackundback.de/products/4-sonntags-broetchen/ ] On the ends of these rolls are two tinplate lids. Normally some paper based roll is pressed in the rim of the lids. I remove the paper and found that these lids are perfect for building little tanks. One I used for the bottom and one for the lid of my tank. You can solder the tinplate lids and thin brass sheets are perfect for this.
I searched a lot for a small pump for pumping some minutes a day over years and I found only a piezo membrane pump from Bartels microtechnik. Information: https://www.servoflo.com/micropumps/mp6 These pumps are driven by a high voltage driver with a square wave, sinus or bit round square wave (forget the name). To drive this small pump a MP6 OEM controller was used providing the 200V high voltage with a square wave with a 5 V power supply. See also: https://www.servoflo.com/micropumps/kits-accessories
Steam Oil
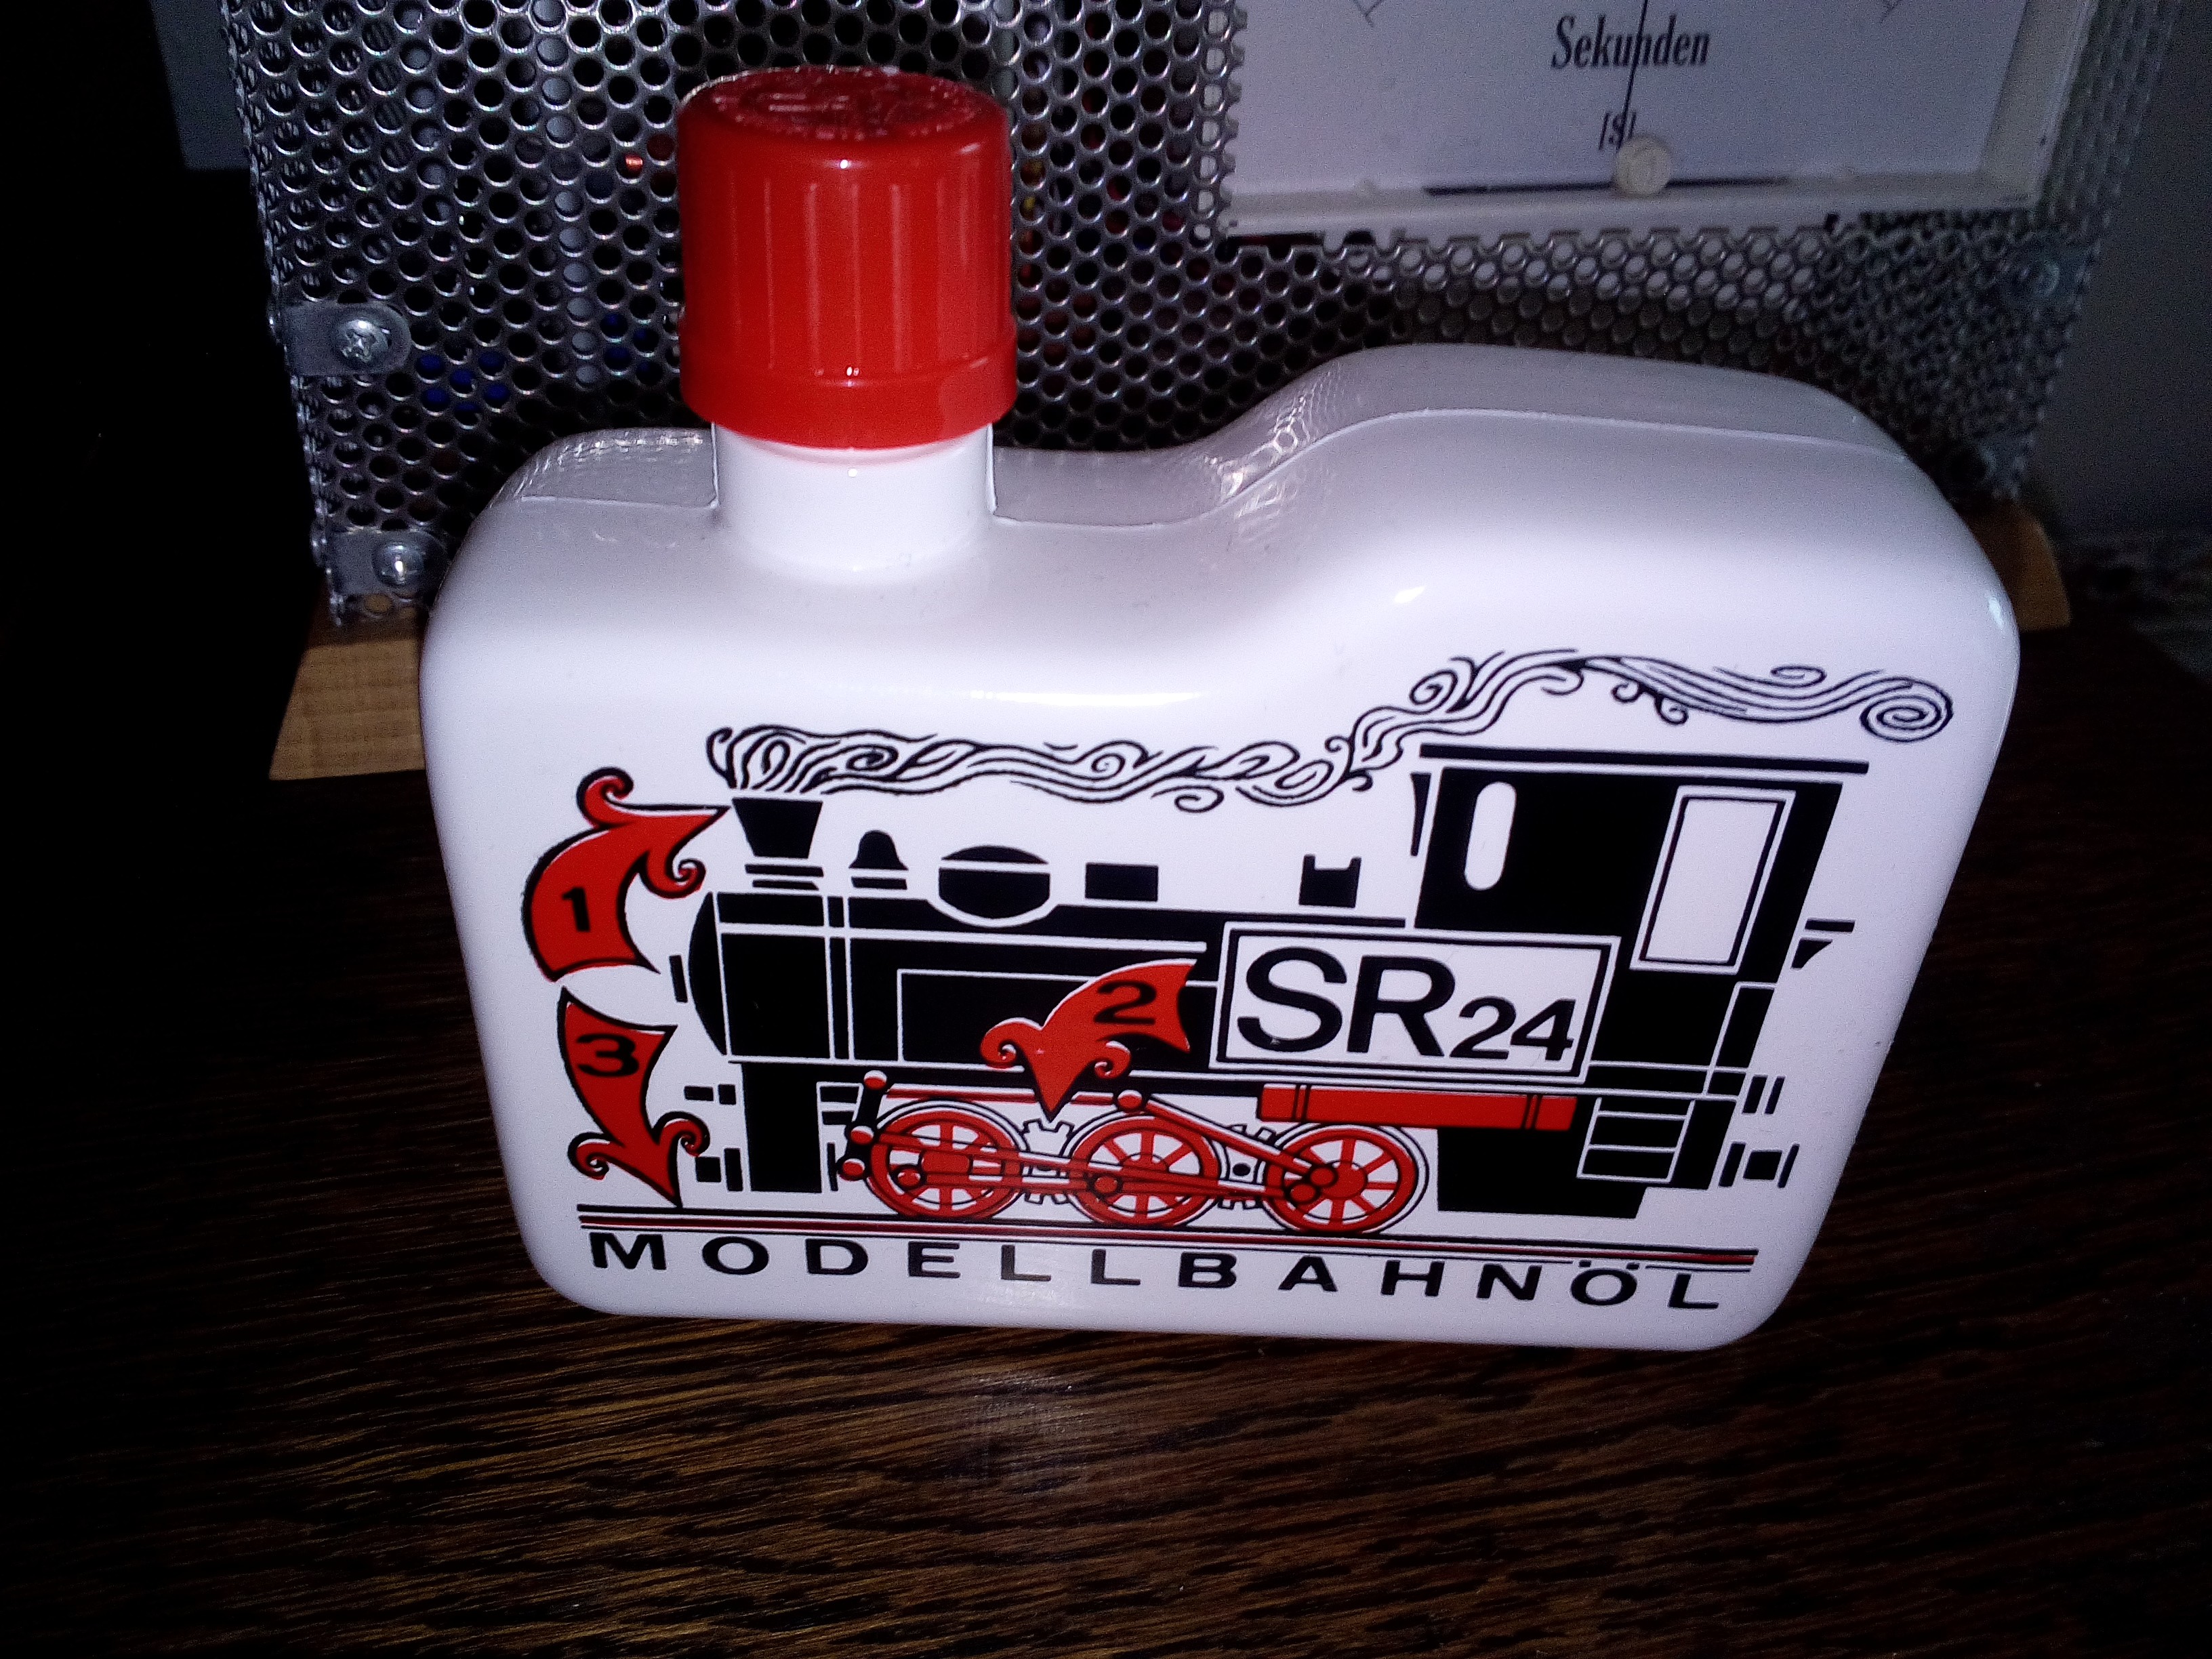
I was searching for a non toxic fluid for producing the steam. Model railway player know the different methods for producing steam in their small engines. From burning paper with some saltpetre salts up to electric heaters with steam oils based on petrochemical fluids. One of the big advantages of these petrochemical fluids is the mostly residue free behaviour after using. (I am not really sure if these oils absolutely non toxic like is written on the bottle) But believe me a fluid without any surface tension is really difficult to handle especially when you are building a not perfect prototype with some lose tubes or small holes in you oil system. One of the advantages is the non conductive feature of this oil. I am using the SR24 oil from a German producer. This oil is not completely odourless and you can smell the full hour. An olfactory clock!
Steam Protocol
When the pre-programmed hour is full, the pump start to pump new steam oil into the steam generator. This needs about 50 s, then the vent starts. After 80 s the LED is switched on. 2 seconds pause, then the lid opens with the servo. 2 seconds later the filament is switched on. 24 second is the time for producing steam. After that the filament switch off, a second later the pump is also switched off followed by closing the lid and switching the LED.
To spare steam oil time points were set when the steam clock producing steam every full hour. If the hour is 7, 12, 16, 18, 19, 20, 21, 22, 23 and 0 at midnight, steam is produced. The reason is during this time the probability is high that anyone can smell the steam (hour) in our family.
Code was written in CCBasic for C-Control 2.0
'NUMITRON UHR MIT DAMPFGENERATOR
'----------------------------------------
'------ I/O PORTS and Variables ---------

define i as word
define x as byte
define stunde as byte

define sekunda      DA[1]
define SDA          port[9]
define SCL          port[10]
'--------------------------
'---- SYSTEM MEMORY -------
'--------------------------
define EXTPORT      byteport[3]
define EXTPORTII    byteport[10]

define pumpe        port[6]
define ventilator   port[4]
define klappe       port[3]
define heizer       port[5]
define leuchteled   port[2]

SDA=on
SCL=on

second = 35
minute = 59
hour = 6

day = 24
month = 08

#z

EXTPORTII = ((minute mod 10)*16) + (minute/10)

EXTPORT = ((hour mod 10)*16) + (hour/10)

sekunda = (second *4)

stunde = hour

pause 1

If stunde = 7 and minute = 0  then rauchen()
If stunde = 12 and minute = 0  then rauchen()
If stunde = 16 and minute = 0  then rauchen()
If stunde = 18 and minute = 0  then rauchen()
If stunde = 19 and minute = 0  then rauchen()
If stunde = 20 and minute = 0  then rauchen()
If stunde = 21 and minute = 0  then rauchen()
If stunde = 22 and minute = 0  then rauchen()
If stunde = 23 and minute = 0  then rauchen()
If stunde = 0 and minute = 0  then rauchen()

if second = 40 then datumanzeigen()

goto z

sub datumanzeigen()

for i = 1 to 5

EXTPORTII = ((month mod 10)*16) + (month/10)

EXTPORT = ((day mod 10)*16) + (day/10)

 sekunda = (second *4)
pause 50

next i

end sub


sub rauchen()
pumpe = on
pause 2500
ventilator = on
pause 1500
leuchteled = on
pause 100
klappe = on
pause 100
heizer = on
'Heizen und dampfen
pause 1200
heizer = off
pause 50
pumpe = off
ventilator = off
pause 50
klappe = off
pause 50
leuchteled = off

end sub