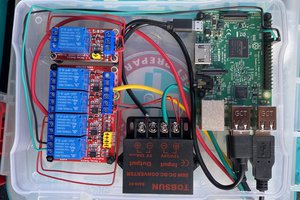
Close
0%
0%

Snap Crackle Pi

Make your gas fireplace sound like the real thing with way too much technology.

Similar projects worth following
Have one of those sealed gas fireplaces that are silent and just generally lacking in cozy factor? Well take the cozy factor to 11 with your Raspberry Pi.

In this installment of "Underutilizing Your Raspberry Pi", we configure a headless Raspberry Pi to loop fireplace sounds at bootup. Login over WiFi to adjust the volume, maybe even add to the ambiance with Pandora via the Pianobar command line client. (Haven't actually tried that yet). For the audio, we add the simplest possible amplifier (2 transistors, 2 resistors, 1 cap, and the obligatory LED so we can see as well as hear that it is on), powered from the Raspi's header.

The idea is to power the Pi off a USB charger plugged into an outlet controlled by a switch by the fireplace. Turn on the fireplace, turn on the fireplace sound!

See project logs below for build details. Quite straightforward...but gets the job done and made entirely from components I had laying around the shop. Alas, if only this had been done in time for the Hackaday Prize.

  • 1 × Raspberry Pi Series A or B
  • 1 × 2N3904 Discrete Semiconductors / Transistors, MOSFETs, FETs, IGBTs, NPN
  • 1 × 2N3906 Discrete Semiconductors / Transistors, MOSFETs, FETs, IGBTs, PNP
  • 1 × Small Speaker
  • 1 × Wire Resistors (Fixed) / Zero Ohm Jumpers

View all 11 components

  • Amplified speaker

    Eric11/29/2014 at 19:50 0 comments

    For the speaker I used pretty much the exact circuit used by BrunoIP in his instructable here. The only change is that I used the 5V supply from the Raspberry PI. R1 is 4.7KOhm, R2 is 1M. Q1 can be a 2N3904 (NPN) and Q2 can be 2N3906 (PNP). C1 is a 10uF electrolytic capacitor. Oh and I threw in the obligatory power LED with a 1K resistor between +5 and the anode.

    Picture of Making the circuit


    As you can see from the photo of my project I just threw it together on a mini breadboard and put it in a high tech enclosure (tupperware with a hole cut in the lid into which I hot glued the speaker).

  • Setting up the Pi to loop sound file at boot

    Eric11/24/2014 at 02:53 0 comments

    Step 1: Get Raspian image.

    Step 2: Burn image to an SD card.

    Step 3: Transfer the fireplace WAV file to the raspberry pi.

    • Set up your Pi with a keyboard and display, and download the file from the internet using a browser running on your Pi.
    • Or, set up your Pi the completely headless way, log in to it, and then use wget to fetch the file. For example:
    wget -O fireplace.wav http://soundbible.com/grab.php?id=1543&type=wav
    • Or (for example, if the audio file you want requires log in to download--like this one from freesound.org which is the one I am actually using), use scp to transfer the sound file to your Pi.

    Step 4: Play sound at boot up, by creating /etc/init.d/fireplace.sh file:

    #!/bin/sh
    while [ true ]; do aplay /home/pi/fireplace.wav; done;

    Now make this file executable:

    sudo chmod 755 /etc/init.d/fireplace.sh

    Now add this script to all the defaut runlevels:

    sudo update-rc.d fireplace.sh defaults

    Reboot and you should be all set!

    If you don't like the volume, you can log in to your Pi and then run the command line mixer:

    alsa-mixer

    The save your settings to a file using the alsactl ("also control") program:

    mkdir ~/.config
     alsactl --file ~/.config/asound.state store

    Then you will want to load these settings before you loop your sound file at boot by editing your fireplace.sh script as follows:

    #!/bin/sh 
    alsactl --file /home/pi/.config/asound.state restore 
    while [ true ]; do aplay /home/pi/fireplace.wav; done;

    Next up: an amplified speaker to hear the sounds.

  • 11/16/14 Watch This Space

    Eric11/17/2014 at 03:49 0 comments

    I have the system up on running, complete with low density polyethylene speaker enclosure (aka "Tupperware"). In the next few days I will post photos and schematic, as well as a run down on how to get your raspberry pi up and running without using an attached keyboard or monitor. This is all old-hat for most of you, but for the uninitiated may be useful for future reference.

    I spent quite a bit of time hunting around for the simplest possible amplifier that would run off of 5 volts. There are lots of examples of suitable Class A amplifiers out there, but I wanted a Class B amplifier to reduce the quiescent current draw on the Raspi. Most Class B amplifiers seemed to be designed for higher voltages, but I found a nice example of the simplest conceivable low voltage class B amplifier here:

    http://www.instructables.com/id/Rechargable-pocket-sized-amplifier/

    (The author there further cites "Lupin, introduccion a la electronica", but I am not sure at this moment what exactly that is.)

    Class B amplifiers can distort low amplitude components of the audio signal due to "crossover distortion"--i.e, the signal is neith positive enough to push nor negative enough to pull, remembering that transistors do not conduct at all when the base voltage is < 0.7 volts. But in this case, any distortion just adds to the ambience. A class AB amplifier would be better (it uses a bias voltage to ensure that at any given moment on or the other transistor is in the conduction zone), but would nearly double my part count!

    I found a very nice tutorial on amplifier basics here:

    http://www.electronics-tutorials.ws/amplifier/amp_6.html

View all 3 project logs

Enjoy this project?

Share

Discussions

Similar Projects

Does this project spark your interest?

Become a member to follow this project and never miss any updates