Close
0%
0%

LETL trigger

Handy Long Exposure (LE) and Time Lapse (TL) photography trigger with trinket.

Similar projects worth following
I have recently gained interest in Long Exposure and Time Lapse photography. So i decided to make a trigger that will help me with shooting those two types of photography.
Long Exposure photo is a photo made with long-duration shutter speed. Shutter speed is time when shutter is open and light can make it to the sensor. In long exposure this times can be from 30 seconds up to few minutes. Problem is that most cameras slowest shutter speed is 30 seconds for longer exposures you have to use remote trigger.
Time Lapse photography is shooting multiple photos over time, for example you take one photo every 5 second for an hour. Then you playback all those photos at movie speed (24 fps) and you get a really speed up movie long 30 seconds.
Trigger uses 16x2 lcd screen with few buttons to navigate. It has user interface with few different modes to input parameters for a shoot.

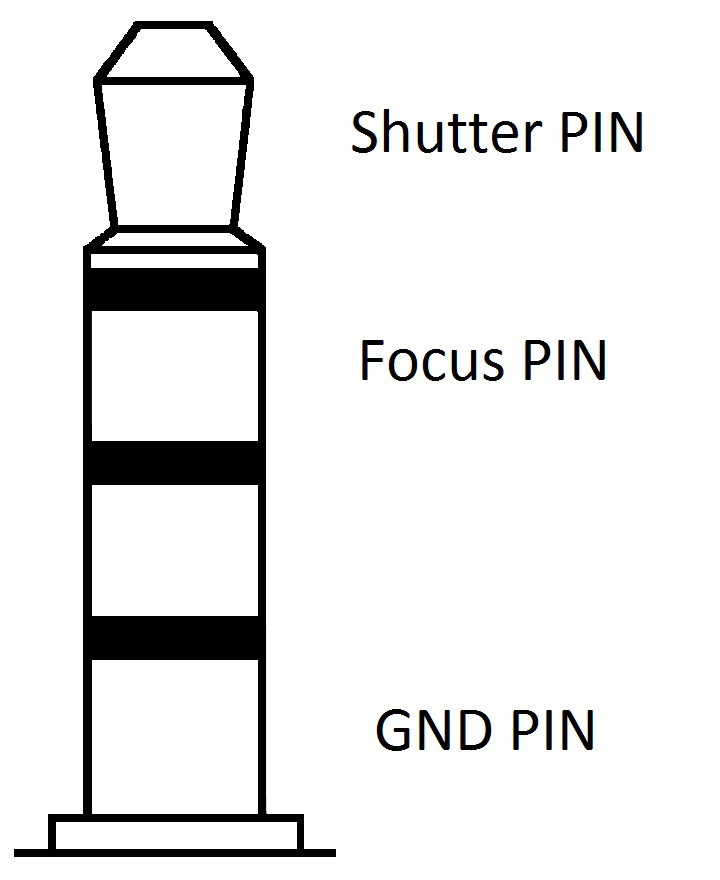
So a few basic principles how triggering the camera works. I have a cable that connect to camera and on the other side has a standard 4 pin 2.5 mm plug. On a image you can see which pin is good for what. So if you want to focus you have to connect pin focus and ground pin. For triggering the shutter you have to connect both focus and shutter pin to the ground (it is advised to always connect to ground via some resistor).

4pin 2.5mm plug

  • 1 × Adafruit Pro Trinket 3V
  • 1 × 16x2 LCD display
  • 4 × Tactile button Buttons for interface
  • 1 × Cable for camera communication Appropriate cable for your camera. I will reuse a cable form remote trigger. (2.5mm plug on one size and Nikon RS-N3 connector on the other)
  • 1 × Transistor For triggering the shutter.

View all 6 components

  • Let's start =)

    kamerman12/01/2014 at 23:22 0 comments

    Let's see what did i start with? Well technically I started with submitting project on hackaday so this is the next thing i did. Since I am waiting for my trinket pro I started with designing user interface.

    I believe that user interface is of the most important things that make a product desirable. There will probably be a lot of different designs along the way but you have to start somewhere. User will have 4 buttons to navigate - increase, decrease, back, next. There will be a few different modes to use. I am thinking of having 2 different modes for long exposure and 2 for time lapse.

    Long exposure mode one will be fairly simple. You will simply input the time you want the shutter to stay open. The problem with this mode is that you will have to manually calculate how much time you need shutter to stay open.

    Long exposure mode two will be a little more helpful. In this mode you will enter shutter speed that is shown on your camera. Then you will enter in the "stop" value of your ND filter (for achieving longer exposures we use ND filters). For example if your camera shutter speed without filter is 1/15 s and you have a 10 stop filter the correct exposure will be 60 seconds long. So instead of manual calculating (like mode one) all the calculating will be done by trigger.

    Time lapse modes are a little more complicated. There are few parameters in shooting time lapse. We need to know how may photographs we want. We determine that by how long our final video need to be and by frame rate it will be played. So the equation looks like this.

    \color{White} \large \color{White} \large number\ of\ photos = video\ time * video\ fps

    Now we know how many photos we need. We just need to know how fast do we shoot them. For example maybe 1 photo per 4 seconds. That is determined with how long we want to shoot. We got one more equation coming up.

    \color{White} \large \color{White} \large number\ of\ photos = real\ time * photo\ fps

    For example we want to make a 10 second video clip from 20 minutes scene. Our video will be played with 24 fps. With that we calculate that we need 240 photos and we need to shoot them 0.2 fps (one frame every 5 seconds). Okay enough math. As you can see there are a lot of different possibility for which parameters to input. Two most logical to me are described next.

    Time lapse mode one will not demand the knowledge how time lapse work. You will simply insert your target video time (video fps will be fixed at 24 fps) and for how long you want to photograph.

    Time lapse mode two will accept number of photos you want and the duration you want to shoot. There maybe additional mode with number of photos and photo fps for input.

    That's pretty much it for now =).

    PS. If you really read all that here is a long exposure photo for you to enjoy =)


View project log

Enjoy this project?

Share

Discussions

Similar Projects

Does this project spark your interest?

Become a member to follow this project and never miss any updates