 Brandon Piner
I want to be able to make really good looking PCBs at home. One of the missing elements is adding a solder mask.
Adding a solder mask from paint requires curing it with UV light. The trick is to black out the pads so that it is not exposed and therefore does not cure. I have not had much success with this method. But I saw a video (linked below - skip to 3:23) where an engraving tool was spring loaded to only apply a light pressure when engraving. This was then used to engrave away the solder mask where the pads should be exposed.
I have never been able to spring load my engraving bit so I decided to try and design a tool that allows engraving bits to be spring loaded. I decided to 3D print the part but it would be best if I could turn it on a lathe and mill.
This is the design I have come to test:
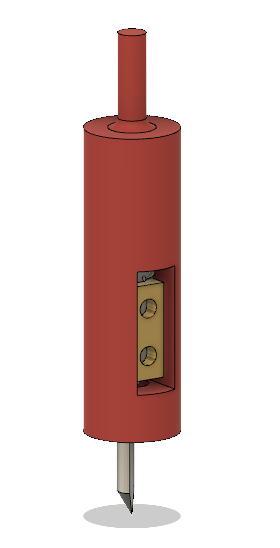
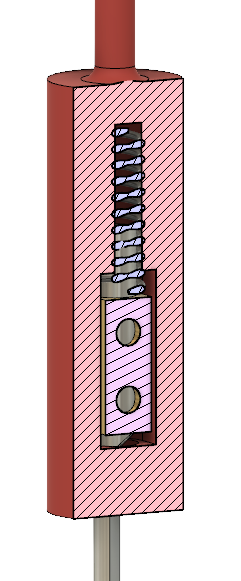
It is more clear from the cross section view. I am using the clamp from a terminal block to hold the engraving bit. I used a pen spring to push down on the terminal block clamp.
Go to 3:23 of the below video to see what the aim is
Discussions
Become a Hackaday.io Member
Create an account to leave a comment. Already have an account? Log In.
I manage to make this with a old antenna and a spring.. the spring is from a broken RC car.. here are some pics https://www.dropbox.com/sh/1g0jo671uspmwwm/AAAl1pNNaacWUVJqWNjTNvioa?dl=0 (this was just the prove of concept. ) my spindle is big for a pcb so this might not work for everyone..
Are you sure? yes | no
Found this video, probably this is a better way to build one https://www.youtube.com/watch?v=wr7l67sd3NM
Are you sure? yes | no
This idea is pretty good. I was also looking for a way to replicate the results in the video you've shared on my cheap Chinese CNC3018.
Since I was not able to find the 3D models and because I had different pars I replicated it adapting your idea for my needs.
I didn't have the terminal block to get the clamp since we are in quarantine days. But I had the original drill chuck without the originals (headless) socket set-screw. I am using screws with fillister head. They are bigger than the chuck, so I had to cut vertical spaces to be able to add the screws and to let the chuck move free in the Z-axis.
These big head screws made the whole difference because they restrict the drill chuck movements in the Z-axis only. I put this first version of the 3D model in the Thingiverse.com if anyone wants to give it a try.
I didn't try to use it yet maybe it will need some improvements as usual. The current version is here https://www.thingiverse.com/thing:4252330
Are you sure? yes | no
@John McNelly any luck with 7mm engraver bit holder? I also just ordered one from ebay, however only have er8 collet directly integrated with bldc spindle motor, so mounting will be another problem. Tired from constant wear of cheap engraving mills during relatively long pcb routing, where height map doesn't help much, so plan to use this holder for isolation milling as well.
Are you sure? yes | no
Hello, I came across this post searching for the same problem solution.
How about using two clamps ? - one for the engraving tool, second for the motor shaft. The claps would be connected by the spring and additional loose shaft for the stability. The clamps movement axis would be limited by the tool housing. Makes sense ?
Are you sure? yes | no
Any update on this? I am also interested to try this with my 1610.
Are you sure? yes | no
How did this work out for you? I'm tempted to try it but I'm assuming it would break right where the collet attaches, since the layer adhesion in the plastic is pretty weak.
Are you sure? yes | no
The issue I had was that it is unbalanced due to using a bolt to attach it which caused too much wobble
I did try balance it with another bolt but it did not balance it sufficiently.
I have put it on the backburner for now until I get a new idea of how to achieve this
If you have suggestions or if you come up with one then please let me know
P.S. I think I changed the design to not have a printed collet but rather to put a 3mm rod into it so layer adhesion was not an issue
Are you sure? yes | no
Ah that makes sense. I think you might be able to mitigate the weak point by mounting a stainless steel shaft in the chuck and then building a 3d printed attachment around the shaft.
I just ordered a 7mm spring engraver from eBay and a 7mm" ER11 collet to try using a legit spring engraver with my 1610. I'm currently back to masking pads with printed transparency masks, which works well. Hopefully the spring engraver can cut down on some of the setup time though--printing and layering transparencies takes a while.
Are you sure? yes | no