Networking Group Timing Light
A mini timing light to keep introductions brief and on task.
A mini timing light to keep introductions brief and on task.
To make the experience fit your profile, pick a username and tell us what interests you.
We found and based on your interests.
Last Wednesday I used the timer light in my networking group for the first time.
The group really liked it. I had a number of people asking if I would sell them for other groups (including one person wanting one for their pastor at church) or make ones with variable times[1], etc.
Sadly the power dropped too low about 2/3 of the way around the table[2] and the light stopped working.
Next up will be using a LiPo battery pack and lowering the brightness of the light to extend time.
And the schematic
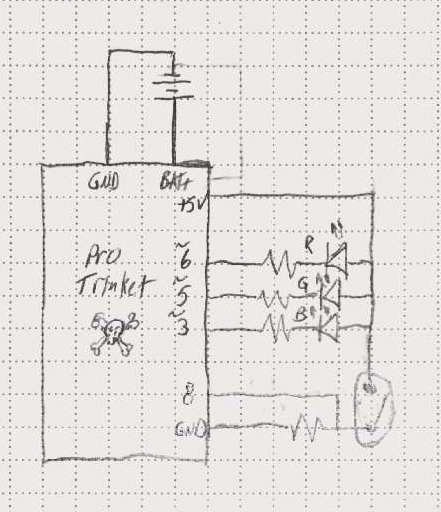
Here is the code:
/*

  Networking Group Timer

  Created by: Chad Lawson <chad@origamirocket.com>
  Version: 1.0

*/

// Assign the LEDs to pins
#define RED 6
#define GREEN 5
#define BLUE 3
#define TILT 8

// Assign times to the colors
#define gTime 60
#define yTime 90
#define rTime 120
#define BOUNCE 60

// Since we are using a CA LED we need to work backwards
#define COMMON_ANODE

// Define our variables
long start;
boolean running = true;
boolean tiltState;
int bounceCheck = 0;

void setup() {
  pinMode(RED, OUTPUT);
  pinMode(GREEN, OUTPUT);
  pinMode(BLUE, OUTPUT);
  pinMode(TILT, INPUT);

  // Initialize our timer
  setColor(0,0,0);
  start = millis();

  // Let's try it
  Serial.begin(9600);
  Serial.println("Let's go!");

} // setup

void loop() {

  tiltState = digitalRead(TILT);
  if(tiltState == LOW)
  {
    Serial.print("Tilt!: ");
    if(bounceCheck > BOUNCE) {
        running = false;
    } else {
        bounceCheck++;
    }
    Serial.println(bounceCheck);
  } else {
    if(bounceCheck > 0) {
      bounceCheck--;
    }
  }

  if(running == true) {

    int secs = getTime();

    switch(secs) {

      case 0:
        setColor(4,4,4);
        break;

      case gTime:
        setColor(0,255,0);
        break;

      case yTime:
        setColor(128,255,0);
        break;

      case rTime:
        setColor(255,0,0);
        break;

    } // switch

  } // if(running)

  else {

    setColor(128,0,128);
    start = millis();
    running = true;

  } // else

} // loop

int getTime() {
  long delta = millis() - start;
  int secs = delta / 1000;
  return secs;
}

void setColor(int red, int green, int blue)
{
  #ifdef COMMON_ANODE
    red = 255 - red;
    green = 255 - green;
    blue = 255 - blue;
  #endif
  analogWrite(RED, red);
  analogWrite(GREEN, green);
  analogWrite(BLUE, blue);
}

/*
  Version History

  1.0 - Initial Version (141220)

*/
Okay, I forgot to mention a few things in my last update:
I've added a second battery holder. I was going to just use two CR-2016s in the one holder to get up to at least 5v, but I want more time per pair of batteries.
I've added a count up/down limit timer when the device is tilted or not to make sure it doesn't reset when the table gets bumped. Also I have a dim light when it's counting but before the green light as well as a purple light when it's in tilt-reset mode.
I don't get to say those words often enough.
My work bench is littered with half complete projects, but not this one anymore!
The leader of my networking group is excited to see it in action next week.
No sooner did I write my last entry that I saw a flash out of the corner of my eye and the send/receive light on the board started going nuts.
Despite the large rubber feet on the protoboard keeping the wiring away from the tin, it looks like I just shorted across something near the red pin of the RGB led. That side of the LED looks dark and I can't get red to work.
Time to replace the LED and better insulate the underside of the protoboard.
Last night I soldered everything but the tilt switch into place, drilled a hole in my tin for the LED to poke through and polished the code.
The tilt switches are scheduled to arrive today or tomorrow and then I just need to add the switch code to reset the timer.
And then I'm done! Yay!
Now that I have the code all but ready and my tilt switches arrive tomorrow, it's time to start building.
I just couldn't make the Altoids Smalls (been calling them minis) tin work, so I went to a larger tin. With that I chose one of the Penguin caffeinated mint tins I have laying around instead. I grabbed one of my mint-tin protoboards and added the battery holder and female headers for the Trinket. I also placed the LED but haven't soldered it in place until I can drill the hole in the lid and better position it. There are little rubber project feet on the bottom of the board to keep the components from shorting on the inside of the tin.
The Trinket just barely fits height-wise with the use of headers but I just can't bring myself to solder the Trinket directly into a project .
But it's looking good and I have my first photos for the project.
Tomorrow I'll be at my Makerspace working on the enclosure.
On one hand I want to use an Altoids mini tin, but I can't quite get things fitting the way I want.
I could use a standard Altoids tin, but it's bigger than I want and now I have a lot of dead space.
Personally I would like to use a laser cut wooden cube about two inches on each side such that the LED is on "top" and when laid on one side resets, and another turns off; but turned "up" starts counting.
The only issue with that plan is that it is no longer a "everyday carry" size.
Looks like I'll just be sucking it up and putting everything in one of the Altoids tins.
Today I spent time that should have been used in more profitable efforts to tinker with code. It was the only way to get it out of my head.
Using my Uno and Proto Shield along with red, yellow, and green LEDs (and resistors) I mocked up some basic non-delay-based code to check for the presence of the tilt switch (currently hardcoded) and then start changing the lights at the appropriate intervals.
On the plus side it caused a couple of people at my co-working space to come over and ask about it. As people who have been to networking groups like mine with overly long intros, they like the idea.
So a timer for a networking group was the instigator for some networking. Hmmm.
Create an account to leave a comment. Already have an account? Log In.
Would recommend using an ATTINY 85 or 45, as it would be cheaper and be able to run off of 3v only. Then again, you could go all-out with the minimalism and use an ATTINY 10...
What a guy! What a project! and built at the Milwaukee Makerspace! What a place!
Become a member to follow this project and never miss any updates
 pRoFiT

 Drap & Design
 Alan Green
 PointyOintment
Neat idea - once you have more power, perhaps a 2:15 vibrator? (like those pager things that restaurants give you). Not everyone looks down when they speak...