icstation
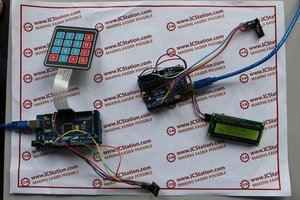
ICStation Team introduce you this PS2 Keyboard read display system in details.The operating voltage of PS2 Keyboard read display system is DC 5V. When you press the keys of letters or numbers, the LCD1602 will display correspondingly and also can control the size of the letters.The advantages of using PS2 keyboard design are the automatic scanning, automatic identification, and automatic coding of the keyboard. Only when you press the keys, the data will be sent out, which reduces the burden of CPU. It is very convenient to use LCD1602 to display. It is a very simple and low-cost analog keyboard display system.
Functions:
1.when you press the keys of letter or number only, the LCD1602 will display the letter or number correspondingly.
2.when you press the keys of shift plus letter together,the LCD1602 will display the capital letter.
Step 1: Components List

1.ICStation ATMEGA2560 Mega2560 R3 Board Compatible Arduino
2.830 Point Solderless PCB Bread Board MB-102 Test DIY
3.1602A HD44780 Character LCD Display Module LCM Blue Backlight
4.PS2 keyboard
5.Breadboard Plug Wire Cable Tire
6.Dupont 20cm Color Cable Line
The material of the related module :1602A HD44780 Character LCD Display Module
http://www.icstation.com/ebay/IC/All%20data%20modules/1419.zip
Step 2: Hardware schematic diagram

Step 3: Hardware making graphic tutorials

Draw forth the power line and ground wire from ICStation Mega 2560 development board. And the red breadboard plug wire is the power line and black one is the ground wire.
Step 4: Decompose 16 pins

Step 5: Weld LCD1602

Weld the pins which have been decomposed to LCD1602
Step 6: Connect the LCD1602 to the bread board

Put the welded LCD1602 into the bread board.
Step 7: Connect the the cathode and anode to the public cathode and anode.
 According to the schematic diagram,connect the pin 1 and pin 16 to the cathode and connect the pin 2 and pin 15 to the anode.The black represents cathode and the red represents anode.
Step 8: Place the slide rheostat


Connect the pin 1 of slide rheostat to the cathode and pin 3 to the anode, pin 2 to connect the pin 3 of LCD 1602
Step 9: Connection diagram of Slide rheostat

Note: By adjusting the slide rheostat to control the brightness of LCD
Step 10: Connect the pin5 of 1602LCD to the ground

Step 11: Connect the 1602LCD to the Mega 2560


Connect the pin 4 and pin 6 of 1602LCD respectively to the pin12 and pin 11 of ICStaion Mega 2560
Connect the pin 14、13、12、11 of 1602LCD respectively to the pin 5、4、3、2 of the ICStation Mega 2560
Step 12: Schematic diagram of PS2 keyboard port

Connect the SDA port and SCL port of PS2 ports respectively to the pin 8、9 of the ICStation Mega 2560
NC represent no connection
Step 13: PS2 keyboard interface connection

Step 14: Connect the port SDA and SCL of the PS2 keyboard to the ICStation Mega

Step 15: Connect the PS2 keyboard to the bread board


According to the schematic diagram and PS2 keyboard port diagram, connect the cathode and anode of the PS2 keyboard to the cathode and anode of breadboard
Step 16: Experimental Effect (Provided code)


Program code:
http://www.icstation.com/newsletter/eMarketing/jianpan.txt
 hx-20
hx-20