 Patrick McDonnell
What I wanted was simple: a small device that would measure how much current a circuit was using and send that data to a web database where it could be viewed through a web interface. It sounded simple enough at the time, but of course when you're dealing with electronics nothing works right the first time.
 I always play around in EagleCAD, designing boards and hardware for things I know I'll never actually get around to making. It was just another way to pass time if I was board. Because of this, I was well prepared to lay out a simple board that connected the ATMega328P-PU chip to both the clip-on sensor and the ESP8266. It took me about 15 minutes to get a first-revision board done.
In hindsight I probably should have paid a bit more attention while making the boards. When they arrived, I noticed that I had the footprint for my voltage regulator backwards. Unfortunately, I didn't notice this until after I fried the regulator that had just taken a week to ship. After ordering six more just to be safe, I tried to think up a solution that didn't require me waiting another month to get more boards from china made.
The fix was stupidly simple. If you flipped the SO-223 package upside down, the pins aligned properly with the Vin, Vout, and GND pads. I grabbed my pliars and bent all the pins backward, and when I plugged it in this time the magic smoke stayed inside the regulator and the leds sprang to life.
Now that I had a working module, it was on to the website.
 Web design was another one of my hobbies that never really went anywhere. Using the amazing highcharts system along with MySQL and javascript, I had a working graph in a day and a nice-looking interface soon afterwards. For now, the website only displays data for a single module, but I plan on changing it in the future to support an unlimited number of sensors.
Not much security has been implemented for the website at this point, as it is a local site and is not accessible from the internet. All the protection comes from the security of whatever network you are running the board on. Additionally, there is no protection implemented yet for the communication between sensor and website, and anyone on the network with a computer could very easily impersonate the sensor to send data.
For the most part, though, the website does what I need it to do. Everything in this project is still in very early testing stages and the whole thing is one big learning experience.
Of course, what's a beautiful board and website without beautiful firmware to go with it?

The firmware for the board is the youngest part of the project. While basic features like wifi communication have been fully implemented and working since the initial flashes, things like power measurement and accurate calculation of current are still barely implemented and barely functional.

The ESP8266 makes wifi communication really, super easy. I was able to get connected and communicating with the module in about five minutes, and I was able to send data to the monitor website within an hour. The ESP8266 uses AT commands for all of its communication, and unlike when I started using the module there are now heaps of different documentations for anything and everything about this module.

There are many, many things that I would love to include in this project. I keep coming up with more features, more ideas, and more things I could mess around with. The only thing stopping me is my lack of free time.
Here are a few of the planned features:
- Encrypted/more secure module communication
- Support for multiple modules on one web panel
- Support for more measurement options - frequency, power factor, and voltage
- Battery-powered version for easier setup / charging via power line?
Thanks for reading! Feel free to leave comments, suggestions, and point out anything I'm doing badly wrong.


 Yann Guidon / YGDES
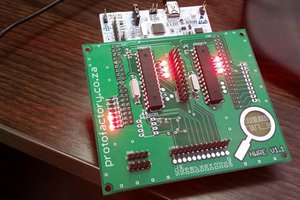
 Tom Van den Bon
 David Spinden
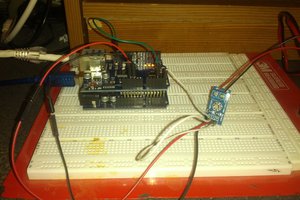
 Gary
Gary
please make a fuzix os on esp and make a week working time in one charge