 blorgggg
Introduction
Fabricating a Stroke Sensor
A Stroke Sensor is a device that responds to your touch, with the nice soft feeling of fabric and yarn. You can use it to add plush controls for your Mod that can be embedded in your clothing or even stuffed animals. This is adapted from Hannah Perner-Wilson and Mika Satomi's work at Kobakant. The sensor allows individuals to rub, stroke, squeeze, brush, and even pat in order to distribute corresponding vibrations to your Mod. Swivel your fingers through this furry sensing device and witness the variation in vibration intensity transmitted to your dildo!
Tools & Materials
Tools
- Scissors
- Sewing Needle
Materials
- Conductive Thread – We used yarn but reccomend against it. It makes the sensor less responsive (unless this is something you want from it)
- Resistive Thread
- Stretch Conductive Fabric
- Substrate for sensor (Could be your clothing, a carpet, a stuffed animal – we used a Foam Board 1.5mm thickness)
- Resistor
- 2 Wires
- 2 Double Alligator Clip Test Leads
- Breadboard
- USB Breakout Board
- USB Cable
Making the Sensor
Conductive Thread, Resistive Thread, Conductive Fabric, Foam SheetThe first step in using your Stroke Sensor is to actually create the sensor itself! By following the steps below, you will be able to create your device with a great deal of ease.
NOTE: in this how-to we show how to make the sensor with Yarn as the non-conductive part in-between. After a while though, the yarn can kinda stick together and stop it from working as well. Better designs would be to use normal thread for the non-conductive area in-between.
1) Cut Foam SheetBegin fabricating your sensor by taking a sheet of foam sheet, cutting it to the desired size that you want your sensing device to be.
2) Placing FabricCut two pieces of conductive fabric. Then take both pieces of stretch conductive fabric, stacking them atop of one another to allow for equally cut strips to be made of the two materials. Make sure to cut their size to fit within your foam's shape. The strips of conductive fabric will go on opposing sides of the foam surface area you previously cut.
3) Threading NeedleTo thread your needle, begin by taking your conductive thread and sticking it through the eye of your needle. Keep in mind that we will be performing a double stitching method. This stitching method involves stitching two strands of thread at a time, allowing us to conserve our efforts.
Make sure to continue pulling the thread through your needle so that it's long enough to stitch the entire side of one of the conductive fabric pieces to the cut foam sheet.
4) Sewing Conductive ThreadBegin stitching your conductive thread along your first conductive fabric piece. Make sure to stitch completely across the foam sheet and conductive fabric, leaving about an inch and a half of thread slack on the front side of the sensor (opposite side of conductive fabric). It should look like hair follicles sticking out!
Continue to stitch across the foam in this fashion until the total surface area of the conductive fabric is fully fastened to your foam. Repeat this step for the second strip of conductive fabric that will be on the other side of your sensor. Make sure to cut the loops that were made when sewing to make individual thread strands.
5) Sewing Resistive ThreadAfter sewing your conductive fabric with conductive thread, you will then take your resistive thread (we used yarn!) and sew the negative spaces of the foam sheet. Make sure that the resistive thread and conductive thread are close in proximity, allowing the yarn to occupy the rest of the foam sensor space.
Constructing Circuit
Resistor, Wires, Alligator Clips, Bread Board, Breakout Board
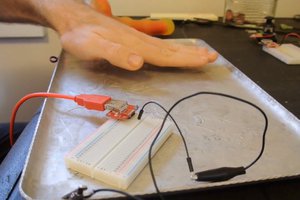
1) Alligator ClipsAttach both alligator clips to each side of your sensing device. Make sure that the clips make contact with conductive fabric. Set this piece to the side — you will be using it again very soon!
2) Setting Up BreadboardTake your breakout board and mount to the top of your breadboard. Next, you will take...
Read more »


 Michael O'Toole
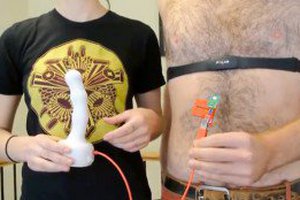
 CaptMcAllister