 Orlando Hoilett
From Sunday, January 19, 2015
After doing some work on the continuous heart rate monitor and hitting a dead end, I started working on placing a pedometer on my wrist. I had previously written some code for an Arduino pedometer, so I moved my Arduino pedometer from my waist to my wrist. It appeared to work out well. I was a little nervous about decoupling the movement of my arm from the movement of my body. While I am actually walking, this should not be a problem. But, while not walking, but simply moving my arm, the current code will not work.
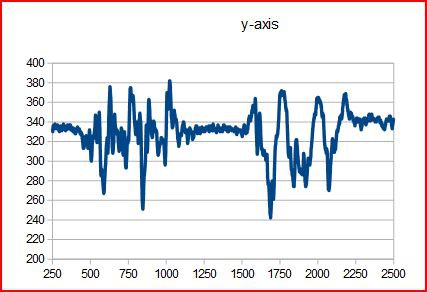
There are 5 "zones" in this data. The first is me being still, then walking forward 4 steps without swinging my arms, then me being still, then walking forward 4 steps while swinging my arms, then me being still.
My accelerometer data is not as clean as I thought it would be and I am not entirely sure why. I may need a new module or something.
/*
  FILENAME:   pedometer_V_0_1_0.ino
  AUTHOR:     Orlando S. Hoilett
  EMAIL:      orlandohoilett@gmail.com
  WEBSITE:    http://www.instructables.com/member/ohoilett/
              http://hackaday.io/orlandohoilett
              https://www.youtube.com/user/shoilett1
  VERSION:    0.1.0

  AFFILIATIONS:
  Calvary Engineering Family Group, USA
    - a group of DIY enthusiasts

  UPDATES:
  Version 0.0.0
  06/21/2014:1654>
              Uses a simplified algorithm to detect steps. Right
              now, we are using thresholding to determine a step.
              Right now, that's an AC signal of 40 raw ADC. The
              sampling period for a step is 600 ms. Used an op
              amp (MCP6002) in non-inverting configuration with a
              gain of 1.5.
  Version 0.1.0
  08/16/2014:1736>
              Changed thresholding to 70 raw ADC and sampling
              period of 800 ms. A non-inverting op amp (MCP6002)
              with a gain of 2 was used. Also added Bluetooth
              functionality to help in ES140 demo.

  DESCRIPTION
  This program is the backbone of a pedometer. It detects steps
  by changes in acceleration as a person is walking.

  Citations:
  1.  Jef Neefs (neefs@gmail.com) and Jeroen Doggen
      (jeroendogeen@gmail.com) for their AcceleroMMA7361 library.
  2.  HobbyComponents.com for Bluetooth code snippets
      FILE:    ARD_BLUETOOTH_SERIAL_MODULE_HCARDU0004_Example.pde
      DATE:    17/07/12
      VERSION: 0.2

  DISCLAIMER
  This code is in the public domain. Please feel free to modify,
  use, etc however you see fit. But, please give reference to
  original authors as a courtesy to Open Source developers.

*/


//library include
#include <AcceleroMMA7361.h>

//initializes pedometer object
AcceleroMMA7361 myPedometer;
int x;
int y;
int z;

int maxVal = 0;
int minVal = 1023;

int array[10];

int index = 0;

unsigned long tCalib = 0;
unsigned long tOld = 0;
unsigned long tNew = 0;

int steps = 0;

const int CALIB_TIME = 5000;

const int threshold = 50; //change in Z acceleration
const int samplingFreq = 600; //milliseconds


//Code for Blueooth functionality
#include <SoftwareSerial.h>
//DIO used to communicate with the Bluetooth module's TXD pin
#define BT_SERIAL_TX_DIO 10
//DIO used to communicate with the Bluetooth module's RXD pin
#define BT_SERIAL_RX_DIO 11

//Initialise the software serial port
SoftwareSerial BluetoothSerial(BT_SERIAL_TX_DIO, BT_SERIAL_RX_DIO);


void setup()
{
  Serial.begin(9600);
  BluetoothSerial.begin(57600);

  //sleepPin, selfTestPin, zeroGPin, gSelectPin, xPin, yPin, zPin
  //functions depending on which version I am using
  myPedometer.begin(3, 12, 5, 4, A0, A1, A2);
  //myPedometer.begin(10, 12, 10, 9, A0, A1, A3);


  myPedometer.setARefVoltage(5); //sets the AREF voltage to 3.3V
  myPedometer.setSensitivity(HIGH); //sets the sensitivity to +/-6G
  myPedometer.calibrate();

//  Serial.println("Calibrating pedometer.");
//  while (tCalib < CALIB_TIME) {
//  }
}

void loop()
{
  tNew = millis();
  x = myPedometer.getXRaw();
  y = myPedometer.getYRaw();
  z = myPedometer.getZRaw();

  if (z > maxVal) {
    maxVal = z;
  }

  if (z < minVal) {
    minVal = z;
  }

  if ((tNew - tOld) >= samplingFreq) {
    if ((maxVal - minVal) >= threshold) {
      steps++;
    }
    tOld = tNew;
    minVal = 1023;
    maxVal = 0;
  }

//  Serial.print(x);
//  Serial.print(",");
//  Serial.print(y);
//  Serial.print(",");
//  Serial.print(z);
//  Serial.print(",");
//  Serial.print(steps);
//  Serial.print(",");
//  Serial.println(tNew);

  BluetoothSerial.print(x);
  BluetoothSerial.print(",");
  BluetoothSerial.print(y);
  BluetoothSerial.print(",");
  BluetoothSerial.print(z);
  BluetoothSerial.print(",");
  BluetoothSerial.print(steps);
  BluetoothSerial.print(",");
  BluetoothSerial.println(tNew);

  if (Serial.read() == '0') {
    Serial.end();
  }

}
Discussions
Become a Hackaday.io Member
Create an account to leave a comment. Already have an account? Log In.
Could you please explain the algorithm? what does the following code do ?
if (z > maxVal) {
maxVal = z;
}
if (z < minVal) {
minVal = z;
}
if ((tNew - tOld) >= samplingFreq) {
if ((maxVal - minVal) >= threshold) {
steps++;
}
tOld = tNew;
minVal = 1023;
maxVal = 0;
Are you sure? yes | no