Close
0%
0%

Arduino openHAB Garage Door Control

Make a smart garage door opener using an Arduino Yun and OpenHAB

Similar projects worth following
openHAB is a great platform for interfacing with Internet of Things stuff. This project explores using openHAB and an Arduino Yun to activate a garage door opener, monitor the door's open/closed status and measure temperature.

So, my garage door opener stinks. The range is horrible. The battery always seems low. It can't tell me if the door is open or closed. It's not smart! I am, however, should be smart enough to replace it with a uber garage door opener/closer device.

Let's build a garage door controller that can make intelligent decisions. And actually open the door when I want it to.

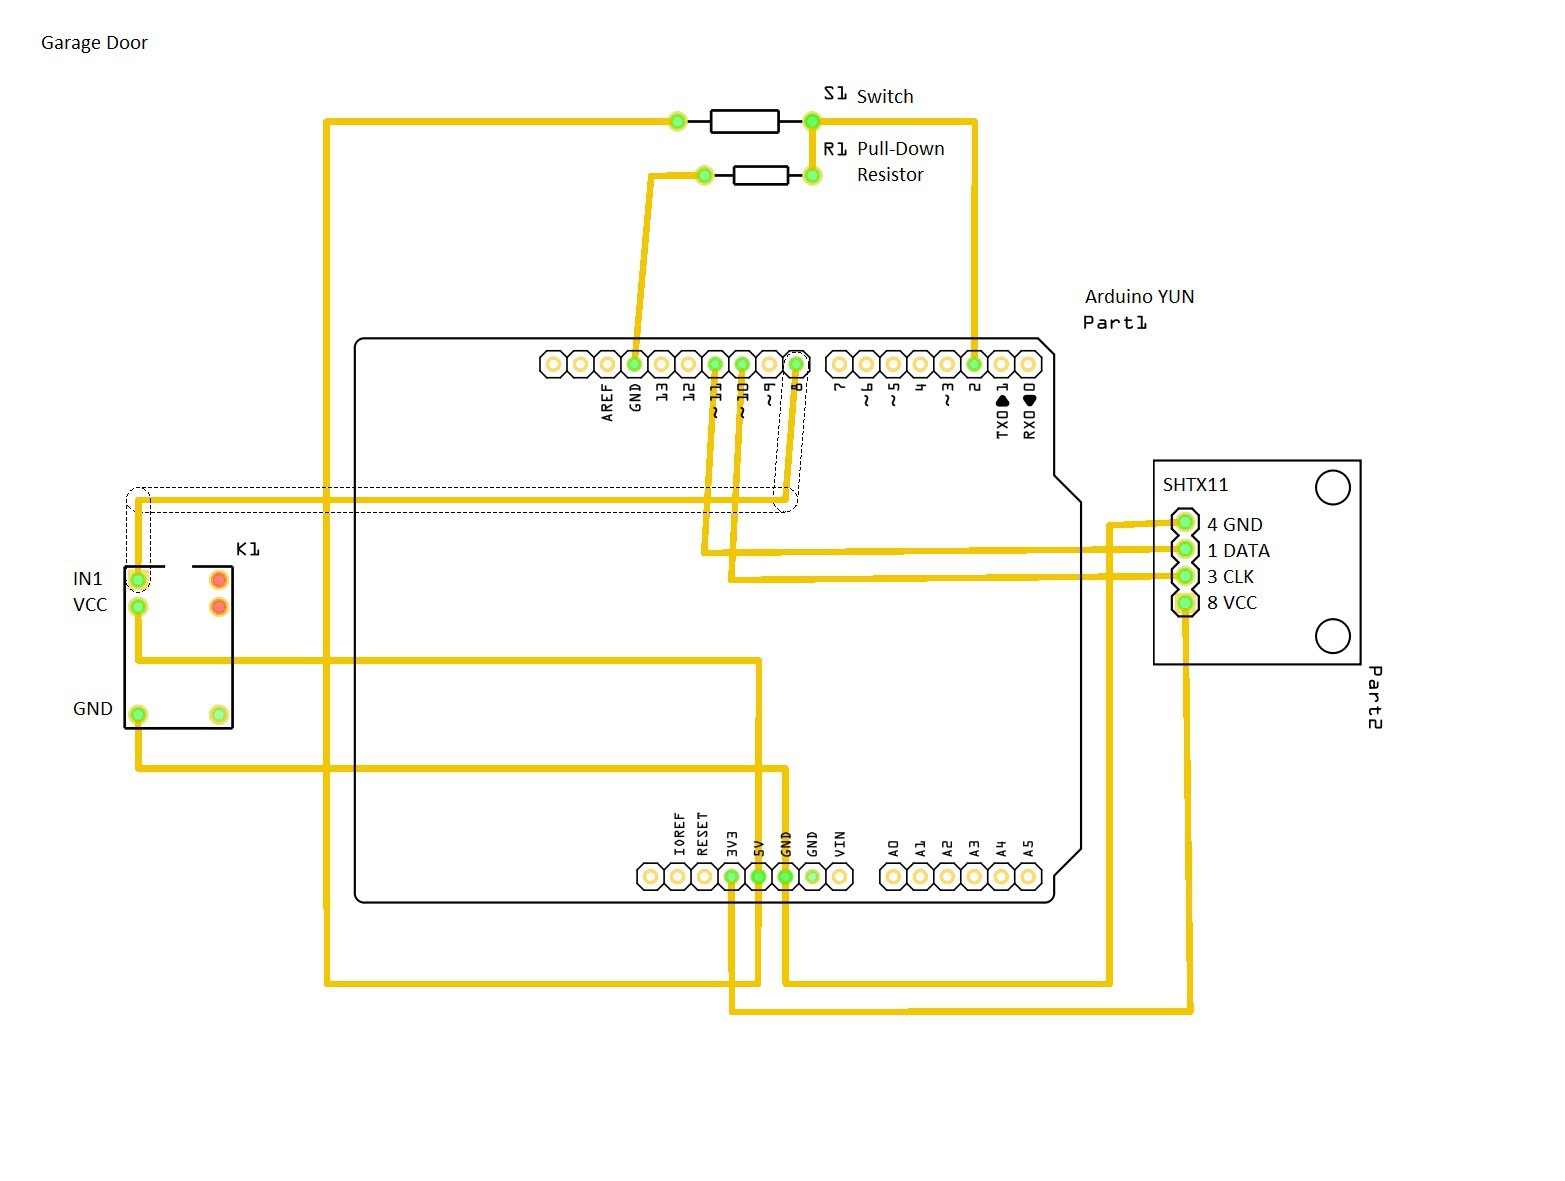
With an Arduino and openHAB, we can build a system that will allow for monitoring and control of the door from a webpage or mobile device. The main elements look like this:

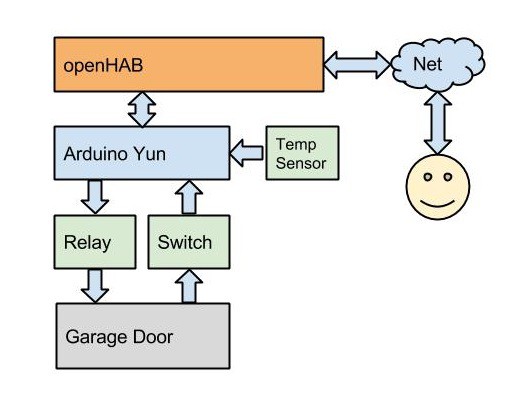
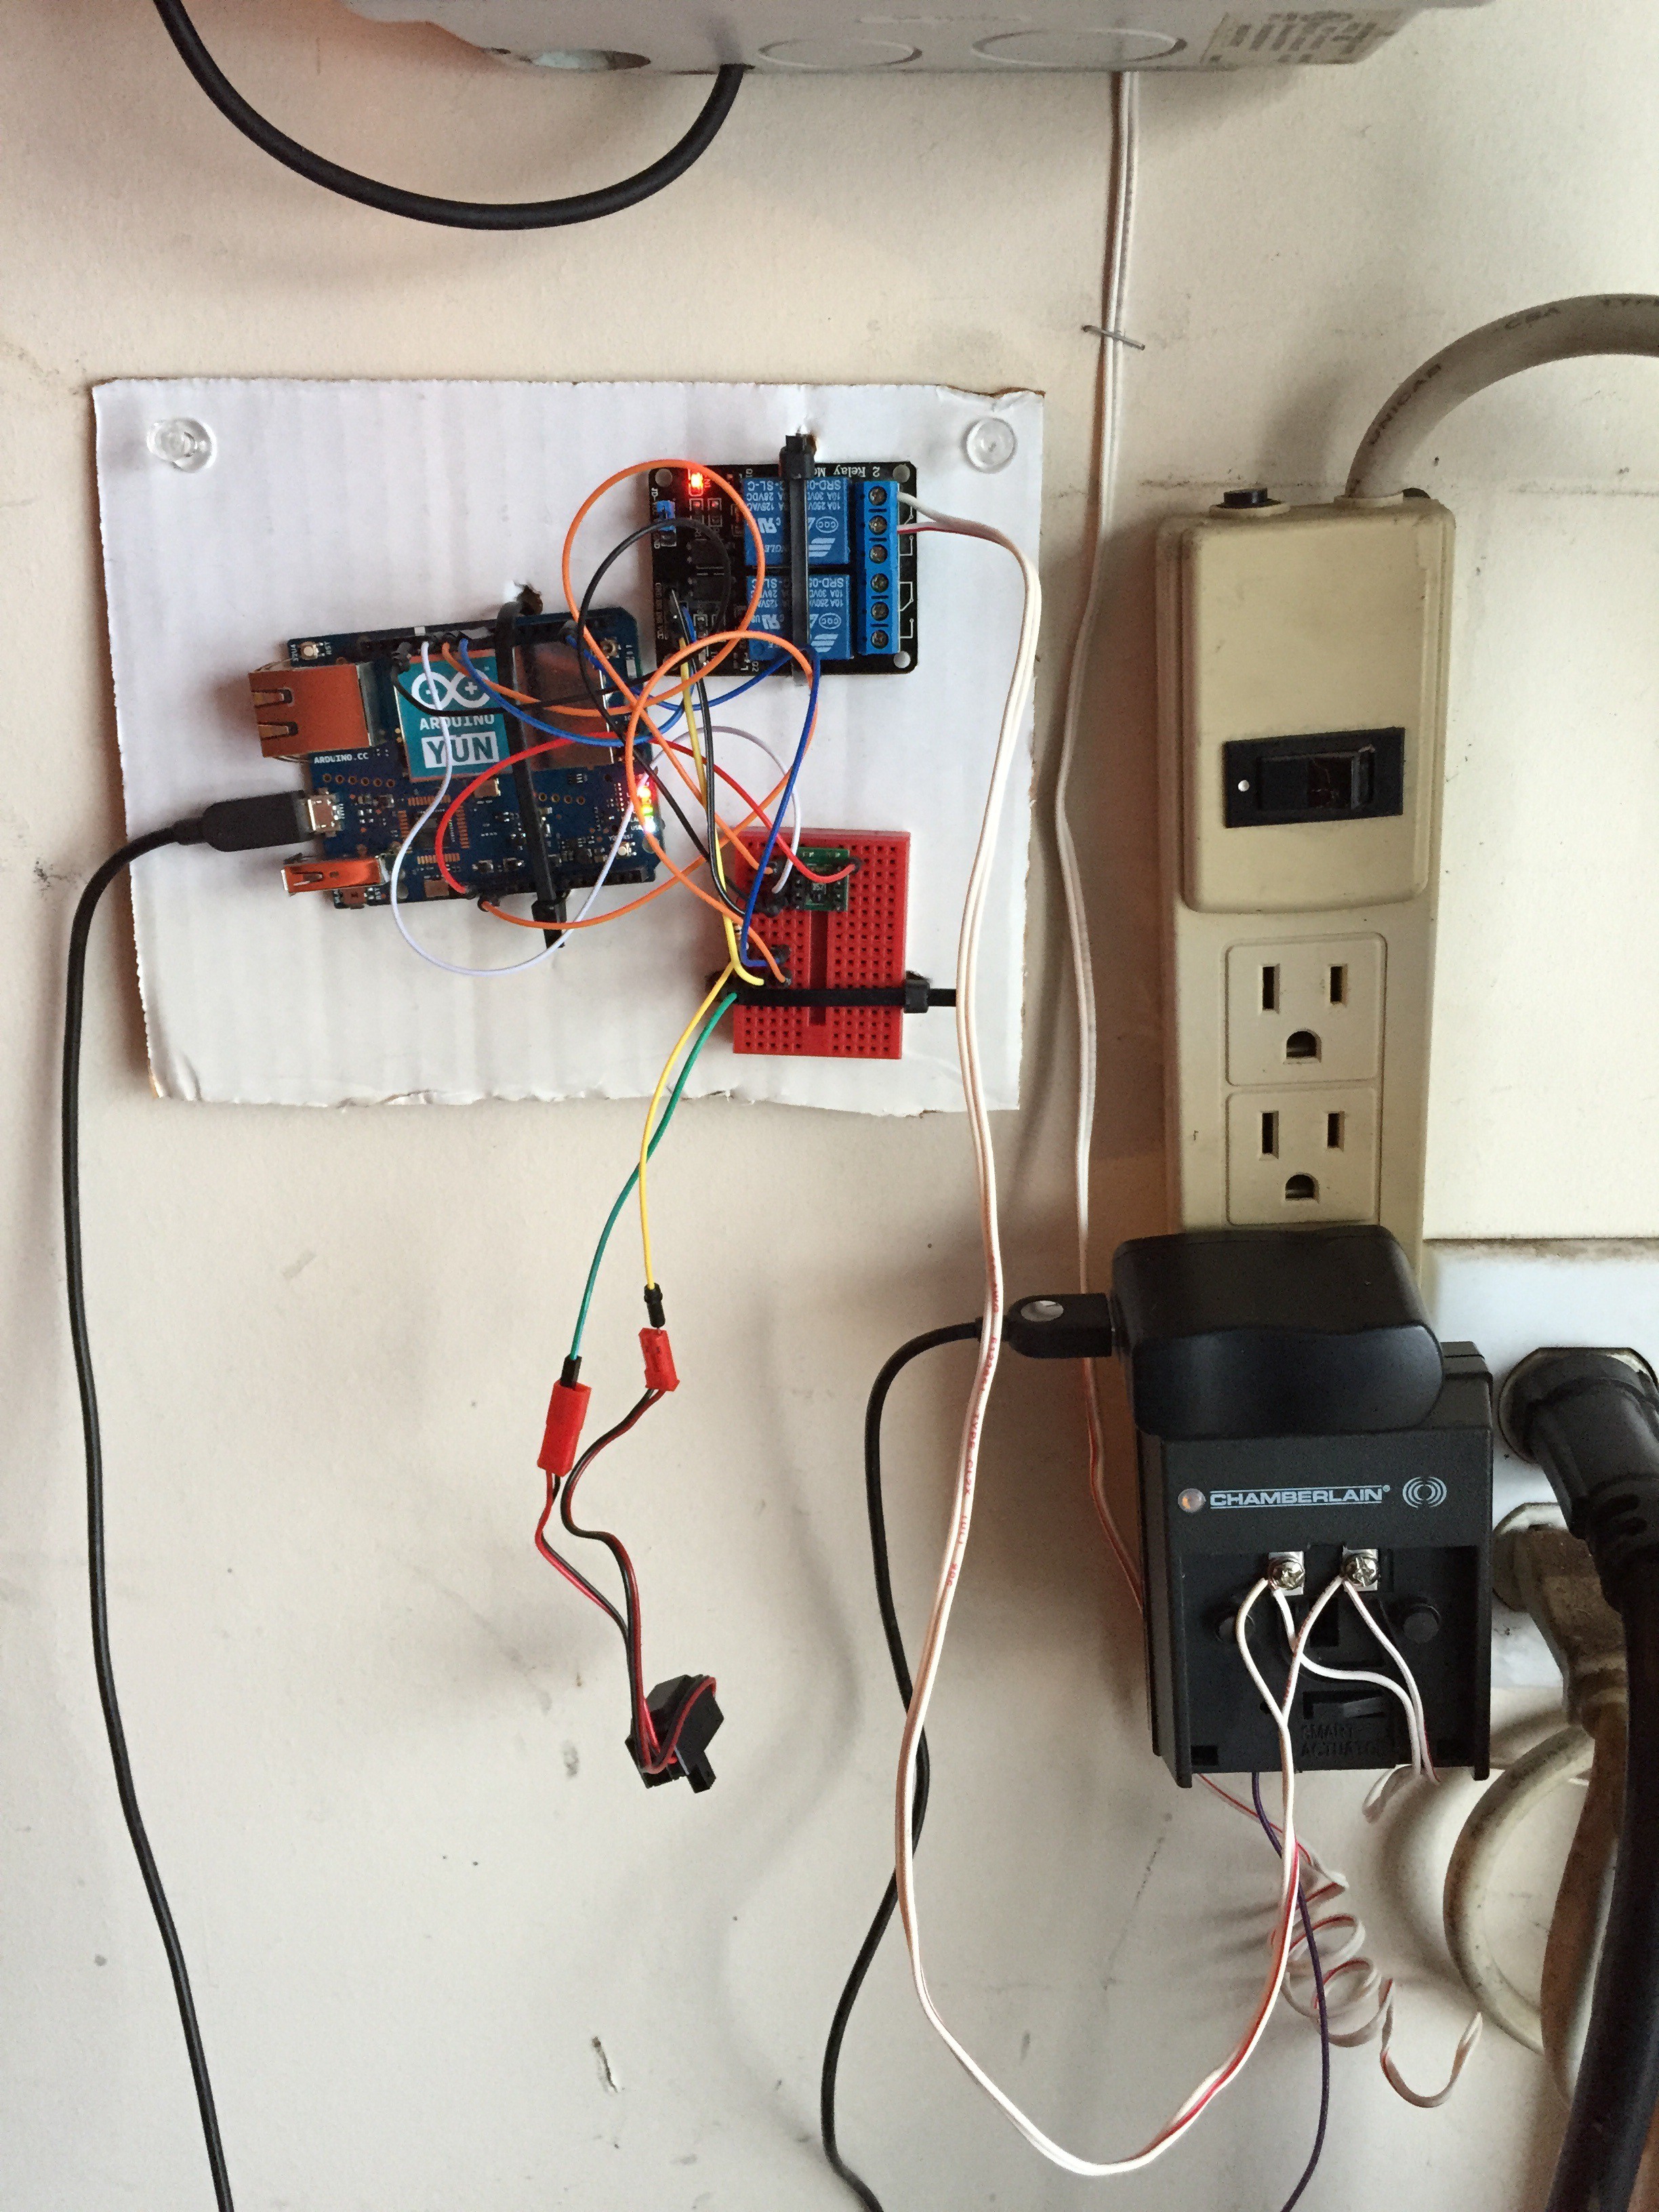
The Arduino Yun is used to:

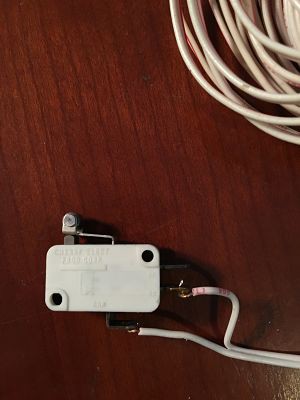
  • Monitor status of switch to show if garage door is open or closed
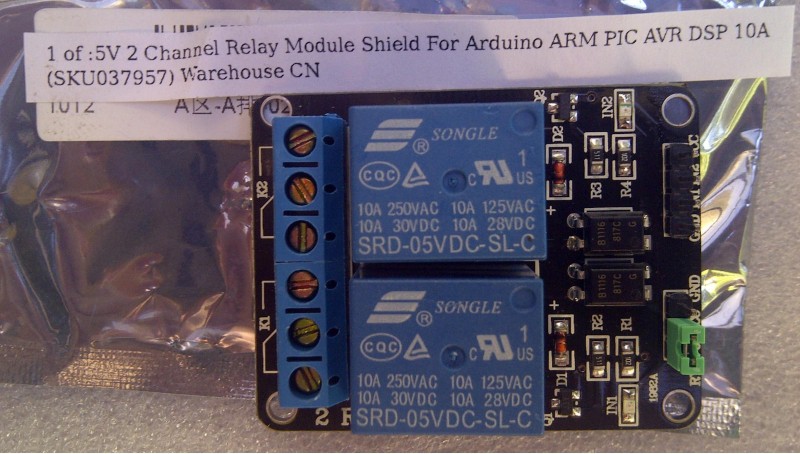
  • Activate a relay to effectively push the garage door button
  • Monitor temperature sensor

openHab is used to:

  • send/receive messages from the yun
  • send/receive messages from user via network
  • Process rules
  • maintain trending data for display

    • Version 2 in the works

      Pete Hoffswell02/13/2015 at 02:39 0 comments

      I have been working on a version 2 of this system that uses a low cost esp8266 wifi module -

      http://kayakpete.tumblr.com/post/110860425884/garage-door-controller-with-esp8266-running

      You can see the garage door sensor simulated as a push button in this picture. The board to the left is a USB to TTL serial converter used to program the ESP-01 esp8266 module. The relay is above, and a power supply on the right.

      I am running NodeMCU on the ESP01, but it is crashy.


    • Project Complete!

      Pete Hoffswell01/28/2015 at 02:15 0 comments

      I now consider this project complete! It's very nice to be able to control the garage door from my phone as I pull into my neighborhood, and not suffer from the poor regular remote.

      This project has been a great learning experience for me. Both in programming and operating the Arduino Yun, as well as working with openHAB. I look forward to adding more sensors to my openHAB installation in the future.

    • Files published to github

      Pete Hoffswell01/25/2015 at 20:26 0 comments

      I am a novice at github, but think I might have things sorted out enough to get some files published. You can see the Arduino .ino program as well as my openHAB configuration at https://github.com/petehoffswell/garagedoor.

    • Door sensor detail

      Pete Hoffswell01/25/2015 at 19:54 0 comments

      Today I got on the ladder and worked out my door sensor. The microswitch is mounted in the garage, and closes when the door closes.

      I am using the NO (Normally Open) tab on the switch.

      The microswitch is mounted to the frame of the garage door, and a tab is mounted over the switch. When the door is closed, the tab pushes down on the microswitch, and it closes.


    • Controller mounted in garage

      Pete Hoffswell01/23/2015 at 22:37 0 comments

      One of the nice things about the Arduino Yun is that you can just plug it in anywhere, and still access it via wifi. So, in it goes, and connected to the garage door button.

      Here you can see the relay connected to the garage door button that is plugged into the power strip.

      My door switch sensor is still in "test mode", hanging down under the red breadboard. That will be this weekend's task.

    • User Interface

      Pete Hoffswell01/23/2015 at 19:41 0 comments

      The user interface is delivered by openHAB. OpenHAB runs a web server that is available on the net. OpenHAB also has an iPhone app that delivers the same interface formatted appropriately for my phone.

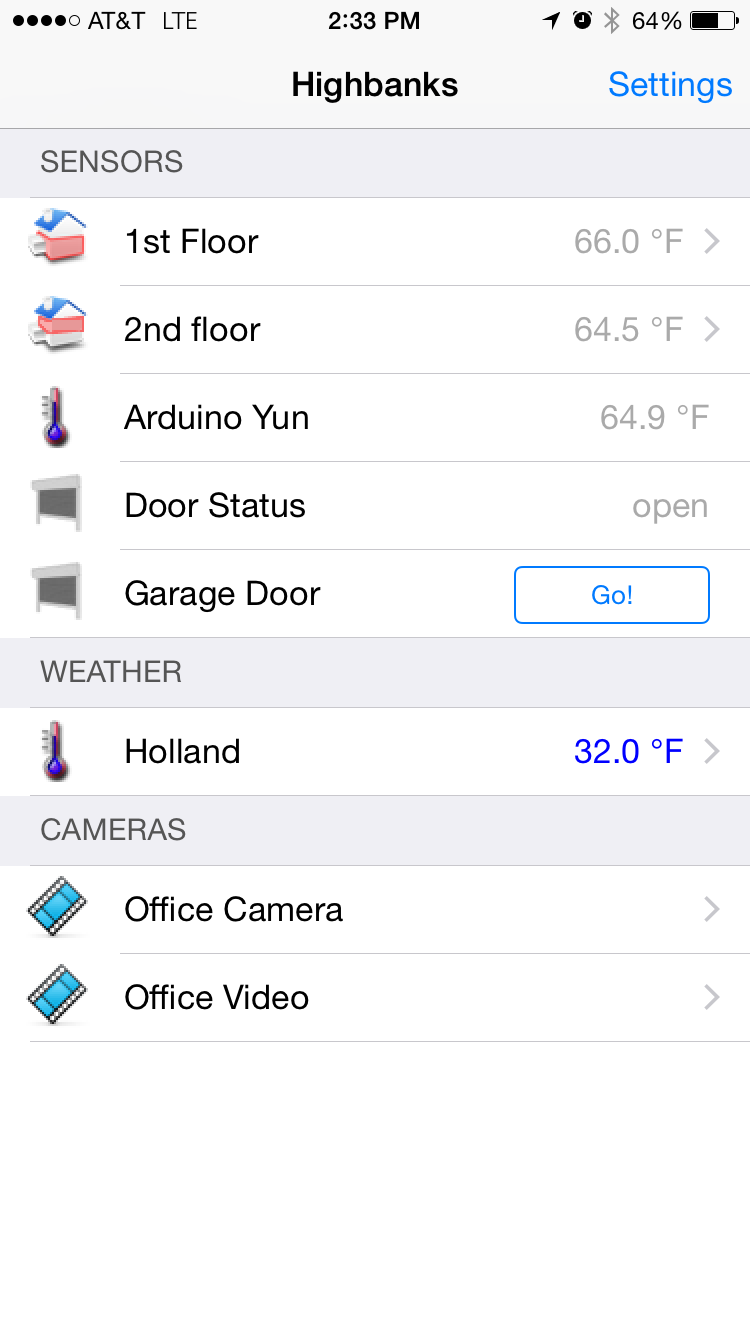
      Of particular interest is the Arduino Yun temperature, Door status and Garage Door Go! button. These three components match directly to our arduino's peripherals, the temperature sensor, Switch and relay.
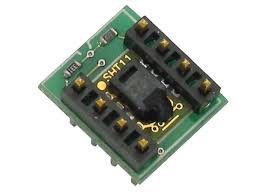
      The other elements on this interface are openHAB expermentitation by me. They include interfaces to my wifi-enabled home thermostats, internet-based weather data, and a network-connected camera.

    • Prototype working on bench

      Pete Hoffswell01/23/2015 at 16:27 0 comments

      Everything is running great on the bench. Time to interface the door state sensor switch and opener activation relay to the actual garage door.

    View all 7 project logs

    • 1
      Step 1

      Gather Components

      This project uses an Arduino Yun with 3 components - A temperature sensor module, a relay module and a switch.

      ---------- more ----------

      I use Parallax Sensirion SHT11 Sensor Module. I'm not sure you can get those anymore, but you should be able to modify this program to use some other temperature sensor. You could, of course, just leave temperature sensing out of your project, if you are looking at just controlling the door.


      For activating the garage door, I use a Banggood 5v 2 channel Relay module. These are very nice in that they have an indicator LED right on the board in case you can't hear the CLICK.


      The final special part you need is a switch. Any switch might do, as long as you can figure out how to activate it when your garage door is closed. I used a micro switch. I wish I had one of those micro switches with the long actuator arms or a magnetic door sensor, but, hey, this was what was in my junk box.


      For my installation I used a small bread board to connect everything up.

    • 2
      Step 2

      Interface Components to Arduino YUN

      Wiring up the Arduino YUN to the components is pretty easy. Mount your sht11 to the breadboard, and go from there.

      ---------- more ----------

      // shtx11 to Yun connection -----------
      // YUN  > SHT11
      // 3.3v > VCC 8
      // GND  > GND 4
      // 10   > DATA 1
      // 11   > CLK 3
      
      // YUN to Relay ---------
      // 8 >  In1
      // GND > GND
      // 5v > VCC
      
      // YUN to Switch ---------------
      // 5v > Switch NO
      // 2 > Switch Comm
      // 2 > GND via 10k pulldown resistor


    • 3
      Step 3

      Program Arduino YUN

      Grab the garagedoor sketch from Github and and modify the code to your taste. The only real value you will need to customize is the MQTT Server variable:

      // MQTT Server
      #define MQTT_SERVER "192.168.15.22"

      Adjust this to match the ip address of your openHAB/MQTT server.

      Note that you can run the code now, before building your openHAB server, and monitor temperature and switch status from the serial window of the Arduino IDE. If you can see a temperature and a 1 or 0 for switch state, you are in fairly good shape. The onboard pin 13 LED will also show switch status.

    View all 7 instructions

    Enjoy this project?

    Share

    Discussions

    ronald_ioi wrote 02/21/2016 at 12:06 point

    Hi Pete,

    Thanks for your interest. The door is installed but electrical installation is suspended until i find the time to get it build. At this stage it is a subproject of a home automation project  under  construction. The focus is shifting towards the ins and outs of openhab 2.  Wil keep you posted.

      Are you sure? yes | no

    Pete Hoffswell wrote 02/09/2016 at 01:10 point

    Hi Chimera - Sorry for the delay.  No, I did not.  I use the Yun for quick prototyping work.  This was replaced with the esp project you can see on my page.  I thought the Yun would be too underpowered for something like openhab2


    I had a openhab server set up, and had a few things talking into it (thermostats, garage door, etc.)  That's a nice way to go.  I think a lower power device, like a Pi would be great for the openhab server.  I was using my mega-whopper esxi server. :)  A cloud-based openhab install might be a nice option as well.

      Are you sure? yes | no

    ronald_ioi wrote 07/29/2015 at 05:17 point

    Hi Pete just ran into your project. Great stuff. I am planning on building somthing simular using Openhab. Still have some getting started to do. 

      Are you sure? yes | no

    Pete Hoffswell wrote 02/09/2016 at 01:11 point

    how did it go, Ronald?

      Are you sure? yes | no

    chimera wrote 05/18/2015 at 09:43 point

    Solid stuff Pete. Have you ever tried to put OpenHab2 on the Yun? I did install jamvm and allowed OpenHab2 to consume max 38MB by adding the -Xmx28M argument to the start.sh script. (more is not possible). It stops where osgi command line is available. On a more powerful machine with the Oracle SE JRE it runs immediately thru. You did not install OpenHab on the Yun itself, right? I dislike the idea of maintaining boards for the Gateway/Dispatcher (MQTT on Yun) and one for OpenHab. 

      Are you sure? yes | no

    Pete Hoffswell wrote 02/09/2016 at 01:11 point

    Hi Chimera - Sorry for the delay.  No, I did not.  I use the Yun for quick prototyping work.  This was replaced with the esp project you can see on my page.  I thought the Yun would be too underpowered for something like openhab2


    I had a openhab server set up, and had a few things talking into it (thermostats, garage door, etc.)  That's a nice way to go.  I think a lower power device, like a Pi would be great for the openhab server.  I was using my mega-whopper esxi server. :)  A cloud-based openhab install might be a nice option as well.

      Are you sure? yes | no

    Similar Projects

    Does this project spark your interest?

    Become a member to follow this project and never miss any updates