 pbleisch
There are sites out there that provide details of what a membrane keypad is and (more generally) what a matrix keypad is. For my version, I'll end up with four layers:
- A "front decal" layer that has the images of the buttons. This is what the user sees.
- A "top foil" layer that contains the traces that link the rows of buttons together and provides "pads" onto which to connect wires. The top foil layer is the opposite side of the front decal layer (i.e. the "inside" of the front of the keypad).
- A "bottom foil" layer that contains the traces that link the columns of buttons together and provides pads. The bottom foil layer is the "inside" of the back of the keypad.
- A "cutout" layer. This layer is sandwiched between the top and bottom foil layers and provides just enough separation to prevent the row and column traces from shorting when a button is not pressed.
I drew the four layers in Adobe Illustrator and printed them out. The decal layer uses a 4×4 matrix arrangement with some "custom" graphics (thanks icons8.com). After printing out the four layers separately, I had the templates to which I could attach my traces. (As soon as I figured out how to make the traces.)
There are a few options here but I ultimately need the keypad to be as thin as possible and as cheap as possible. Using paper for the substrate covers those needs pretty well. After a bit of searching around I came across copper foil tape that seems to be popular (or at least known) in the wearable electronics space.

This stuff is pretty cool. It is tape so it is sticky on one side and thin conductive foil on the other. It comes on a role where there is a paper separating each winding. You unroll some of the tape, cut it off with scissors, peel off the backing and stick it where you want. To connect two traces you just overlap the tape. It took a bit to get used to getting the backing off but it is very easy to work with.
In places where I needed multi-layer traces (!) I just used normal masking tape between the layers. I'm sure this causes some subtle capacitive effect but everything seems to work out.
At the bottom, row and column traces are pulled off the keypad using jumper wires. They are attached using the same copper foil tape.
Top foil layer:


The bottom foil layer is simpler and once I was happy with it I glued the cutout layer directly onto it and attached leads there as well.


Final construction of the keypad was to glue the decal layer to one side of a piece of cardstock (thicker paper) and the top foil layer to the other side. Then I glued the bottom foil+cutout layers to another piece of cardstock. Finally I glued the two assemblies together.
 Alex Rich
 Quinn
Quinn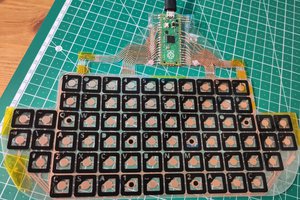
 Kārlis
 Brainy.Baboon