Close
0%
0%

CX shifter mount

Adapter to mount my internal gearhub shifter to the brake lever of my Cyclocross bike.

Similar projects worth following
I use a single speed frame as my daily commuter bike. Because I like to cyclocross it as well I run it with an alfine 8 speed internal gear hub. The problem is getting a shifter that fits my drop bar. They are either as easy to find as unicorns or nearly twice the price of the gear hub itself. There is a small company who mounts a standard microshift shifter to a cheap tektro brake lever. Because they're small and they probably don't sell a lot of em they're not in my price range. Well since I'm dutch I build one myself with the help of a 3d printer.

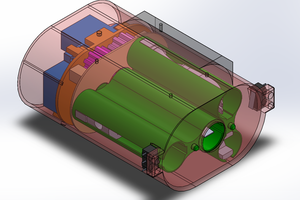
I used onshape to create the 3d file.

Sorry for the mess it's my first time using cad software. So I had to learn most of it along the way.

See, get and edit the file on onshape below. If you need help of have questions contact me.

https://cad.onshape.com/documents/3157a2ccc0cf39b892a9c9c9/w/5d804c41b785b866f0e49add/e/091dd2420db1fe1822691d6c

I started with scanning the side of the brake lever on my flatbed. And traced the contour of the top and scanned that as well. This way I replicated the lever in the CAD software.

After that I took the shifter from the base plate and meassured the base to replicate it in the CAD software.

I'll add pictures of the product en process.

  • 1 × tektro rl520
  • 1 × microshift 8 speed internal gearhub shifter
  • 2 × m3 bolt and nut

  • I'm A noob with CAD software

    stormeporm01/28/2018 at 20:12 0 comments

    I'm a noob with cad software, but back in the days (10 years ago) I've done some 3Ds max modeling. Which was some help in how to start. I went as following and I would change a lot in my order of modeling things if  I would do it again, but in the end it worked out fine.

    My first step was taking my brake lever apart so I could put it on my flatbed scanner. I scanned the side of it with a ruler next to it so I had a reverence for size which I could later use in my software to set the scale right.

    I did the same thing with the top view of my brake lever but instead of scanning it directly I traced it on a paper and scanned that wit a ruler. I traced both scans in the CAD software after setting the correct scale with the ruler in the scans. After that I used the sweep tool to have the top view follow the side view. With this I had a 3d model of the lever. I extracted this model from a block printed it and fitted it on my lever to see if it was any good.

    After that I measured the original base of the shifter Since its just squares and circles I did not scan it I just used calipers and used this to model a base.  Again I printed it and test fitted it to the shifter. After a successful fit I combined the 2 models printed it again and checked if everything actually fits my bike.

    The third part was the part where the cables enters the base plate. I measured the outer cable and  the diameter of the circle the inner cable follows on the shifter.

    This went well printed it and the thing was alive.

    After this I started experimenting with printing orientation and supports. I cant say much about it it was just trial and error.

    What I learned.

    A flatbed scanner is a dirt cheap tool to get you started getting the real world in to the digital. Seriously get one! Same for the ruler always add one to your scan.

    Its good to know what your part will look like in the end. I didn't and it made the designing take up a lot more time.  But It was a good way of learning.

    Print small steps. When your parts are small to print its 30 minutes well spend if you check if your on track.

    Do an 30 to 60 minute of designing a day. It gave me a lot of time to think about things in between.  Think twice design once.

    Dont stop because you dont know how it should be done you will figure it out.

  • Is it strong enough?

    stormeporm01/24/2018 at 21:08 0 comments

    At this moment the shifter base is finished and I'm using it for 2 month now.
    I was really afraid it would not be strong enough printed with pla but its doing just fine.

    I did crash hard with it and it broke but that was actually a good thing since it preserved the most expensive part the shifter itself. Printed a new one and I was good to go in no time.

View all 2 project logs

Enjoy this project?

Share

Discussions

Similar Projects

Does this project spark your interest?

Become a member to follow this project and never miss any updates