Close
0%
0%

Ninja Blender Black to Gray Adapter

A simple sleeve to use the gray-colored Ninja motor on (older?) black blades.

Similar projects worth following
The Ninja blender seems to have come in a couple different variants over the years, including a gray version with a larger drive spline, and a black version with a smaller spline pattern. This adapter sleeve fits over the black splines so you can use the gray motor if, like me, you lost your black one but have tons of parts from both.

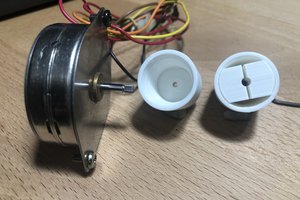
Back when Ninja (https://www.ninjakitchen.com) got their start, they had only one product - a top-drive food processor system where you'd put a blade in your vessel, put a lid on that, and then clap a power pod on top to blend everything. They still sell a version as the "Master Prep Pro System" (https://www.ninjakitchen.com/exclusive-offer/QB1004WBKT/ninja-master-prep-pro-system/). It would seem that, over the years, there have been a couple of variants. They're mostly compatible, but for whatever reason, appear to have different spindle sizes.

My household has two systems, an (older, I suppose?) gray one, and a black one that I can only assume matches the current unit. Unfortunately, I lost the black motor, rendering all those black blades useless. So I decided to draw up an adapter that I could 3D print, making all the mismatched parts useful again!

Note about 3D printing this: because the sleeve needs to fit relatively tightly over the spindle, your 3D printer's dimensional accuracy needs to be pretty good. If it's a little tight, there's nothing wrong with pounding the sleeve on with a mallet (but make sure it fits loosely in the drive unit first). But if your printer has any sort of problem with elephant's foot, it'd be best to tune that out before trying to print this part. Also, printing with a brim will likely cause problems, since it's tough to get inside the splines with a deburring tool or anything like that. Though since that'll only be on the outside, it might not cause problems with fitting over the small spindle.

Ninja_Adapter.stl

3D printable mesh

Standard Tesselated Geometry - 545.00 kB - 01/25/2018 at 00:11

Download

Ninja black to gray adapter v4.f3d

Source Fusion project export, for modification or investigation

fusion - 191.49 kB - 01/25/2018 at 00:11

Download

  • Designing the adapter

    alexwhittemore01/25/2018 at 00:10 0 comments

    The whole design is drawn in Fusion 360, as anyone familiar will have guessed from the sketch screenshot.

    Initially, I started to copy the geometry by taking a best-effort orthogonal photo of the original drive splines, importing that into F360, scaling it, and drawing over it. That quickly proved more trouble than it was worth, since the geometry is, in the end, relatively simple.

    Once the image-based copy attempt proved fruitless, I just used calipers to take some very accurate measurements, and a few other best-guess style measurements. Namely:

    1) diameter of spline valley to valley (minor spline diameter)

    2) diameter of spline peak to peak (major spline diameter)

    3) observe that the valleys and peaks appear to be semicircular and not some other more complex geometry

    4) observe that the spline pattern is perfectly hexagonal

    5) draw control points at all the measured peak and valley centers

    6) draw semicircular arcs to intersect those control points

    7) shrink by a small offset (.15mm) to account for tolerance of manufacturing on both parts. 

    Initially, I'd hoped that I could simply shrink the large spline shape with an "offset" command, but that changes the peak and valley geometry quite substantially to be non-semicircular. A version of this I believe worked almost-well-enough, but it was very sloppy. Ultimately, I performed roughly the same steps as above to come up with the smaller spline pattern, and I simply extruded the gap between them.

    That's the part I'm using now, but I did observe that putting the motor on the blade can be difficult if the blade isn't pre-clocked to be close to the same rotation on the drive and shaft sides. To handle that in the final version, I added a bit of chamfer. Most 3D printers will only reproduce this to a limited extent, but any chamfer in the output part will prove helpful.

    Overall, this was a fun experiment in reproducing geometry of a physical part, and I've now got a bunch of blender parts that work together instead of existing in my cabinets only to cut me while reaching for things.

View project log

Enjoy this project?

Share

Discussions

Similar Projects

Does this project spark your interest?

Become a member to follow this project and never miss any updates