 alexwhittemore
Designing The Foot
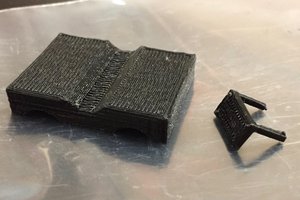
The first step to designing my replacement foot was figuring out how it'd slide over the original foot-parts, and securely snap into place so that it wouldn't wobble off every time I picked up the unit. I decided to take advantage of the hooked nature of the front of the stock foot, as sort of a toe to hold the front of the prosthetic in place. The back of the foot would sit flat against the back face of the stock foot, requring just a little force to pop it in place. I figured that'd be just enough to hold it securely, if I got the tolerance right.
The tolerance of the assembly was the tricky part, since the geometry isn't super straightforward. Since the profile is made mostly of straight lines, I started by measuring those and drawing them in a profile sketch, then measuring what additional distances I could to try to constrain all the vertices to the right positions. When I thought I was getting close, I'd print a 1mm extrusion of the profile I'd sketched, and test fit it against the scope. After about 4 rounds of (quick, 5m) test prints, I knew I had the profile correct enough for a finished part. I extruded this profile the width of the stock foot geometry, then added some side walls to make a sort of bathtub shape that the stock foot fit snugly in. Since the stock rear foot of the scope is rubberized, I added an internal wall to sit flush against the back wall of the stock front foot, fulfilling that sort of snap-fit of my original idea. That wall has a wide gap in it to accommodate the original fold-out foot extensions, in the case that your scope still has them. The gap is wide enough to be symmetrically functional on either side of the scope, since the fold-outs are not symmetrically placed on each foot.
Finally, I added the thick fin to the original profile sketch, to tilt the scope back and recover the function of the original fold-out feet. I also added a flat to the back-side of the prosthetic, co-planar with the flat on the extension off the front, so that I could affix rubber feet to the front and back to keep the scope from sliding around on the bench.
Because the back end of my prosthetic extends farther back than the original rubber foot, and the front extends farther forward, this prosthetic has the advantage that it's also slightly more stable than the original fold-out feet. You can really hit the buttons hard without moving the scope around your bench or tipping it over. Even if the feet work fine on your scope, you might find it beneficial to print a set of these, modified with a slightly longer front extension to give you a bit more angle on the control panel.


 Patrick
 Jose Ignacio Romero
 Øystein
 Myles Eftos
My DS1074Z has been wearing these prosthetics for almost 2 years now and they've been a great help! The fit was just right after the first try using my university's printing service's settings. Even the overhang turned out alright. Thank you for sharing your design files.
result: https://cdn.hackaday.io/files/1765627554028608/1.JPG https://cdn.hackaday.io/files/1765627554028608/2.JPG