 Shree Kumar
Smartphones include amazing technology. Unfortunately, a lot of it never gets exposed to users, mostly due to form factor considerations (my guess), and possibly due to “consumers don’t need it”.
What do we have for this post? Let’s make some music with Kite… And not just any music – let’s make it LOUD. The speaker in Kite is fine for personal use, but that’s not something that showmen would fancy. To motivate you to read the rest of the post, here’s the PianoPhone:
For reference, the files required for this build are in piano-phone-v01.zip.
The centerpiece of the Piano Phone, is Pimoroni’s Piano HAT. This includes one octave implemented with capacitive buttons. It has LEDs for feedback - could possibly be used a learning aid too. Plus octave & instrument keys. To top it off – it’s a joy to behold.
Wiring this up is a bit more work than wiring up our name badge, though. Nothing too difficult. Let’s open the back cover & see for ourselves. Looks a bit of a mess, but hey we need quite a few wires. The Piano HAT is sensitive to exactly which wires you connect, though. At first try, we wired up the other 3.3V pin, which the Piano HAT just didn’t like. To cut a long story short, here is wiring:

That bit of tape ensures that we don't end up with accidental shorts. An essential safety mechanism...
The wiring looks a bit messier than what it is. Reason for that is I have cheated a bit & wired the I2S and power lines that we will need a bit later in this post (all the wires going over the pogo pins). I am documenting this at the end - after putting everything together - too lazy right now to tear up a beautifully built up unit for documentation.
Coming to the software : Kite runs Android, and that means that you need a tiny bit of effort to get Raspberry Pi HATs to work. Not too much work , mind you – but things may not work out of the box completely.
One of the things I like about the stuff from Pimoroni are their decent Python libraries. The chroot linux environment on Kite is the best way to get started (for a background on this, do have a look at the Name Badge post). The Piano HAT has two capacitive touch controller chips. The Piano-HAT library talks to it over I2C. The LEDs are connected to the same chips – making them very easy to control from the code. Each touch controller has an “Alert” GPIO associated with it. This is monitored by the python library.
Now, if there’s anything that Arduino has taught me (and the world) – it is this: interrupts are evil. Don’t do interrupts when… when you can just poll. The Piano-HAT library relies on RPi.GPIO, getting which to work with the same semantics on Kite would have been a serious pain; not something I was keen on. I wanted to make music, not war. So, I went to poll. I did. Luckily for me, Piano-HAT already had code to help me poll. Set the alert pin to -1 to unlock the magic. I wrote a silly wrapper for RPi.GPIO to ensure I don’t change code unless absolutely required. In case you are wondering what “poll” means in this context... it’s a while loop that executes in a separate thread, and periodically checks the capacitive touch sensing chips over I2C for events (checkout piano-phone-v01/kite-chroot-pianophone for all the gory details!)
--- a/Piano-HAT/library/pianohat.py
+++ b/Piano-HAT/library/pianohat.py
@@ -191,11 +191,11 @@ def setup():
         return True

     # Keys C, C#, D, D#, E, F, F# and G
-    _piano_ctog = cap1xxx.Cap1188(i2c_addr=0x28, alert_pin=4)
+    _piano_ctog = cap1xxx.Cap1188(i2c_addr=0x28) #, alert_pin=4)
     _setup_cap(_piano_ctog)

     # Keys G#, A, A#, B, C, Instrument, Octave -, Octave +
-    _piano_atoc = cap1xxx.Cap1188(i2c_addr=0x2b, alert_pin=27)
+    _piano_atoc = cap1xxx.Cap1188(i2c_addr=0x2b) #, alert_pin=27)
     _setup_cap(_piano_atoc)

     for x in range(0,8):
With this, I got simple-piano.py (in the Piano HAT codebase) to report the keystrokes. However, to get to this stage, I had spent a couple of hours. I was desperate for music. So, I thought: wouldn’t it be nice if Kite could just double up as a keystroke “server” of sorts? Tunnel the keystrokes to my Linux Laptop. Offload the music part on the Laptop… beats programming in Android Java for me any day.
I created piano-server.py (inside kite-chroot-pianophone) for this purpose. It starts a TCP socket server (port 1501), and reports the piano-strokes to a single connected TCP socket client. Then, using ADB forwarding, port 1501 of my Linux laptop is connected to port 1501 of my android device:
$ adb forward tcp:1501 tcp:1501
$ python simple-piano.py
The second line starts the client - that connects to the piano-stroke server on port 1501 (code for simple-piano.py is in piano-phone-v01/laptop-client/, btw). Now, we can play some music:
With that bit of instant gratification out of the way, it was time for some serious work. Time to get rid of those wires. To make that happen, those key events need to go to Android – to the app domain. Java is good for network programming – wasn’t that how it became a smashing success in the first place? So, I fired up that Android Studio, and reluctantly started writing some Java code. Yeah, had to start doing some hard work, starting from io.kite.android.PackageNameWithCamelCaseAndAllImportsInOrderWithGoogleAsYourFriend
Okay Google, I give it to you – Android App programming is not so hard, and StackOverflow is my friend in my quest to make that simple sounding app. A couple of hours, and many crashes later, my app was ready. It was now able to make just the right noises when my fingers struggled to hit the right tune. So far, so good. The complete code of the app is available in android-app/SimplePiano in piano-phone-v01.zip.
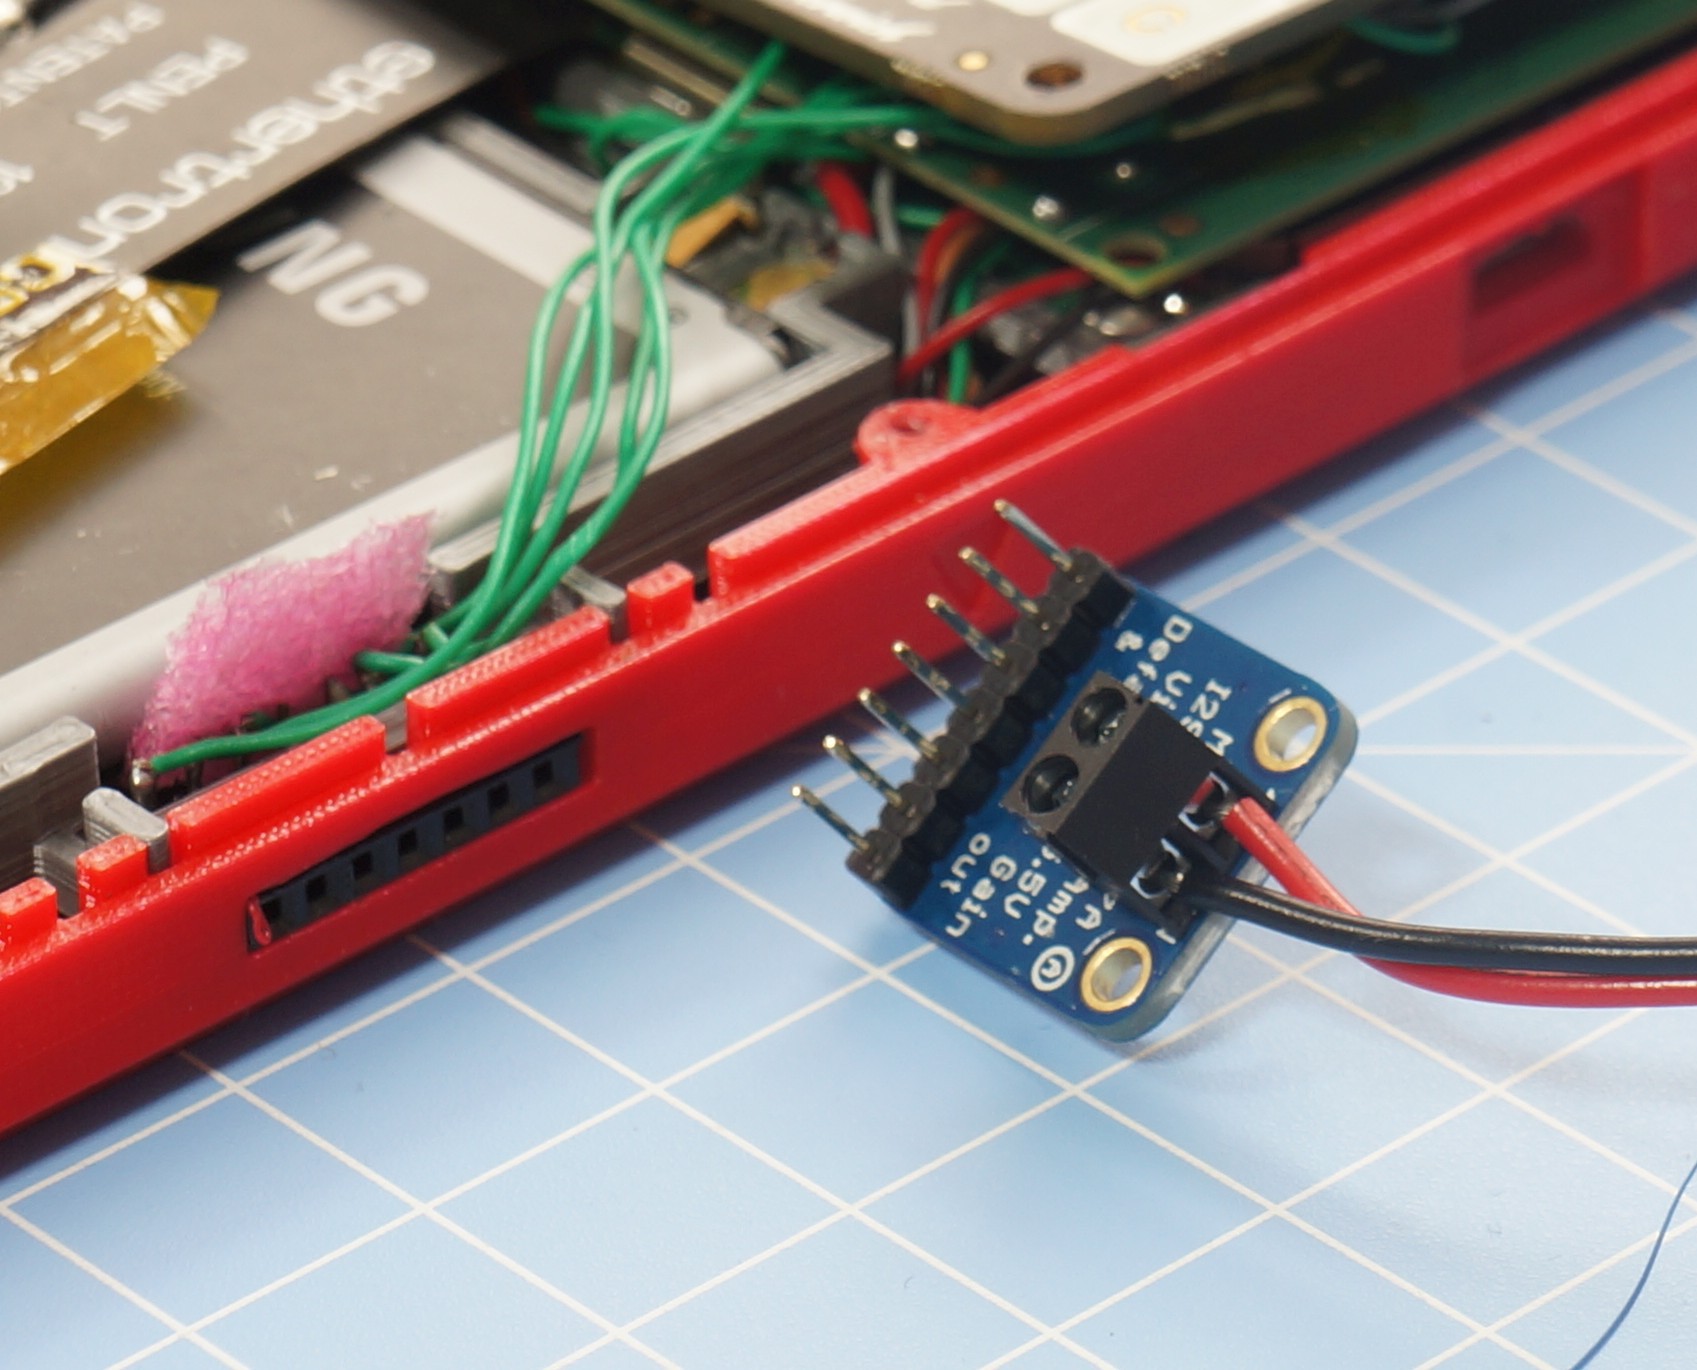
The next problem? The small speaker on Kite is nice, but not something that I would use to announce to all my colleagues passing by – “here, it’s ready”. One of the nice things about the Raspberry Pi compatible header is that … it also gets me I2S audio. Route that over an amplifier to a big speaker, and get ready for some serious showtime. Luckily, I got just the right tools for this – an Adafruit MAX98357 I2S 3W Class D Amplifier, and that large 3W speaker from Google’s AIY Kit (PiMag subscriber, I am).
Android’s audio routing is a bit of a strange beast – again, it does what consumers want. And where exactly do consumers use I2S on a mobile phone? So sorry, no API for you. Hacks rule. I ended up changing the Android audio routing policy file to get my speakers blaring. Basically, we need to change /system/etc/mixer_paths.xml - with an important change, highlighted below:
    <path name="low-latency-playback">
        <ctl name="QUAT_MI2S_RX Audio Mixer MultiMedia5" value="1" />
    </path>
To change this file, the following steps are required
$ adb root
$ adb remount
$ adb push mixer_paths.xml /system/etc
The final part of the Piano Phone consisted of modifying the case so that everything sits nicely and looks like a phone. That took some work, but was immensely rewarding. I ended up cutting a slot in the front case, designed to hold a 7 pin 0.1” female header for the I2S amp.
The 3W Adafruit Class D Amplifier plugs into the female header. The front cover modifications are best shown in the below picture:
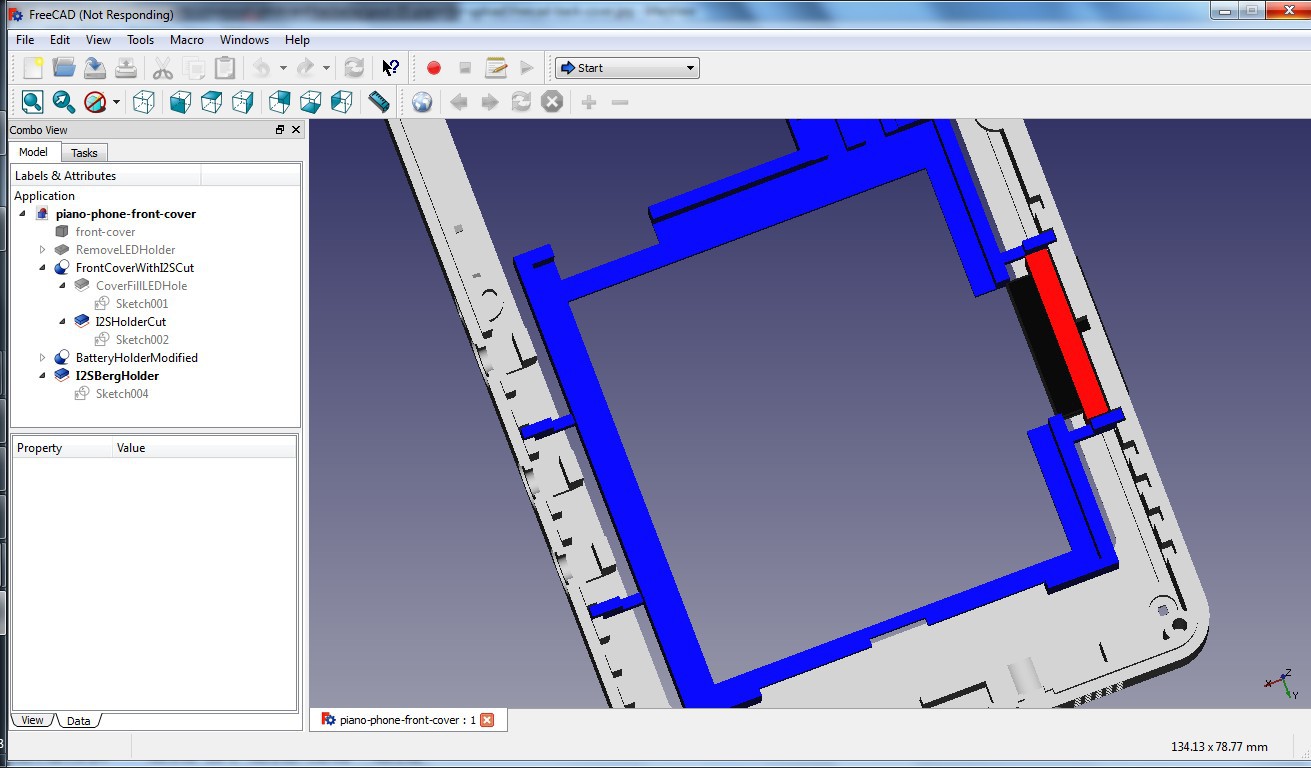
I cut the battery holder a bit to ensure that the header can easily be inserted into place. The red piece is a small U shaped part that I ended up gluing to the header for positioning it tight.
The Piano HAT needs a holder to seat it. The back case needs modifications too.
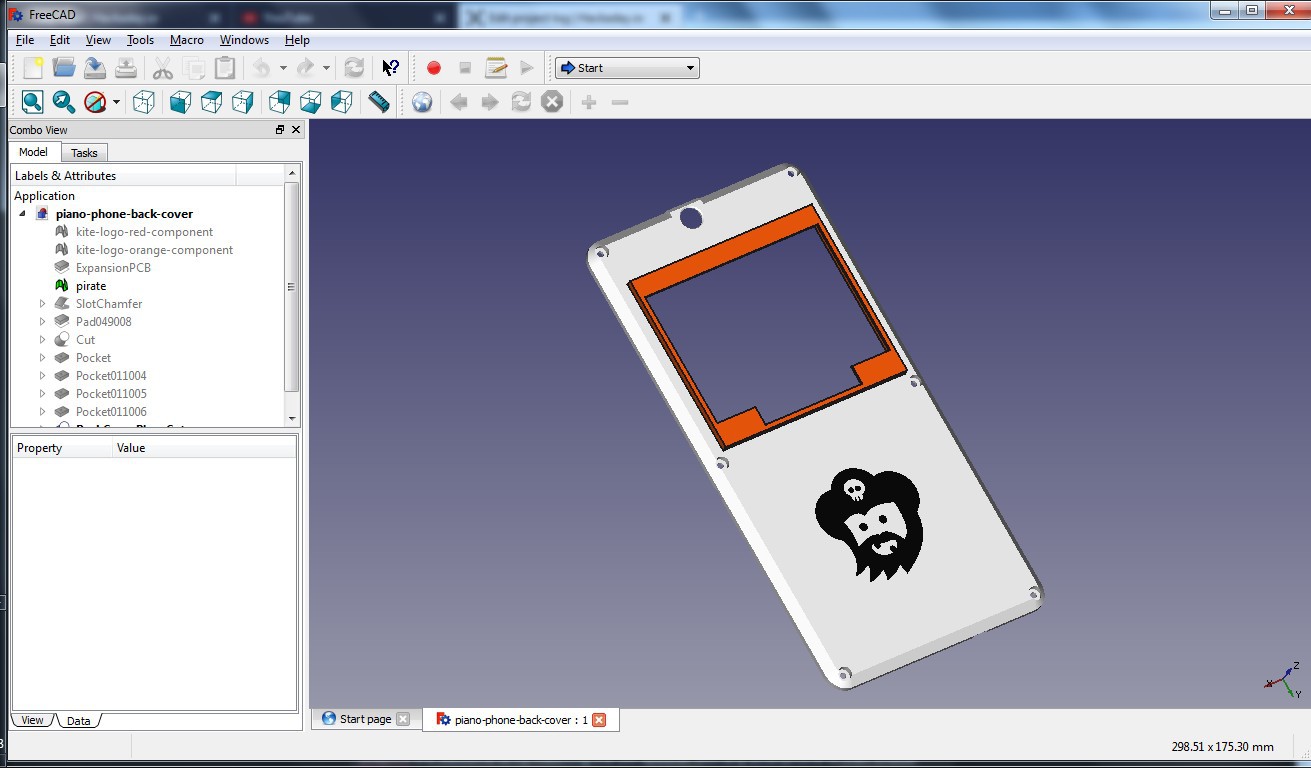
Note that the Piano HAT is modelled upside down - not a problem due to the rectangular geometry of the HAT.
Everything looks really neat at this stage. The case is a joy to use. Two more pictures, ere we end. Side view to show how less the Piano HAT jets out:
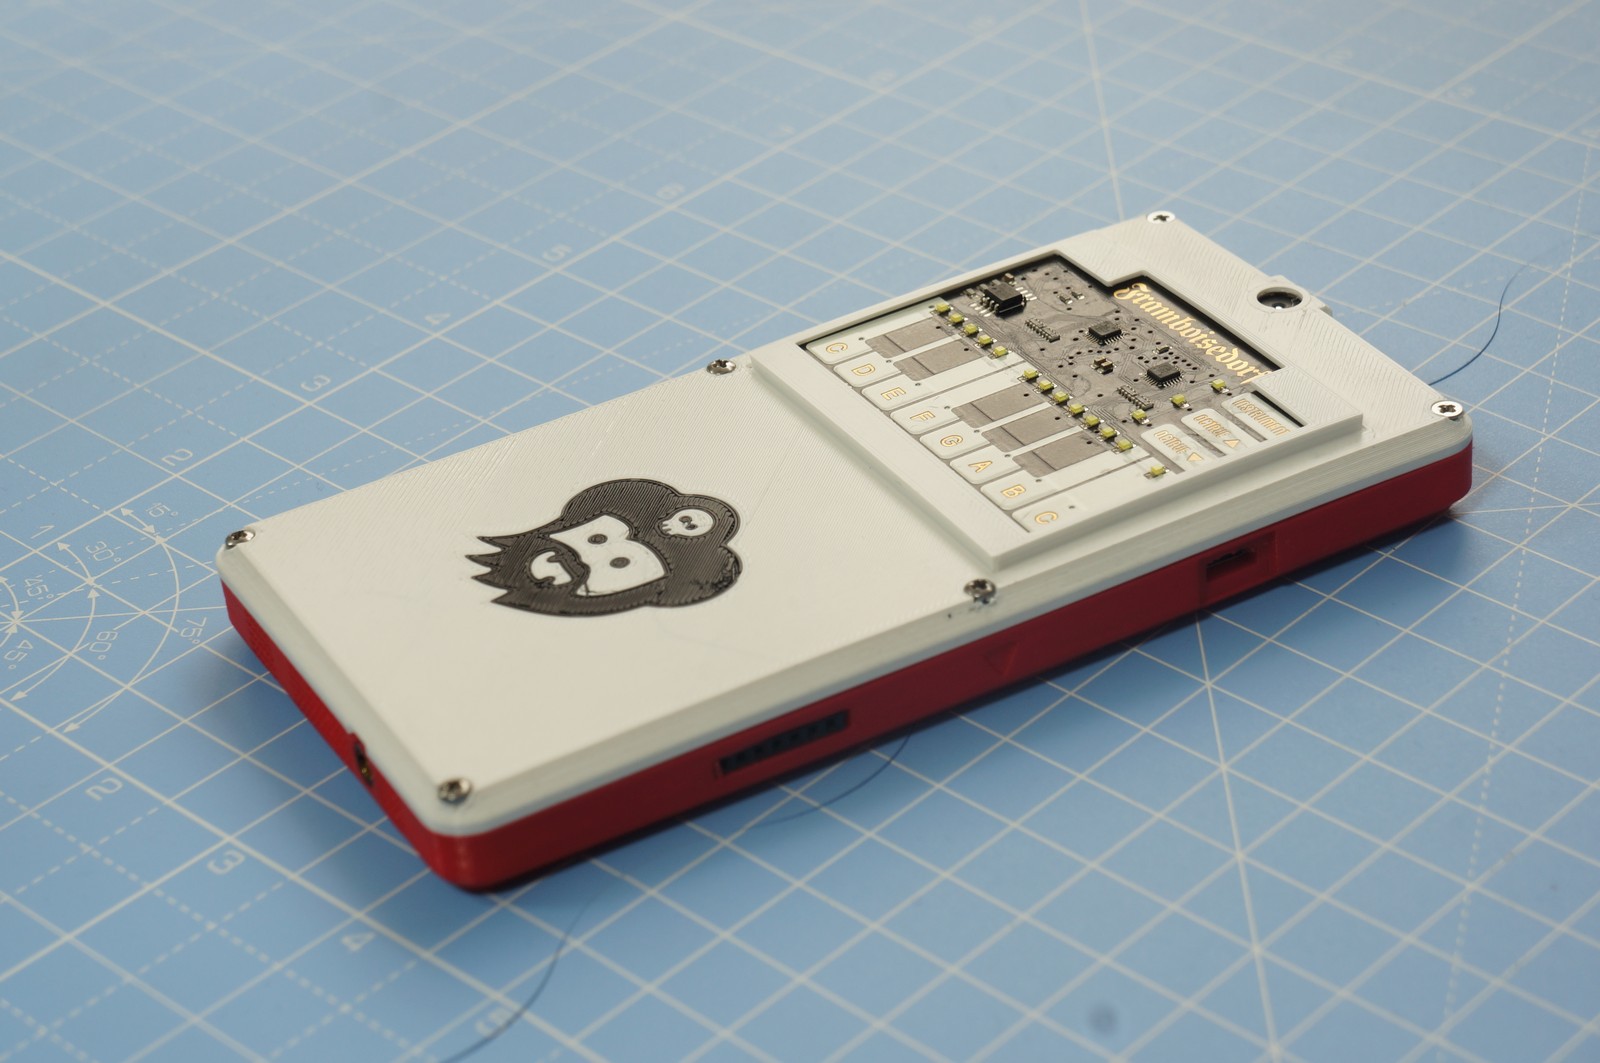
And one with the I2S amplifier plugged in:

The music pumped out by that speakers is quite LOUD too. Sceptics are welcome to try matching the 3W speaker with any smartphone of their choice. The audio folks would appreciate the I2S output coming right at them on the 0.1" header.
All done? Almost. One last bit remains - starting the piano server at boot. The piano server runs in the chroot environment. We need to start it on boot. For that, Kite has a hook – a script /system/bin/hwsetup.sh is run with root permissions on boot. That’s a great place to start the piano server. We do that by making a change in hwsetup.sh:
# Start Linux chroot environment
start chroot
sleep 3 # Wait for the server to start

# Start the piano server on boot
env PATH=/bin:/usr/bin /system/xbin/chroot /data/local/linux /bin/bash /home/kite/piano/server.sh
After changing the script, we need a reboot. And then we are ready. To rock & roll.
Discussions
Become a Hackaday.io Member
Create an account to leave a comment. Already have an account? Log In.