 Kert
KertApparently the laser in the Markerlab I'm intending to use uses only and only Chinese closed source control program (with English menus ofc) and a side effect of that is that no kind of G-Code or anything similar access is exposed. Which would be ok, if the laser control soft would have ability to cut with kerf compensation - which it does not apparently. Which leaves only the "hard way" of doing it - by providing CAD drawings with the cut width compensation taken into account.
Obviously this would be damn tedious if doing it one offset at a time and prone to lapses of attention and human errors. What follows is a description how to minimize errors (at least in the plan in my head currently) in that process and partly automate it (Autocad, in my case but most others that can take LISP macros should work somewhat similarly)
(1) Export your flat pattern as a 2D drawing. I am using Autodesk Inventor ability to move the drawing in the export process to positive quadrant of X-Y plane and replacing all lines with closed polylines. But practically all CAD programs should be capable of doing something like that. With some additional post-processing might be needed for making all existing lines into closed ploylines and for getting rid of overlapping lines (which would cause the laser to burn that line as many times as many overlapping lines you have). Outer profile and inner profiles in different layers for me and only lines to be cut on the drawing.
NOTE: Circles remain circles and are not converted to polyline (for me). They must be converted afterwards which is not a straightforward process in Autocad. This: http://forums.autodesk.com/t5/visual-lisp-autolisp-and-general/circle-to-polyline-circular-polyline-to-circle/td-p/3036078 LISP macro can be used for that and seems to work well for that purpose. Load it, select circle and issue "C2P" command from command line and the magic happens making it a polyline.
(2) A neat LISP macro: http://www.realerthanreal.com/autolisp/offsetmultiplepolylines.lsp is capable of offsetting all selected CLOSED polylines either inwards or outwards by the same offset value (that is why I had to convert regular circles to polyline circles). Obviously mine are all closed lines. I intend to cut them, after-all with a laser. You can call that command by issuing command "OffsetMultiplePolylines" from command line.
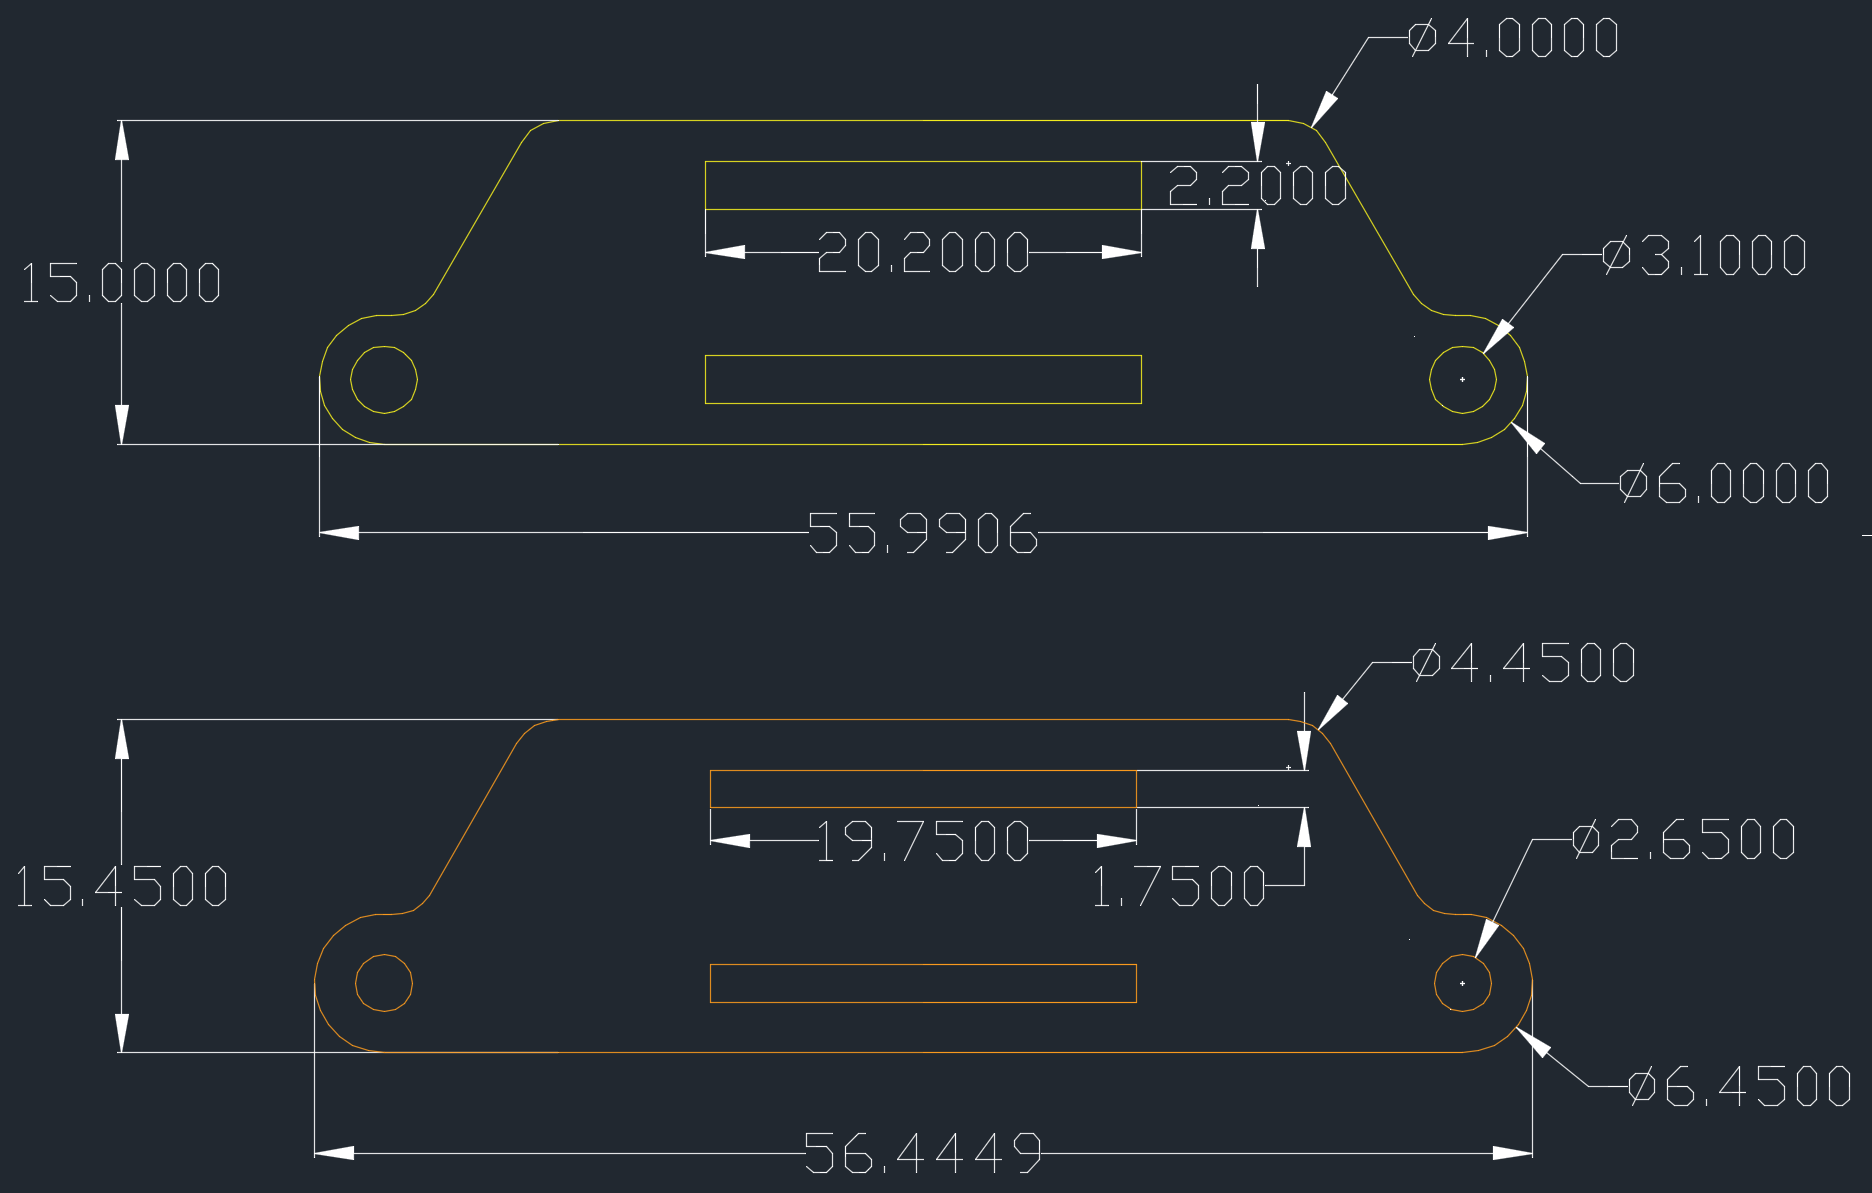
(2a) All INNER profiles will be offset inwards by half of your laser cut line width. The big bonus part is that you can select them all at once and offset them all at once avoiding errors (assuming you manage to select them all, that is why mine are on different layer, I enable only that layer, select all and offset them all, then enable outer profile and offset that separately, that one can be done with a regular offset if its already a single polyline).
(2b) OUTSIDE profile will be offset outwards by half of the laser cut line width.
Loading a macro in Autocad can be found Tools/AutoLISP/Load Application... After loading the macro it can be called from command line like regular Autocad commands.
At least that is the plan so far. We'll see if this will actually work in practice as well when I get around to exporting the flat patterns for the machine and doing kerf compensation for these. But I want to first finalize the design for these components as I still have to properly plan out the cable management and figure out where, exactly, will I put electronics components.
I currently tested the concept only on that laser-cut cable chain for a start as it will be few weeks before I can do the next trip to a laser and actually cut something (The Makerlab I'm planning to use is moving into new rooms and should reopen early March).
Discussions
Become a Hackaday.io Member
Create an account to leave a comment. Already have an account? Log In.
Is it Lasercut? Because the version of that that we (Protospace, in Calgary) have was recently discovered to have kerf compensation by one of the members.
Are you sure? yes | no
That is the intention. The laser is (if I remember it correct) MT-6040 with 70W CO2 tube. To be honest I have used the laser only once so far doing couple test pieces and getting a short lecture about safety protocols and what button does what. When I asked about kerf compensation I was told that they are not aware of any. I tried finding that laser manual online but no luck so far in this regard. Having an automatic kerf compensation in the laser driver would obviously make doing stuff with the laser more convinient.
Are you sure? yes | no