-
1Step 1
Assemble components on PCB. Should be straight forward if you have the eagle schematic and board file. Note, I don't have any pictures of the assembly process as I put these together in Oct 2014, and am documenting the project 3 months later.
-
2Step 2
Program the board using the built in header. I soldered wires from a MSP430 launchpad programming pins to a 2x3 pin header and held it in place during the short programming process in Code Composer Studio. I had some connection issues (about 4/5 tries) that were resolved simply by slightly changing the angle and/or pressure in which I held the pin header into the programming socket. The socket isn't going to protect you from +/Gnd orientation, so watch that before you apply power.
-
3Step 3
Cut a segment of RGB light strip and get some big solder blobs built up on the 4 pads (+12V, R, G, B).
-
4Step 4
Get some decent solder blobs built up on the PCB for the same nets at JP2.
-
5Step 5
Make one more check that your alignment of +12V is correct between the PCB and the LED strip. If so, then face-to-face (blob to blob), you can heat the LED strip from the back side with your soldering iron and get the two pieces to connect. There should be enough room to inspect your soldering from the edge. Ohm out each connection checking for shorts between adjacent pins and good connection from PCB to LED strip board.
-
6Step 6
If everything looks good, add 12V and see if it works. The program I wrote should turn the eyes on to a random color immediately.
-
7Step 7
If you get this far, take an old toilet paper roll (or paper towel roll cut shorter) and cut the "eyes" into the roll. I first made a template for the eyes on my printer, and cut the eyes out of that sheet of paper. This made it easy to trace the eye pattern on to the roll. This helped me as I was making a set of 25. I found various design ideas searching google images. Next cut the eyes out of the roll. You can use scissors, but I used an x-acto knife, going slowly as to not cut my fingers apart, but it worked better than scissors with a new blade.
-
8Step 8
I used double-sided tape to fix the LED light strip to the bottom of the roll. I kept it near the bottom of the eye holes so the LED's would shine towards the back of the roll and also be harder to see through the eye holes.
-
9Step 9
I bent the LED strip in half as close to the PCB as possible, and taped that to the outside of the roll. I then taped circular pieces of cardboard to the ends to block light and taped everything together with significant amounts of [inexpensive] masking tape.
-
10Step 10
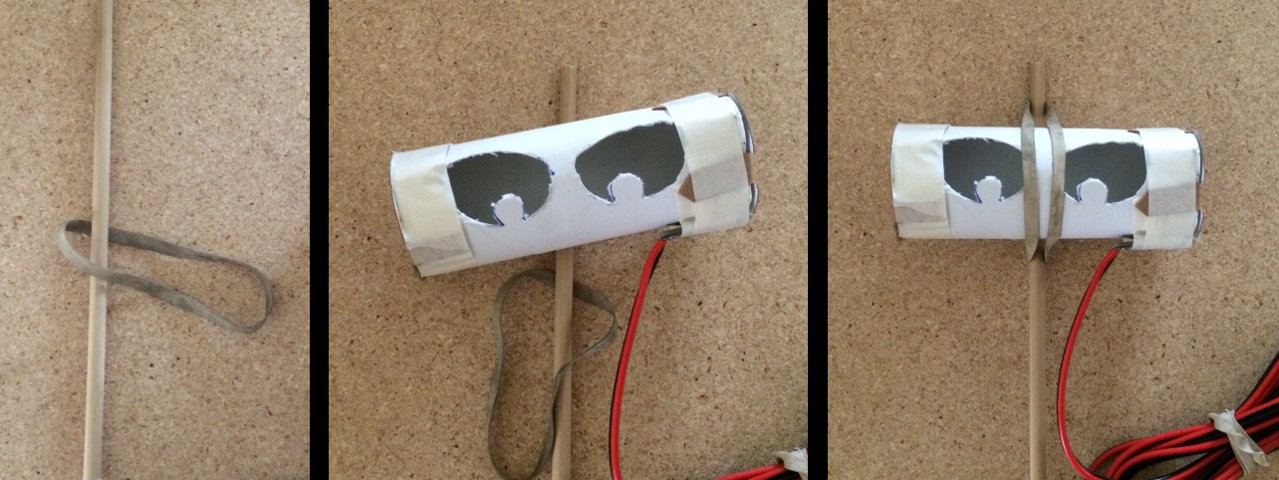
I tried setting these in the bushes nestled in the brances -- that does not work. The eyes end up being at weird angles...and detracts from the effect. So instead, I used wooden dowels as posts and rubber bands to attach the cardboard tubes to the dowel. The dowel will go into soft ground easily and hold up for a night.
![]()
Halloween Blinky Eye Lights
'Blinking Eyes Light' to hide in bushes for Halloween
Discussions
Become a Hackaday.io Member
Create an account to leave a comment. Already have an account? Log In.