This is my first project here and I'm not good at describing things so if you have any questions let me know.
The origin story
===========
This project started with a friend coming up with a number of ideas for new devices to use in paranormal investigation. The idea behind the POD was that it could be left in a locked room overnight in a supposedly haunted location to gather an objective record of everything that happened there, not just visually but using every sensor available to detect any change in enviromental conditions. I'd been planning to try and build a tricorder for some time and it seemed like a close enough project so I offered to have a go at building this instead. It took a number of failed prototypes but eventually I ended up with something that works.
How it works
==========
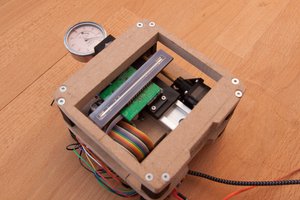
The current system has 2 parts.
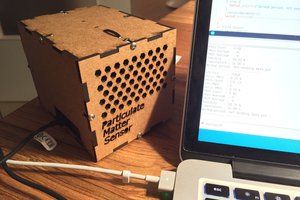
Part 1 is a modified version of Adafruit's Raspberry Pi touchscreen camera. This provides the photography, file handling and user interface functions. It has a NoIR camera for taking photos in infra red, and a PIR sensor for movement detection, but the main mod is the software. The cam.py script has been modified to provide 4 modes of operation (Snapshot, Timelapse, Polyspec, and Investigative). These take a bit of explaination so see the Modes section for a detailed description of each.
Part 2 is a sensor board controlled by an Arduino Nano, containing every sensor I could fit on the board at the time. All components plug into headers on the board so they can easily be replaced or reused without soldering. Included sensors measure temperature (both local and non-contact), humidity, air pressure, magnetic field strength (3 axis), accelleration (3 axis), light (4 bands), sound, and static charge (- and +). To make things simple for the host system, all communication with the sensors is handled by the Arduino. The board needs only a USB connection to a host system to function, and has an extremely simple protocol, explained in the Communication section.
Modes
=====
The camera has 4 modes at the time of writing this. There's still a lot of fine tuning needed and only Snapshot and Timelapse are fully functional.
Snapshot:
This takes a single shot when the user taps the screen, but also gets a reading from the sensor board and logs it in a file called Snapshots.csv. All readings are tagged with the filename of the photo they are taken with. After taking a photo, the photo remains on screen overlayed with the sensor readings until the 2nd tactile button is pressed, then the screen returns to a live view.
Timelapse:
This is configurable through the menus with 2 settings, [Scans] and [Photos]. When the user taps the screen, the backlight shuts down to save power. Following this, a new log file is created in the Logs folder. Every [Scans] seconds the sensor board takes a reading which is added to the log. After every [Photos] readings, a photograph is taken, unless [Photos] is set to 0 for datalogging only. This continues until the 2nd tactile button is pressed, or until the number of photos taken reaches 9999. Logfiles are saved after every sensor reading, so if the camera looses power the data is still safe.
Polyspec:
This is experimental and as of writing incomplete. It is intended to be used with an RGB illuminator that I'm still building, that will be controlled by the RasPi's GPIO pins. Tapping the screen starts a sequence of 4 photographs, each illuminated by a different colour light. Sensor readings are taken at the start and end of the sequence and added to Snapshot.csv. The sequence is currently [ None (natural light only), Red, Green, Blue ] but eventually I plan on upgrading it to [ None, IR, Red, Green, Blue, UV ]. This mode is intended to provide enough data to make composite images with much more colour than the NoIR camera normally provides, although it has very long exposure time due to the number of seperate images it takes.
Investigative:
Technically complete but this still needs some work. This is identical to Timelapse...
 tiefpunkt
 peter jansen
 Blecky