 theschlem
IF YOU NEED THIS PART, YOU CAN PURCHASE AN EXCELLENT 3DPRINT FROM SHAPEWAYS:
https://www.shapeways.com/product/BRRZD74UJ/dewalt-dw708-mitre-saw-quot-dust-extactor-quot-nozzle?
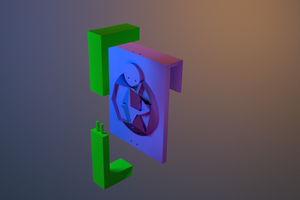
Tinkercad is NOT the best tool for industrial design, but I am very familiar with its capabilities (and the price is right). I increased the dimensions of the mounting flange, requiring mounting bolts that are 5 mm longer than the original. Not realizing that the overall length is a critical dimension, my first iteration was too long to fit without binding. After some feedback on how version 1 fit, I also made some subtle changes to the the mounting face.
Version 2 reportedly mates to the saw "better than the original"
Print Settings
Printer Brand:
LulzBot
Printer:
TAZ 4
Rafts:
No
Supports:
No
Resolution:
0.20 mm layer height
Infill:
50% for strength
Notes:
The overall form factor lends itself well to 3D printing without support. I stuck a brim on the bottom to keep it stuck on the bed. I also designed some integral support for overhangs at the mounting face. Lastly, there are removable support vanes inside the bolt slots and under a curved overhang.
Post-Printing
The part needs a little clean-up before use. Remove the brim: Snap it off with a pliers and file smooth as desired. Pluck the supports from inside the bolt slots, trim remnants with Xacto blade Other supports: There are three vanes that support a convex overhang where one of the mounting bolts must go. A deft swipe with an Xacto blade removes these easily enough.
Good enough is good enough, but I lavished a bit of obsessive trim work on the clean-up, just to make it look nice.
How I Designed This
As mentioned, I used Tinkercad to design this. I made a detailed sketch of the pat and then measured critical dimensions with a digital caliper. I took liberty with the dimensions of the mounting tabs and the length of the part. The mounting tab was a win, but the greater length caused clearance issues for the first iteration.
There are a lot of "union" and "difference" operations in building out this part. I find that constructing subassemblies, saving them as discreet STLs and then putting them all together at the end avoids a lot of manifold error problems. Finally, I used Microsoft's Netfabb STL repair tool, and converted the fixed file from 3mf format back to STL's in MeshLab.
The part printed in about 3 hours.
 Alessia Ianni-Palarchio
 Zoé
Zoé
 Alex Rich
 Alex Gontmakher