The new, smaller board can control a solid state relay (or turn on/off 5V to anything else) on port IO17. Here's some example code using an IR remote to control that port.
This code can be changed into controlling the input relays as well, of course.
Pressing one button on your remote turns the SSR on, another button turns it off. Read below to decide which buttons they are.The on-board LED lights up when the SSR is turned on.
Getting the code to compile
Note that IRremote.h won't compile unless you change it according to this forum post:
https://github.com/z3t0/Arduino-IRremote/issues/582
Change the end of IRremote.h (probably in your Documents\Arduino\libraries\IRremote folder) from:
#else
const int sendPin = SEND_PIN;
#endif
} ;
to:
#elif defined(SEND_PIN)
const int sendPin = SEND_PIN;
#endif
} ;
Note that it's only the first row that's changed, the rest is there to make sure you find the right section of the code.
IR Receiver
I've used a TSOP4838 (not sure if others will work), and connected pin 1 to IO13 on the ESP32. The IR receiver's pin 2 connects to GND and pin 3 to +3.3V.
Open the Serial Monitor in the Arduino IDE, and it will print the IR codes it receives. Use them directly in the program below, the lines are commented with "Button chosen for "ON" / "OFF". Recompile and transfer it to the ESP32.
Here's me pressing "1", "2" and "3" on my remote control. "1" and "2" are already configured as "ON" and "OFF":
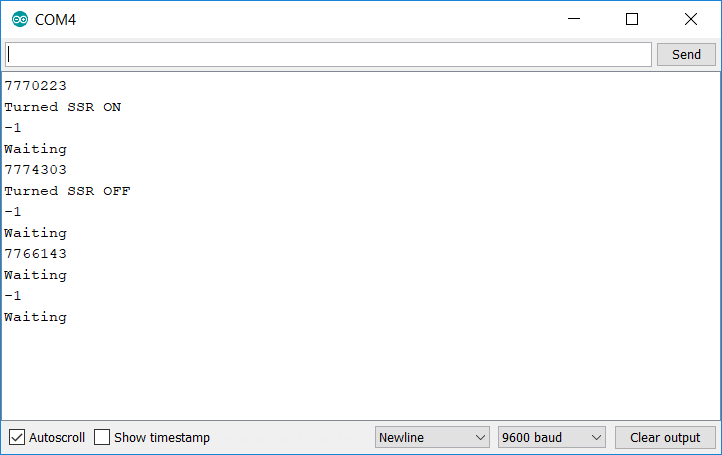
The first output, "7770223", is the "1"-button on my remote control. So I added it to the row that says "Button chosen for "ON"". The next number shown, "7774303", is the "2"-button on my remote. It was added to the row that says "Button chosen for "OFF"". I even pressed "3" on my remote, "7766143", but did nothing with that value.
Example Code
/*
* Muffsy Relay Input Selector
* Turn a solid state relay ON or OFF using IR
*
* Pin 1 on TSOP4838 IR receiver is connected to IO13 on the Relay Board
* (Pins 2 and 3, GND and 3.3V respectively)
*
* 2018-11-13 http://muffsy.com
* Creative Commons Attribution 4.0 International
* https://creativecommons.org/licenses/by/4.0/
* https://www.muffsy.com/blogs/post/Information-on-muffsy-com-Now-Explicitly-Open-Source/
*
* IRremote.h can be installed directly in the Arduino IDE,
* using "Tools -> Manage library". Search for IRremote,
* select the one by Ken Shiriff
*
* The ESP32 board on the Muffsy Relay Input Selector is called
* "NodeMCU-32S" in the Arduino IDE
*/

#include <IRremote.h>

int IR_Recv = 13; // IR Receiver, IO13
int SSR = 17; // Solid State Relay, IO17
int LED = 2;  // Onboard LED, Pin IO2
int SSRState; // Declare integer variable for SSRState

IRrecv irrecv(IR_Recv);
decode_results results;

void setup() {
  Serial.begin(9600);  // Starts serial communication
  irrecv.enableIRIn(); // Starts the receiver
  pinMode(SSR, OUTPUT); // Sets the SSR pin as output
  pinMode(LED, OUTPUT); // Sets the onboard LED pin as output
  SSRState = 0; // Start with the SSR set to "OFF"
}

void loop() {
  // Turn SSR and LED "OFF" if SSRState is 0, "ON" if SSRState is 1
  if (SSRState == 0) {
    digitalWrite(SSR, LOW);
    digitalWrite(LED, LOW);
  }
  else {
    digitalWrite(SSR, HIGH);
    digitalWrite(LED, HIGH);
  }

  // Decodes the infrared input
  if (irrecv.decode(&results)) {
    long int decCode = results.value;
    Serial.println(decCode);
    // Switch case to use the selected remote control button
    switch (results.value) {

      case 7770223: // Button chosen for "ON"
        {
          digitalWrite(SSR, HIGH);
          digitalWrite(LED, HIGH);
          Serial.println("Turned SSR ON");
          // Set SSRState to 1 ("ON")
          SSRState = 1;
          break;
        }

      case 7774303: // Button chosen for "OFF"
        {
          digitalWrite(SSR, LOW);
          digitalWrite(LED, LOW);
          Serial.println("Turned SSR OFF");
          // Set SSRState to 0 ("OFF")
          SSRState = 0;
          break;
        }

      default:
        Serial.println("Waiting");
    }
    irrecv.resume(); // Receives the next value from the button you press
  }
}
Discussions
Become a Hackaday.io Member
Create an account to leave a comment. Already have an account? Log In.