 Casual Cyborg
A lot of times, especially if you're a tinkerer, when it comes to the beginning, we just prefer to dive in and start messing with stuff. This has its advantages, but it also has its disadvantages. If you're on a time limit, going about it this way isn't the best way to do it. Having worked as a program manager for a NASA project, and as a manager/developer/instigator of a good number of other products both technical and non technical, a lot of times it makes far more sense to start with a more formal beginning. And that beginning means outlining your objectives. For me, that means creating what's called a BFT, or a Business/Functional/Technical Requirements Document.
The Business Requirements are the answers to the question of "What need are you trying to fulfill?" For example, let's say we're designing the Smart Cat Bowl. What's the primary need for the Smart Cat Bowl to fulfill?

We want the Smart Cat Bowl to let us know that the cat is eating. Brilliant! Typically, Business Requirements are stated in plain language to show how the product is fulfilling a need. I need to know my cat is eating. (note, I don't have cats. I have dogs. But this'll work the same)
Next, the Functional Requirements answer the question "How are you going to fulfill those needs?"
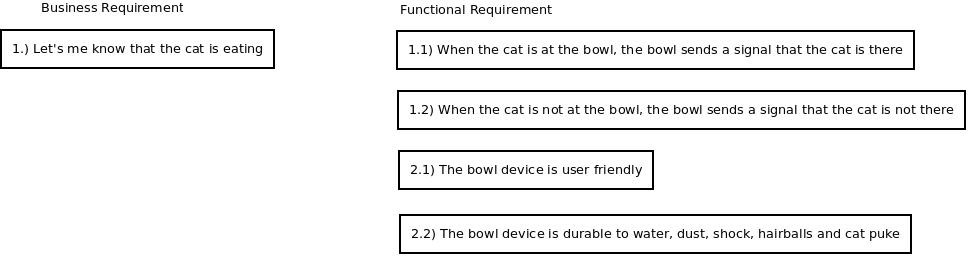
Notice the numbering of the Functional Requirements gets a decimal. This helps group the functions according to a class structure. When writing out your Functional Requirements, you want to group them into general groups of functions, for example,
- When the Cat is at the bowl, the bowl sends a signal that the cat is there
- When the Cat is not at the bowl, the bowl sends a signal that the cat is not there
- The bowl device is user friendly
- The bowl device is durable to water, dust, shock, hairballs, and catpuke
I've grouped the user friendly and durable parts to a class "2", because those are mechanical requirements. User interface requirements would be their own class. You want to create groupings in accordance to both the engineering and design group that will address that particular group. For a team, this makes it a lot easier to delegate and divvy up the parts to the particular expertise of your team mates. Or if you're doing this alone, it helps you focus on just what needs to be done, one group at a time, so that a delay in one part doesn't necessarily delay the other.
Next, we have to attach arrows to the business requirements, which allows us to see how they're related.
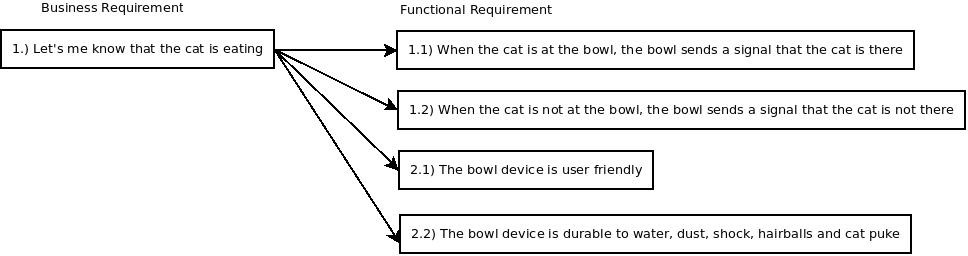
The arrows are important because you get an overall picture of how the parts are related to each other.
Next, the Technical Requirements answer the question of "How will the technology fulfill those functions?"
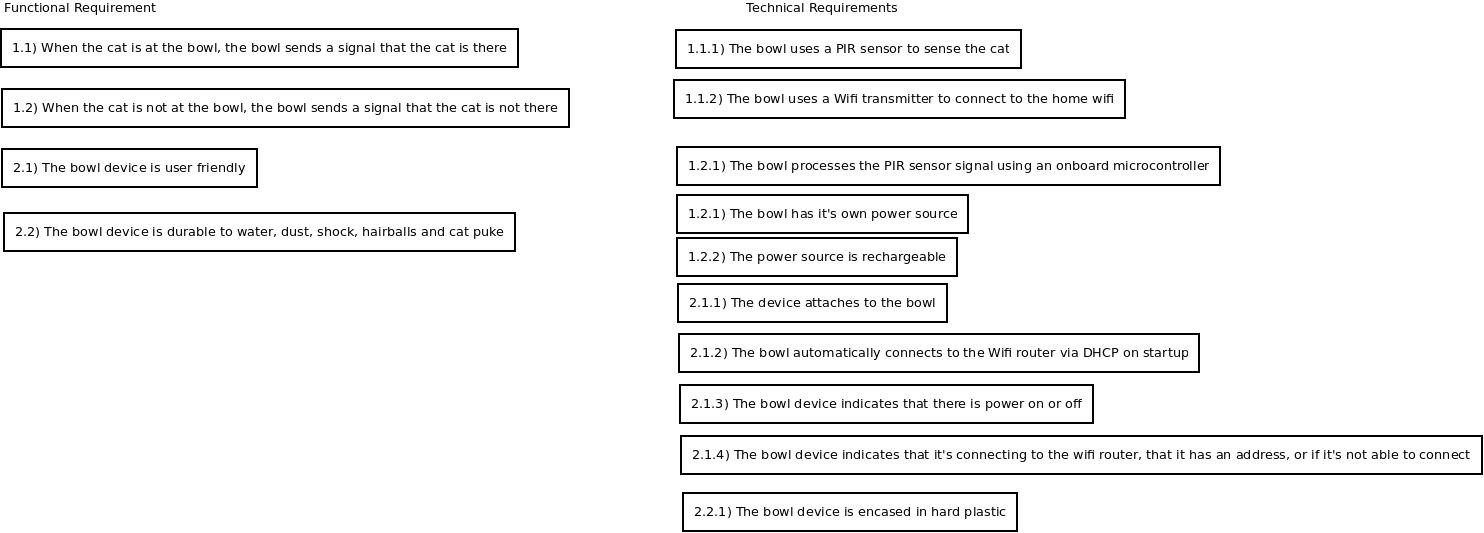
This is where you get to flesh out what makes up the functional component. As an example, for 1.1) which is "when the cat is at the bowl, the bowl sends a signal that the cat is there."
So how do we fulfill that function technologically? Here's the list.
- The bowl uses a PIR sensor to sense the cat
- The bowl uses a wifi transceiver to connect to the home wifi router
You don't want to get into the specifics of exactly what technology, eg. what chip, what sensor maker, etc, to use. It's not necessary. What is necessary is specifying exactly what the core technology is supposed to do. This gives you flexibility, so if a part doesn't work out, you can sub in another part that does the job.
Once you've populated the functional technical requirements, it's time to add the arrows to understand their relationship, and where you put your priorities.
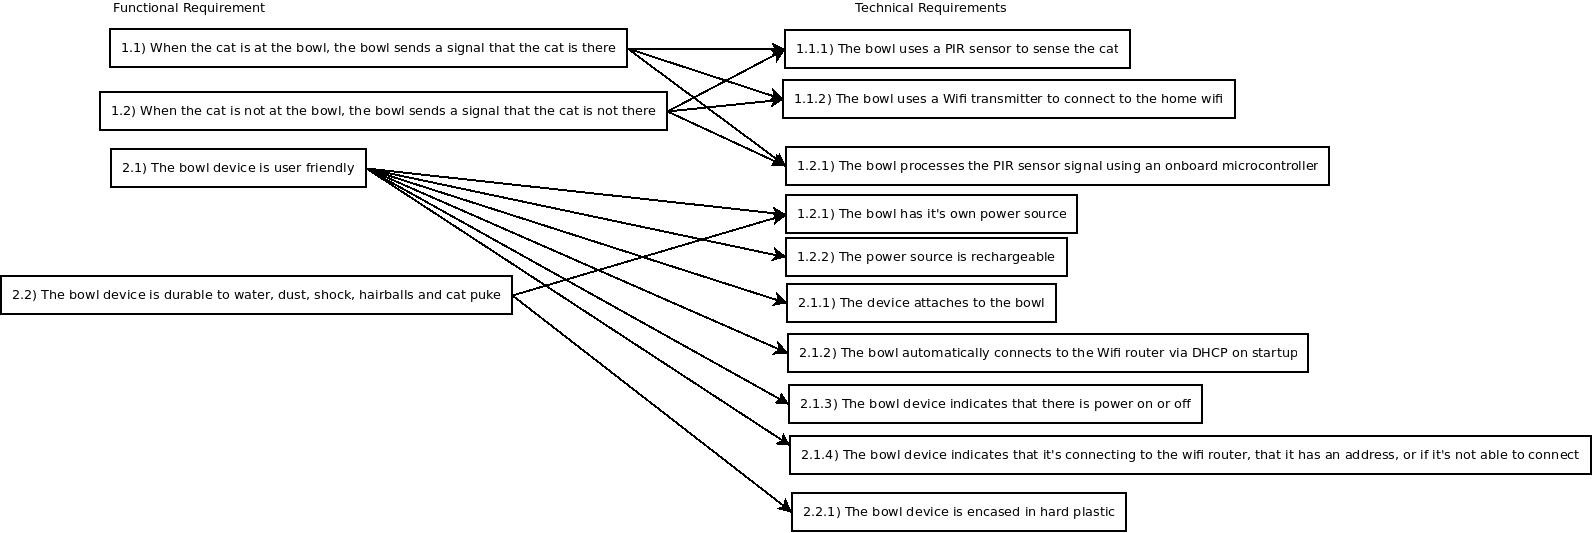
You'll notice there's a lot of arrows coming from "The bowl device is user friendly." There's a good reason for that. A product is only as good as its ease of use for its intended purpose. While the technology parts are important, human interface, user experience is much more important. And it's something engineers often get wrong. The beauty of using the BFT is you can see the emphasis on the functional requirement, and know where to focus to get it right.
Finally, you can include what are the technology specifics that answer the questions of "What chip, what algorithm, what hardware, software, etc do I need to make this technical requirement work?"
 Here, you can get into the nuts and bolts of how you want to approach the technical requirements. This is particularly handy for the mechanical engineering and asthetic design portion of the product. Once you've defined your Technical Specifics, once again, connect it with arrows, like so.

Once you're done, the overall BFT diagram should look like this: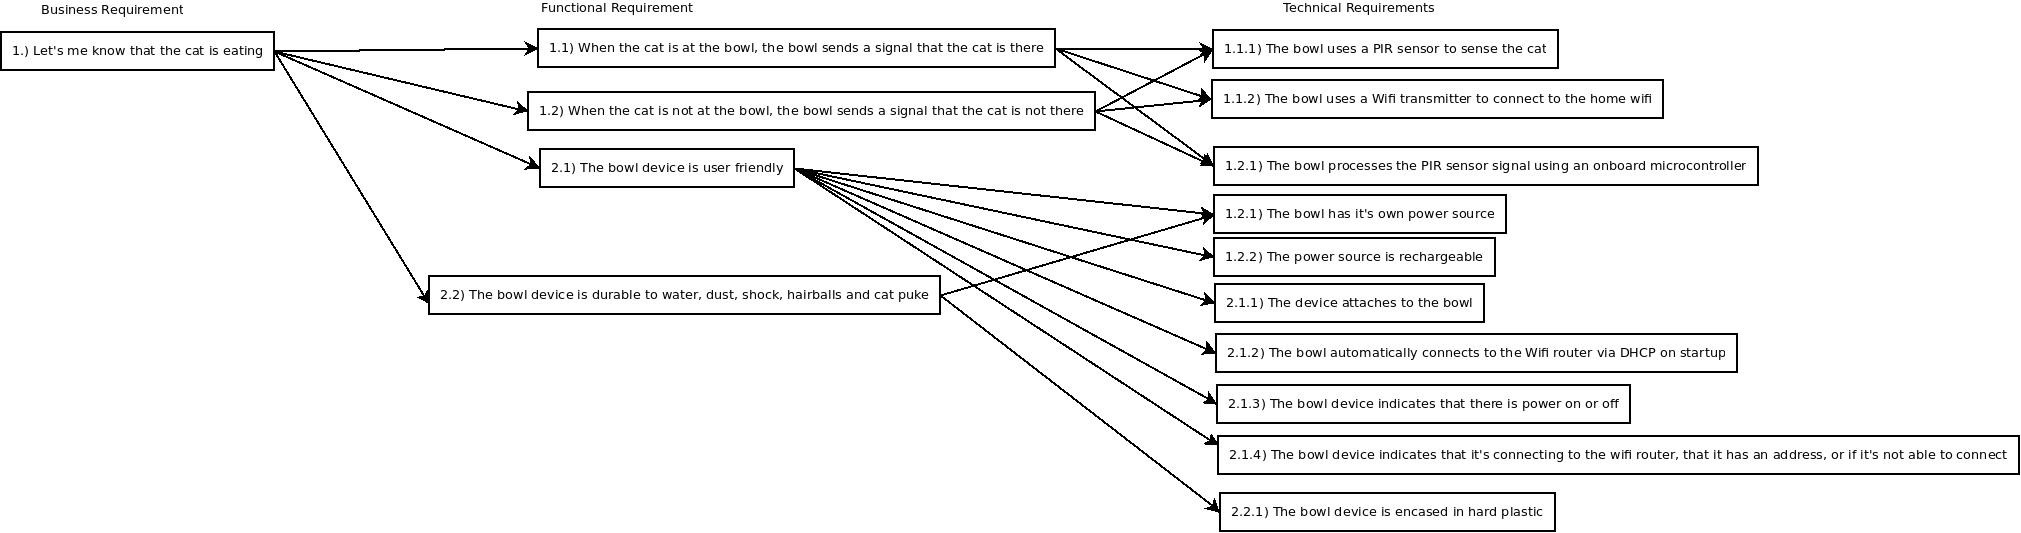
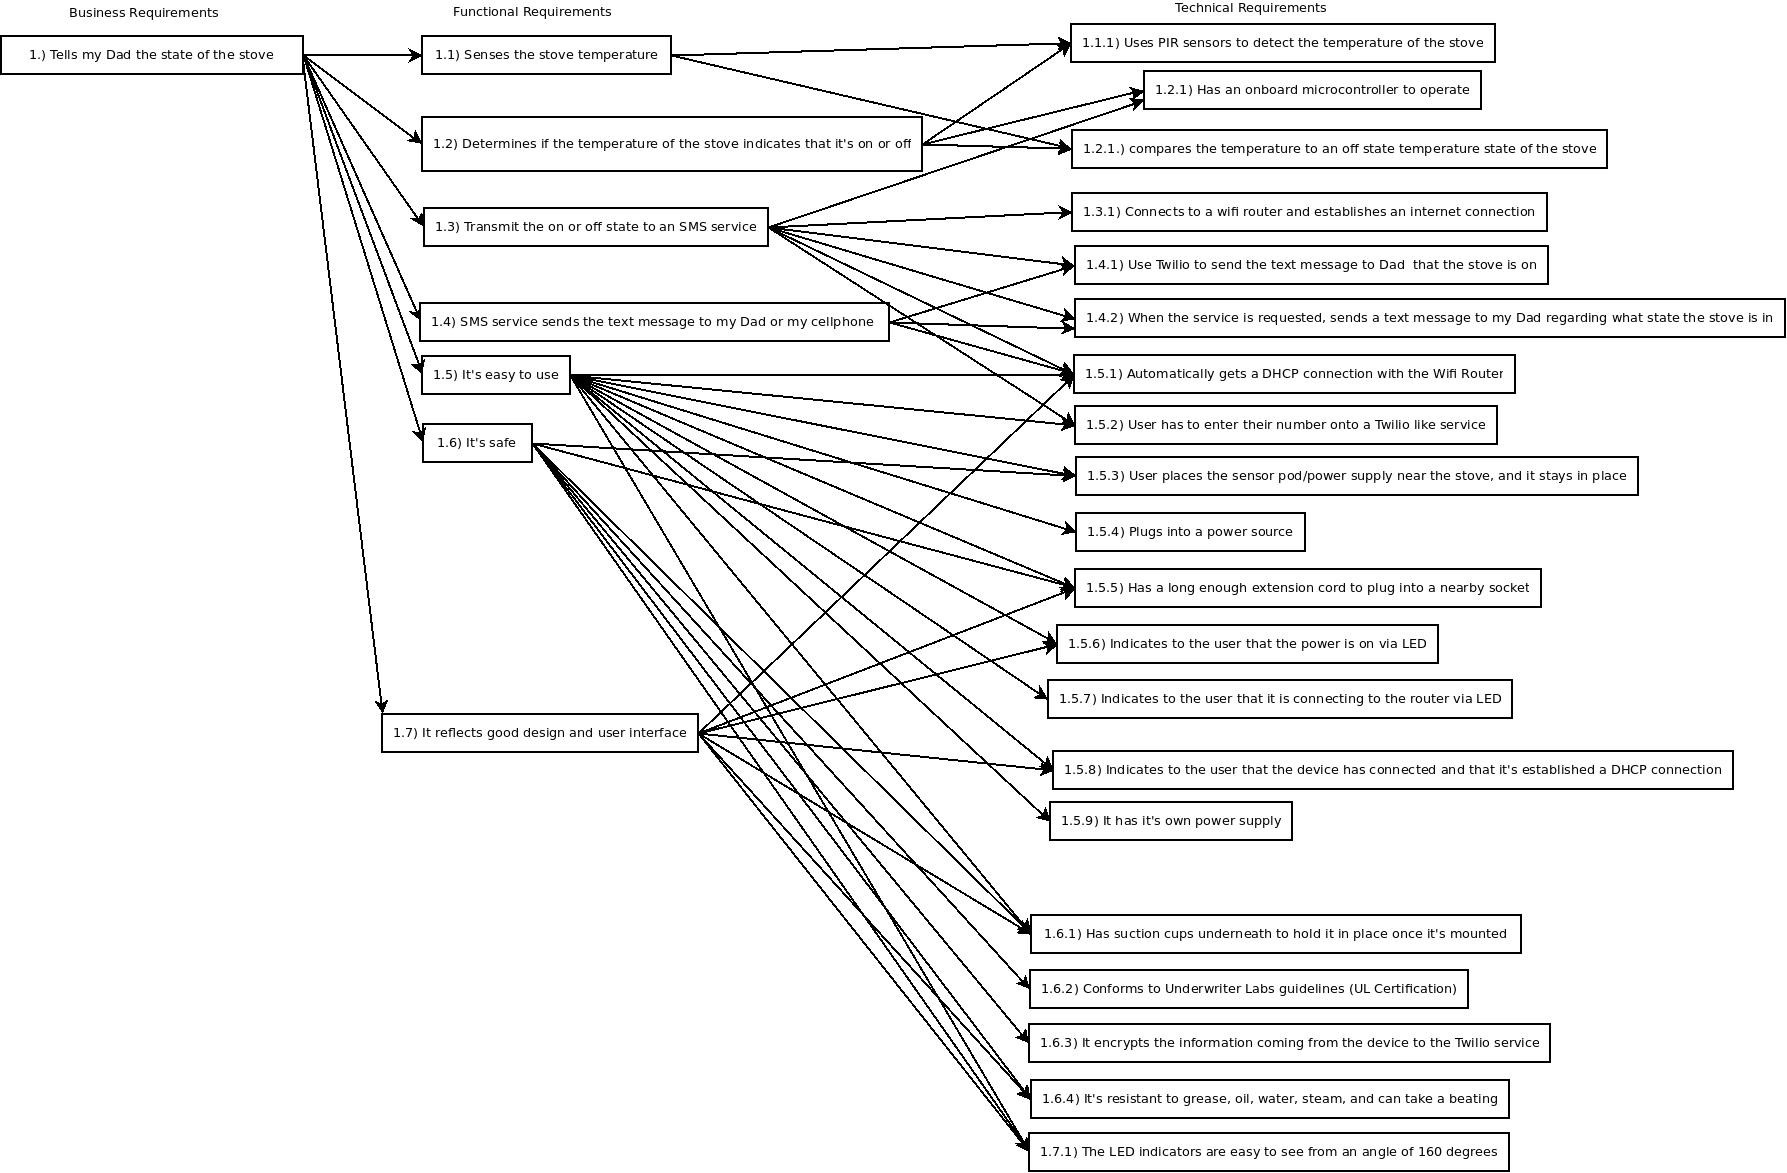
This is a clean, thought out plan for approaching your product. Now, for what I'm working on, the IOT device for my Dad, my BFT looks like this.
Coming up next week, algorithm development, and coming up with the bill of materials to build! And please do leave feedback, how to improve this, suggestions, etc. If you're a teacher, feel free to refer your students to my blog, and do let me know that you're doing so. All I ask is once they've built their stuff, if I can stop by to check it out!
Addendums: Software used is Dia. I run Linux on my systems, so it's easy to get, and I think it's been ported to all software platforms.
Discussions
Become a Hackaday.io Member
Create an account to leave a comment. Already have an account? Log In.