 Peter Walsh
1) Made final board schematic
2) Software is coming along
3) Lots of features added to board/software
4) Semi automated horn tuning seems to work
5) Horn blanks can be cut with a table saw
6) Power control works, but not very well. Probably due to noise.
Added lots of features...
The Arduino controller had leftover g'zintas and g'zoutas so I added to the project:
1) Two inputs.
2) Two outputs.
3) Two LEDs.
4) A buzzer.
5) Power rails from the ATX controller brought out to screw connectors
Inputs and outputs are opto-isolated, so external equipment can be isolated from the controller. The I/O can be linked to software events in various ways. For example, a switch connected to an input can give direct control of the transducer output, an output can trigger a system when the transducer is on, and so forth.
Everything can be controlled by the serial interface, so the user can write their own logic to measure and control things. There's even a left-over I/O for future use.
Power rails from the ATX are convenient for powering user equipment: 3.3V, 5V, and 12V (and GND) are brought out to screw terminals.
(I 'kind of went overboard adding extra hardware and the software to drive it. The system can now be described as "feature rich" :-) On the plus side, I can't think of any more features the system needs.)
The software is controlled via 2(ish)-character commands over the serial port. Any serial port program (putty, hyperterm) can be used, direct user control isn't hard, and I have a perl interface library for program control.
Board schematic version 1.0
The driver is still having some problems, but it's close enough that I'm going to make boards and debug from there. The hand-wired board is getting a little tough to deal with.
The final schematic is in 4 sheets, here's one:
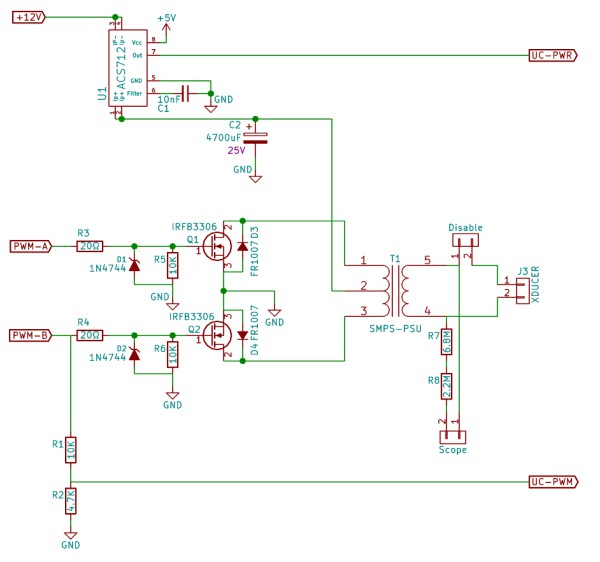
The power control isn't working very well, and I think this is due to noise in the circuit from the generated output: there's 2 volts of noise on the ground rail, and I think it plays hob with the RC timing of the PWM chip.
I'm not sure what to do about this. I plan to proceed with board layout, and separate the driver and controller ground planes by a single trace that can be cut. Maybe a 100 ohm resistor between the two grounds will dampen the noise. (There are decoupling caps on all ICs.)
Noise on the 12-volt rail also affects the current measurement, and putting this through an RC integrator doesn't seem to help. Maybe a stepped filter between the current measuring chip and the transformer would fix this.
I don't have an EE background, so it'll probably take awhile to sort this out.
Any suggestions?
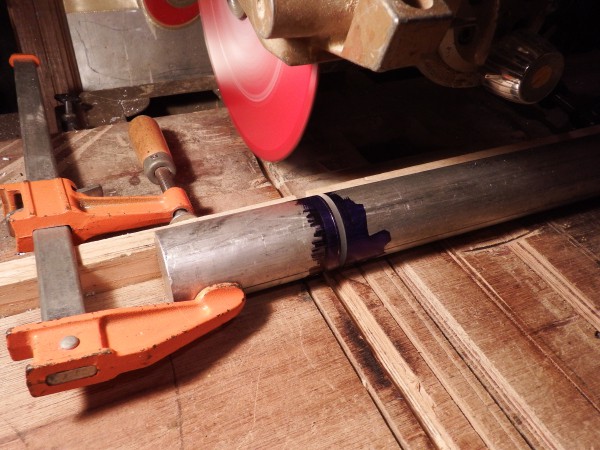
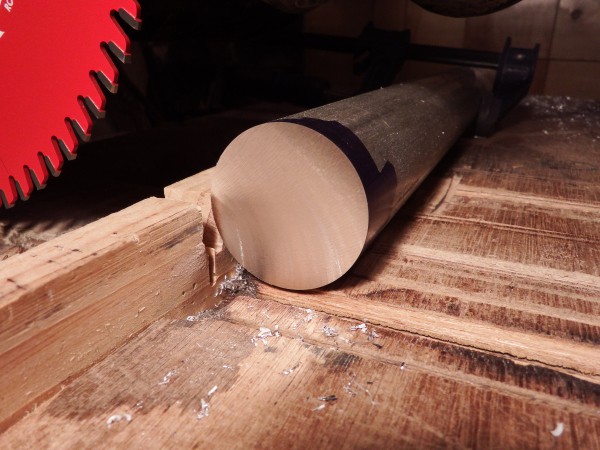
Cutting aluminum on a radial-arm saw
I tried a metal-cutting blade for slicing aluminum to make a new horn.
This seems to work well enough - the cut end has a shiny "pebbled" finish which looks nice artistically, but not the flat mirrored finish you get with machining. It's also very slightly angled relative to the body of the rod, so it still needs to be faced off.
Still, this is much *much* faster and more accurate than bandsaw cutting. I can cut about a horn a minute with this method, and they only need a quick 10 thou facing cut on the mill. Also, I can cut the horn to within 10mm of the desired length without having to worry about bandsaw creep.
I also got a metal blade for my table say. I'm *considering* making a jig that positions a horn blank over the saw blade and allows the user to slowly rotate the blank. Possibly using bearings.
If that works, then it should be possible to make horns on a table saw without a lathe, which would put the project in range of many more hobbyists.
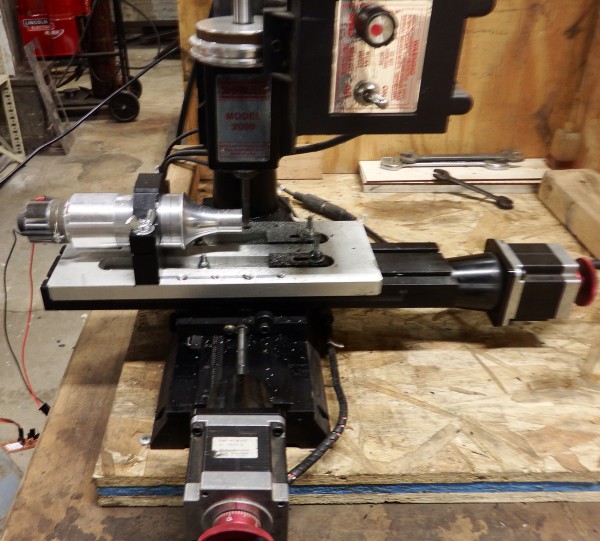
Semi-automated tuning
A small CNC mill can automate much of the tuning process.
Normally, to tune the horn to length you chuck it, face off one end on the lathe, unchuck it, mount it on the transducer, and measure the frequency. This is tedious and time consuming.
I made a mount for the little sherline mill at the space and wrote a program to go back and forth over the end with an end mill.
Now I can keep the transducer and horn as one assembly, measure the frequency, and run the program to slice off a small piece. Much, *much* easier.
One thing of note: Unhook the transducer from the computer while milling. The generated back-emf from the transducer (due to vibration) can kill your serial port. TIL
Her's a picture of the setup. The laptop controls an Arduino via serial port, and a small interface board (hanging from the transducer wires) interfaces the Arduino to the transducer.
Measure, unplug, make a pass, replug, and remeasure. It's pretty simple.

Discussions
Become a Hackaday.io Member
Create an account to leave a comment. Already have an account? Log In.