 icstation
Here is the sketch for the logging feature. It reads the DHT22, converts the floats to strings, and writes the comma delimited data to the SD card. Video is below!
#include
#include "DHT.h"
#define DHTPIN 7 // what pin we're connected to #define DHTTYPE DHT22 // DHT 22 (AM2302) DHT dht(DHTPIN, DHTTYPE);
#include #include
const int chipSelect = 10;
void setup() { // Open serial communications and wait for port to open: Serial.begin(9600); while (!Serial) { ; // wait for serial port to connect. Needed for Leonardo only }
Serial.print("Initializing SD card..."); // make sure that the default chip select pin is set to // output, even if you don't use it: pinMode(10, OUTPUT);
// see if the card is present and can be initialized: if (!SD.begin(chipSelect)) { Serial.println("Card failed, or not present"); // don't do anything more: return; } Serial.println("card initialized."); Serial.println("DHTxx test!"); dht.begin(); }
void loop() { // Wait a few seconds between measurements. delay(2000);
// Reading temperature or humidity takes about 250 milliseconds! // Sensor readings may also be up to 2 seconds 'old' (its a very slow sensor) float h = dht.readHumidity(); // Read temperature as Celsius float t = dht.readTemperature(); // Read temperature as Fahrenheit float f = dht.readTemperature(true); // Check if any reads failed and exit early (to try again). if (isnan(h) || isnan(t) || isnan(f)) { Serial.println("Failed to read from DHT sensor!"); return; }
// Compute heat index // Must send in temp in Fahrenheit! float hi = dht.computeHeatIndex(f, h);
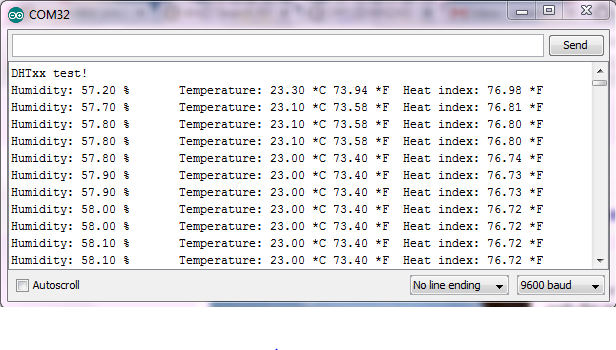
Serial.print("Humidity: "); Serial.print(h); Serial.print(" %\t"); Serial.print("Temperature: "); Serial.print(f); Serial.println(" *F\t");
// make a string for assembling the data to log: String dataString = "";
char buffer[10]; String stringH = dtostrf(h,6,2,buffer); dataString = stringH; dataString += ","; String stringF = dtostrf(f,6,2,buffer); dataString += stringF;
// open the file. note that only one file can be open at a time, // so you have to close this one before opening another. File dataFile = SD.open("datalog.txt", FILE_WRITE);
// if the file is available, write to it: if (dataFile) { dataFile.println(dataString); dataFile.close(); // print to the serial port too: Serial.println(dataString); } // if the file isn't open, pop up an error: else { Serial.println("error opening datalog.txt"); } }
Step 1: MicroSD Card Module

This tutorial will help you get the ICStation Micro SD Card Module up and running. This is ideal for recording data from sensors for future analysis. This is a 5v piece, where commonly sd card modules are 3.3v.
The right angle header that comes pre soldered isn't long enough to sit in our standard breadboard, so we used a mini breadboard where the card can hang off the side. You can also use male to female jumpers.
The connections are as follows:
** MOSI - pin 11 on Arduino Uno/Duemilanove/Diecimila
** MISO - pin 12 on Arduino Uno/Duemilanove/Diecimila
** CLK - pin 13 on Arduino Uno/Duemilanove/Diecimila
** CS - pin 10 on Arduino Uno/Duemilanove/Diecimila. You can change this one.
Connect GND to Arduino GND and VCC to Arduino +5v.
Insert a fat32 formatted micro sd card.
No libraries have to be downloaded or installed, as the Arduino IDE comes pre configured with the SD Card libraries.
Just load the example from File, Examples, SD, Card Info.
This example already comes with the Leonardo / Micro serial delay.
After uploading you should see something similar to the following:
The Arduino only reports volumes less than 2GB, even if using a larger
sd card. Stay tuned for a data logging project using this and the 3 previous modules we have blogged about.
Step 2: DHT22 Temperature Humidity
This tutorial will teach you how to read temperature and humidity readings using the ICStation DHT22 Temperature & Humidity Module.Once you have those readings, you can calculate neat things like Heat Index and Dew Point, and by adding a wind speed sensor, Wind Chill.
Unlike the bare sensors, this one is...
Read more »
 Ahmed Azouz
 muzi
muzi