 alusion
Successful progress on getting AVALON [Anonymous Virtual/Augmented LOcal Networks] to work plug in play with some boot time scripts and new hardware upgrades. I shopped around and got a couple new raspberry pi 2 model B and ABS plastic cases. Here's some pics of the upgraded devices:
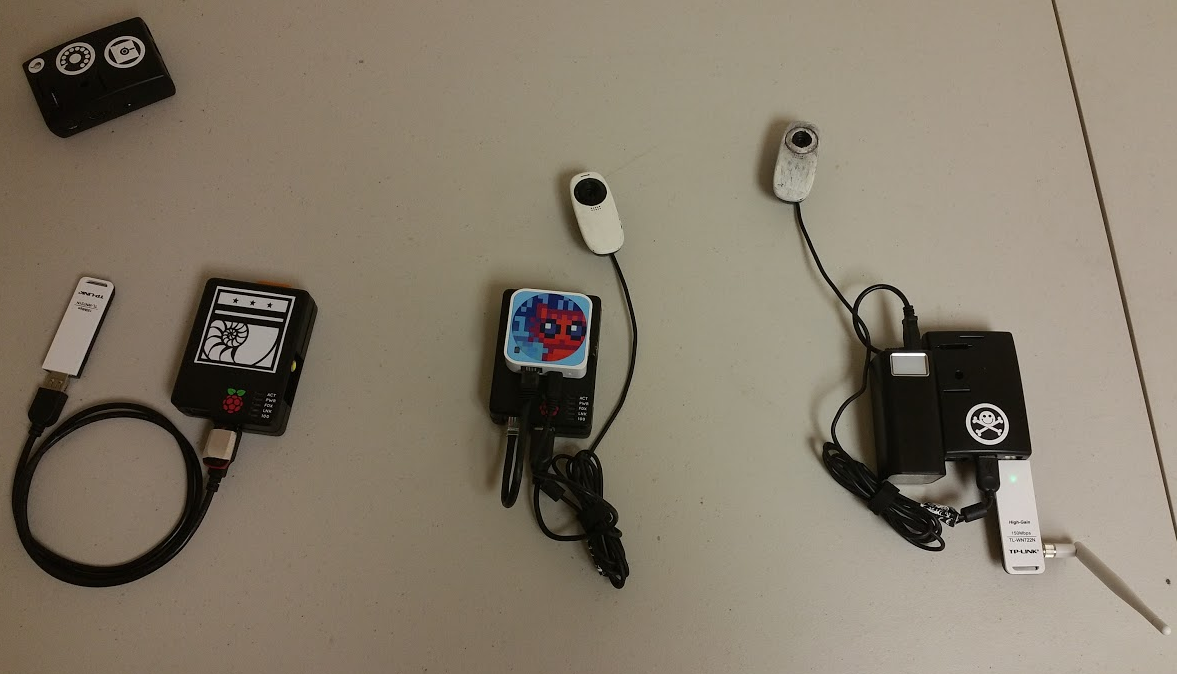
The one on the far left is the basic Raspberry Pi 1 model B that is running the Janus multiserver and Piratebox via the Raspberry Pi build (Arch Linux). The middle one is the same device but PirateBox mounted on top, while the pi is running a webcam server and Janus multiserver inside. On the far right is the current prototype:
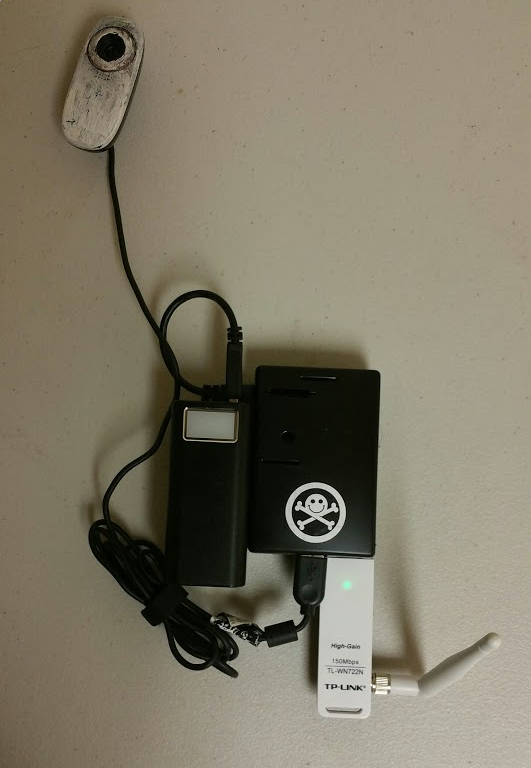
Everything is now self contained with the Raspberry Pi 2 model B + TL-WN722N WiFi adapter, USB battery pack, and a Logitech webcam. It's capable of offline filesharing and communication that is Oculus Rift enabled for realtime 3D Virtual/Augmented reality interaction. This device automatically starts a WiFi hotspot that users can connect to and streams the Webcam video over the web browser which can be viewed inside Janus.

Can now have a window into the outside world inside my private VR/AR network. Quite meta with the camera looking at the device that we are currently inside of.
I've tested the Video Streaming into Janus with both Logitech c270 and Playstation Eye camera. They both work but I would recommend using the Logitech since the PS Eye only has 640x480 resolution. I'm going to write up a how-to on building your own AVALON for the Raspberry Pi 2 next!
First install Raspbian onto a MicroSD card. The Raspberry Pi 2 now uses the tiny SDHC cards for loading its operating system. We need to install the PirateBox utilities. If you're comfortable on the command line you can choose to do this in a chroot environment:
mount -o bind /dev /mnt/dev
mount -t proc none /mnt/proc
sudo chroot /mnt/ /bin/bash
Otherwise, download Raspbian from the official Raspberry Pi downloads page and aftering following the install guide then you can plug it in to your raspberry pi and either SSH in or attach monitor/keyboard/networking devices to interact and install the things. Expandthe FS, change root passwd, and enable SSH for now.
As root:apt-get update
apt-get upgrade
apt-get install git tmux
apt-get -y install lighttpd
/etc/init.d/lighttpd stop
update-rc.d lighttpd remove
apt-get -y install dnsmasq
/etc/init.d/dnsmasq stop
update-rc.d dnsmasq remove
apt-get -y install hostapd
/etc/init.d/hostapd stop
update-rc.d hostapd remove
apt-get -y install iw
rm /bin/sh
ln /bin/bash /bin/sh
chmod a+rw /bin/shThen edit your network config file /etc/network/interfacesauto lo
iface lo inet loopback
iface eth0 inet dhcp
iface wlan0 inet manualSave and exit. Then browse to your home directory and finish installing the rest of the packages:wget http://downloads.piratebox.de/piratebox-ws_current.tar.gz
tar xzf piratebox-ws_current.tar.gz
cd piratebox
mkdir -p /opt
cp -rv piratebox /opt
cd /opt/piratebox
sed 's:DROOPY_USE_USER="no":DROOPY_USE_USER="yes":' -i /opt/piratebox/conf/piratebox.conf
sed 's:PROBE_INTERFACE="no":PROBE_INTERFACE="yes":' -i /opt/piratebox/conf/piratebox.conf
ln /opt/piratebox/init.d/piratebox /etc/init.d/piratebox
cd ../../
rm -rv piratebox/ piratebox-ws_current.tar.gzYou will want to run the PirateBox server by default on startup as well:sudo update-rc.d piratebox defaults
sudo /etc/init.d/piratebox start
sudo touch /opt/piratebox/conf/init_done
When I first tested this, I was frustrated with the reason why PirateBox software was crashing whenever I ran the stream / Janus server. The reason was because of a port conflict over 8080. So you'll need to edit the DROOPY_PORT in the /opt/piratebox/conf/piratebox.conf file and set it to 8085. Then edit the html /opt/piratebox/www/index.html and adjust to 8085. Will fix in pi image.
Now it's time to install the Webcam streamer that allows us to seamlessly pull visual information from the real world into the virtual reality environment as websurface content that you can put anywhere as you want inside your firebox room in Janus.
* The software is extremely versatile and has been successfully tested on openWRT devices as well!
Follow these instructions to compile and start mjpg-streamer working on your raspberry pi with an HD webcam:
cd /usr/src/
sudo mkdir mjpg-streamer
sudo chown `whoami`:users mjpg-streamer
cd mjpg-streamer/
git clone https://github.com/jacksonliam/mjpg-streamer.git .
sudo apt-get install libv4l-dev libjpeg8-dev imagemagick build-essential cmake subversion
cd mjpg-streamer-experimental
make
export LD_LIBRARY_PATH=.
/usr/src/mjpg-streamer/mjpg-streamer-experimental
./mjpg_streamer -i "./input_uvc.so -r 1280x720" -o "./output_http.so -w ./www -p 8090"
The streaming video will be resized to 1280x720 over port 8090. Port 8090 won't conflict with the other services the Raspberry Pi is running. Your IP address will be set to 192.168.77.1 when running PirateBox so type into your browser url:http://192.168.77.1:8090Test if it works. If it doesn't, don't worry I'm working on an AVALON Pi image you can just flash. If it does, cool lets move on.
Lets create a script start_mjpg that will initiate the service on boot time. SSH into your pi and create new text file start_mjpg
#!/bin/bash
cd /usr/src/mjpg-streamer/mjpg-streamer-experimental
./mjpg_streamer -i "./input_uvc.so -r 1280x720" -o "./output_http.so -w ./www -p 8090"
Lets repeat that last step to autostart our Janus multiserver as well. Create a new file start_janus and put this inside. Remember to replace user with your username! **
#!/bin/bash
cd /home/user/janus-server
/usr/local/bin/node /home/user/janus-server/server.js
Save and exit. Now make the scripts executable:
chmod 755 start_mjpg
chmod 755 start_janus
Stick the script into /usr/local/bin to run the scripts from wherever you are when logged into your Raspberry Pi. chown stands for change ownership.
sudo cp save_mjpg start_janus /usr/local/bin/
sudo chown 'whoami' /usr/local/bin/start_mjpg /usr/local/bin/start_janus
Now to configure your script to autorun at boot time, edit the /etc/rc.local file and append the following below the comments and above exit 0.
** Do not forget to change user in the below script to your username!
## Print the IP address

_IP=$(hostname -I) || true
if [ "$_IP" ]; then
  printf "My IP address is %s\n" "$_IP"
fi

## /etc/rc.local will run as root by default
## you must change user in your script!
## Start mjpg-streamer

(sleep 5; su - user -c "/usr/local/bin/start_mjpg; echo 'Browse to $_IP:8090/javascript_simple.html'")&

## Autostart Janus-Server

(sleep 2; su - user -c "sh /usr/local/bin/start_janus")&

exit 0
Reboot and check if everything is working. Make sure that the access point from Piratebox scripts is available and you can connect to it, that upload and download works, that you can browse to http://192.168.77.1:8090/javascript_simple.html and view the webcam livestream. I will upload some default rooms and avatars for AVALON soon so that you can test the janus multi-server easily. Just remember that all the filepaths for your firebox room must correspond to the path hosted from PirateBox! To do:
Customize defaults and UI then create a Raspberry Pi image for AVALON
Create a Github repo for default rooms and avatars that can be downloadable to a user's pi
Testing of CCTV functionality
Take some cool screen-shots / Video and also find a cool lunchbox to stick all the things inside.
Mount AVALON system onto a drone when given the opportunity.
Discussions
Become a Hackaday.io Member
Create an account to leave a comment. Already have an account? Log In.