 icstation
ICStationteam introduce you this MCU Voice Broadcast System based on ICStation Mega2560. This system works under DC5V voltage. It can broadcast internal vested songs in the MCU. What's more, it can realize the function of replay, pausing playback, continuing to play, selecting playlist and so on. It's really a convenient and practical voice broadcast system with manufacture operation.
Function:
1) Switch on the power supply, the digital tube will display number 1. Press key 1, MCU executes the function of "the next one"; Press key 2, it executes the function of "the previous one". The procedure interior has three vested songs, and key 1 and key 2 can realize the switchover of the three songs.
2) Press the key 4, execute the function of "playing the current song"; press key3, execute function of "pausing/continuing to play".
3) Press the key 5, execute the function of "relaying all the songs"
4) Before broadcasting the songs, the digital tube will display the serial number of the current song.
components list:
1.1 x ICStation ATMEGA2560 Mega2560 R3 Board Compatible Arduino
2.1 x Digital Tube
3.1 x 8Ω 0.5W Small Trumpet 36mm Diameter Loudspeaker
4.1 x four terminal switch
5.1 x 830 Point Solderless PCB Bread Board MB-102 Test DIY
6.30 x jumper wire
7.1 x +5V power supply
code for reference:
http://www.icstation.com/newsletter/eMarketing/MCU_Broadcast_Code.zip
Step 1: Schematic Diagram


Step 2: Connect the ICStation Mega2560 to the Breadboard.

From the ICStation Mega2560 development board, plug +5V power line and GND into the bread board, the red wire is used as power line and black one as GND.
Step 3: Connect the digital tube to the breadboard.

Plug the digital tube into the bread board, and connect it to the ICStation Mega2560
Step 4: Connect the switch to the bread board.

Plug the four terminal switch into the bread board, and connect it to the ICStation Mega2560 and GND.
Step 5: Connect the loudspeaker to the ICStation Mega2560

Connect the loudspeaker to ICStation Mega2560 development board and GND.
Step 6: Experimental phenomenon
First switch on the power supply, the digital tube will display number 1; Press the key 1, the number will plus one by itself; Press key 2, the number will minus one by itself. When the number is bigger than 3, it will return to 1, then execute the switchover of the three songs. Press the key 4, the loudspeaker will broadcast the song that the number the digital tube displays corresponds. If you press the key 3 when the song is put on, then the song will be stoped. And press the key 3 again, the song will be continued. After the power supply is switched on, press the key 5 directly, it will replay the three songs.
 Just4Fun
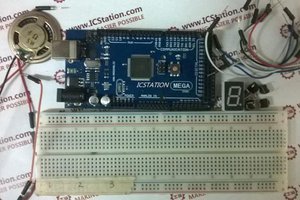
 noughtnaut
 Timo
Timo