Close
0%
0%

Numitron Clock

MQTT-enabled Numitron clock with Arduino and ESP8266

Similar projects worth following
Retro tube display clock that doubles up as a simple dashboard for my Homefront smart home system.

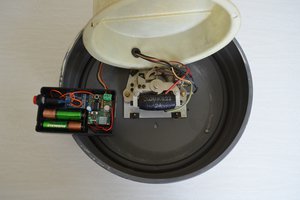
The clock has an RTC module which provides the current time. To set the initial time on start-up the device receives the correct time from the MQTT broker that the Homefront server uses.

The clock can also display temperature and humidity data that's received through the MQTT broker from the Homefront server.

  • 1 × Arduino Pro Micro
  • 1 × ESP8266 ESP-01
  • 4 × IV-9 Numitron
  • 1 × Rotary encoder Mode selector knob
  • 1 × Tiny RTC I2C module

View all 12 components

  • More de-coupling

    Harri Ohra-aho09/25/2015 at 16:00 0 comments

    As everything was connected up and the power was switched on there was a faint whine coming from somewhere in the circuit. I figured the Numitrons were causing some power fluctuations so I added a 100uF capacitor on the power rail. The whining stopped.

    The power supply module I have already has capacitors but they didn't seem to help here.

  • Rotary encoder

    Harri Ohra-aho09/23/2015 at 05:32 0 comments

    The first prototype had a potentiometer which acted as a selector between the clock's different view modes. I replaced that with a rotary encoder as it has unlimited range and avoid the potentiometer's unwanted behaviour of hovering between two states.

  • Numitron adapters

    Harri Ohra-aho09/16/2015 at 18:10 0 comments

    Soldered the numitrons to separate boards with small screw connectors. This should make connecting them a bit easier and also make replacing a tube possible in case a filament burns out.

  • Field telephone

    Harri Ohra-aho04/11/2015 at 13:11 0 comments

    Received the field telephone and it looks like a good fit for the Numitrons and the electronics. As it's military hardware it's very easy to dismantle without breaking anything. I'll just remove everything except the case itself and make a new top which houses the tubes.

  • Possible casing

    Harri Ohra-aho04/07/2015 at 17:52 0 comments

    Instead of doing some woodworking I decided to try to make the casing out of an old field telephone. Its bakelite housing should make a really nice-looking retro case with some modifications.

View all 5 project logs

  • 1
    Step 1

    Hooking up the Numitrons to the TLC5940 went pretty much in the same way as described on the library's page:

    The Numitrons are common anode so they work by hooking the anode to VCC and the filament pins to correct TLC5940 outputs. The Numitrons are listed as having an operating current of 17-22 mA so I used a 2 kohm resistor on the IREF pin. For some reason this lead to the Numitron filaments having very inconsistent glows. I changed the resistors to 1 kohm and after that the filaments had the same intensity.

    The 1 kohm IREF resistor means that each output could potentially sink about 40 mA but the TLCs didn't seem to be heating up so I'm going with that setup.

  • 2
    Step 2

    The ESP8266 is a temperamental little thing but I've had good experiences using the Espduino library so that's used here for the MQTT functionality.

    As the ESP's logic level is 3v3 I used a zener diode level shifter in front of its RX pin to bring the Arduino's 5V down to a safe level. The TX pin is used as it is.

    The Arduino can't properly power the ESP so it's important to supply power to it independently.

  • 3
    Step 3

    The Tiny RTC module is I2C compatible so using it was pretty straightforward wih the Hobby Components library.

View all 3 instructions

Enjoy this project?

Share

Discussions

Similar Projects

Does this project spark your interest?

Become a member to follow this project and never miss any updates