Close
0%
0%

Safe Deposit Box with two-factor authentication

A safe-deposit box that requires 2FA to open. Built with resin.io and Authy.

Similar projects worth following
The Internet of Things is mostly about bringing Things to The Internet, but it's also about bringing The Internet to Things. Two-Factor Authentication (2FA) has been offered by mission critical services websites like bank accounts or Bitcoin wallets for some time now, providing an additional layer of security beyond just a password. Since resin.io is all about crossing the gap between the internet and the real world we decided to put this concept into action by building a safe-deposit box that requires 2FA to open.

By combining resin.io with Twilio’s Authy, we got to do this with a very simple deployment system —git push resin master— and a very easy way to add the 2FA mechanism.

Safes and lockers are usually opened by a key or by tapping in a code on a numeric keypad. We've come up with an alternative approach that combines a numeric code with an SMS sent via Authy to the user’s phone, which means that opening the safe involves having both the code and the mobile phone.

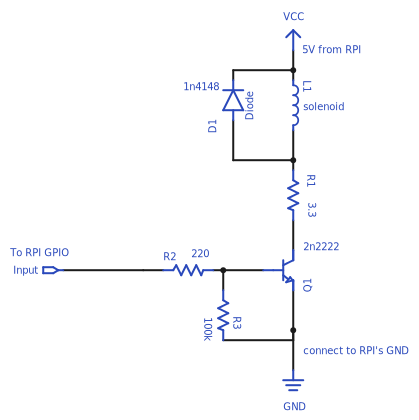
We used a Raspberry Pi 2 and a little circuit on a protoboard. The lock itself is a 5V solenoid.

The Pi runs a node.js server which performs authentication via a simple web interface. We use Authy to provide the 2nd factor authentication and resin.io to allow ultra-simple code deployment.

The procedure to lock and unlock the safe is as follows:-

  • The user inputs their email.
  • If it's a new user, they're asked for a phone number.
  • The UI asks for the user's code to lock the safe.
  • When the code is inputted by the user, the lock is engaged.

Once this is done, to open the safe:-

  • First, the user has to input the correct code.
  • After inputting the code, Authy sends an SMS to the user.
  • The user inputs the SMS code, and the lock opens.
  • The lock only opens for a few seconds, but it can be opened again by pressing the 'Open' button on the UI.

When you use the UI on your phone, you'll usually be able to input the SMS code when it arrives as it will appear in your phone's notification area.

And this is what the unique experience of opening our safe looks like:-

  • 1 × Raspberry Pi 2
  • 1 × A rather hard-to-break box Be careful to choose one with a large enough opening for the Pi’s power cable as well as sufficient space so that the solenoid can be attached such that it blocks the door when it's closed.
  • 1 × A small protoboard
  • 6 × Resistors We used three 10 ohm resistors in parallel to obtain 3.3 ohms resistance (which we recommend to have a greater max current) and two 470 ohm resistors to obtain 235 ohms for R2 (though here a single 220 ohms would work)
  • 1 × 1N4148 diode

View all 8 components

  • 1
    Step 1

    The hardware

    The circuit schematic for the solenoid driver looks like this:-

    (You can also find it on Upverter)

    And this is how we assembled the solenoid driver on the protoboard:-

    proto.png

    The software

    the Raspberry Pi runs a node.js server which implements a multi-step authentication mechanism, in order to achieve this we designed a state-machine using machina.js served up over HTTP via express.js. Most of the interaction operates over socket.io, to provide real time feedback to the user.

    We use the "authy" npm package to easily interact with the Authy API, borrowing some code from their tutorial.

    State machines consist of states and events which generate transitions from one state to another - the model we use in our application, 'Safebox', has 'open' and 'closed' states with transitions going from one to the other in both directions, passing through intermediate states which handle the auth process.

    Whenever a user interacts with the UI, input events are fired via socket.io which are passed on to the state machine.

    The code below is an example of how these states and transitions are defined:

    var safebox = new machina.Fsm({
        /* ... other properties here */
        states: {
            /* ... other states here and below */
            closed: {
                _onEnter: function(){
                    this.lock.enabled(false);
                    this.lock.close();
                    this.persistedState.currentState = 'closed';
                    this.persistedState.save();
                    this.emitStatus();
                },
                input: function(data){
                    this.currentUser.comparePassword(data.code, function(err, match){
                        if(match){
                            safebox.transition('authenticating');
                        } else {
                            io.emit('notice', 'That\'s not your code!');
                            safebox.transition('closed');
                        }
                    });
                }
            },
            /* ... */
        }
    });
    

    When the machine transitions to the 'closed' state its _onEnter function is called disabling the lock and saving this new state. When the user subsequently inputs a code we compare it against their password only transitioning to the next state if there's a match.

    We used MongoDB to persist the box's current state and user data - storing user data allows us to store user's passcodes and phone numbers so they don't need to reconfigure their device each time the device is restarted.

    The code integrating the user model also interacts with the Authy API which provides methods for sending an SMS to the user and verifying the code that they provide.

    On the client side, we have a simple single-page jQuery app that shows different HTML content for each of the state-machine's states, listens to events on the dialpad and inputs, sends socket.io messages and provides the user with the appropiate feedback. We used Bootstrap and toastr to rapidly design an interface that is reasonably pleasing to the eye :)

    We use resin.io to tie everything together with a Dockerfile that sets up the environment and runs our start script:-

    FROM resin/rpi-raspbian:jessie
    RUN apt-get update && apt-get install -y curl
    RUN curl -sL https://deb.nodesource.com/setup | bash -
    RUN apt-get install -y build-essential nodejs mongodb
    COPY . .
    RUN mkdir -p /datadb
    RUN npm install
    EXPOSE 8080
    CMD bash start.sh
    

    Our start.sh script then starts MongoDB (repairing it in case of an unclean shutdown) and our web server:-

    rm /datadb/mongod.lock
    /usr/bin/mongod --dbpath /datadb --repair
    /usr/bin/mongod --dbpath /datadb --fork --logpath mongod.log && node index.js
    

    Using resin.io makes our deployment as simple as typing 'git push' and the fact that it allows us to use docker ensures that all our dependencies are met in the precisely the same way for every device. It couldn't be simpler :)

    You can find all the source code for the project in our GitHub repository!

View all instructions

Enjoy this project?

Share

Discussions

Similar Projects

Does this project spark your interest?

Become a member to follow this project and never miss any updates