Close
0%
0%

Shitty Add-Ons

Stop calling it 'SAO'.

Similar projects worth following
Shitty Add-Ons are a community-derived standard for adding little bits of electronic bling to conference badges. If an electronic conference badge supports the Shitty Add-On standard, it will be possible to add your own small PCBs to add more lights, LEDs, blinky, and Blockchain to your badge.

totem_bom.xlsx

Bill of Materials for new totem

sheet - 13.65 kB - 04/05/2019 at 03:40

Download

totem.pdf

Schematic of new totem (note, as indicated, you can use a voltage regulator if desired)

Adobe Portable Document Format - 23.83 kB - 04/05/2019 at 03:40

Preview
Download

totemv1.69bis_gerbers.zip

gerber files for new totem

x-zip-compressed - 71.02 kB - 04/05/2019 at 03:40

Download

x-zip-compressed - 2.55 kB - 03/25/2019 at 18:58

Download

x-zip-compressed - 1.88 MB - 09/14/2018 at 02:30

Download

View all 10 files

  • 4 × EXAMPLE: B06d-06-AGAA1G 6 Position with key bump The Badge side is a 6 position 2x3 2.54mm Dual Row Socket Strip with Polarizing Bump
  • 1 × EXAMPLE: 302-S-06-D1R1 6 Position with key slot Shitty side is a 6 position 2x3 2.54mm Straight PCB Mount IDC Box Header
  • 2 × EMK107ABJ475MA-T 4.7uF 16v 0603 capacitor
  • 1 × TMK107BJ104KA-T 0.1uF 10v 0603 capacitor
  • 1 × MBKK1608T4R7M 4.7uH 500mA 0603 inductor

View all 8 components

  • Shitty Add-On Upgrade Path Naming Scheme

    Benchoff03/28/2019 at 19:26 5 comments

    The hardest problem in computer science isn't integer factorization, and it isn't proving P != NP. It isn't the knapsack problem, the boxcar problem, or rotating a red black tree on a whiteboard. The hardest problem in computer science is naming things. The last loop you wrote used 'i' as the control variable so don't talk to me about how hard naming things in code is.

    There has been a lot of confusion about the naming scheme of subsequent versions of the Shitty Add-On standard. First it started off without a version, then it immediately jumped to V.1.69bis. It's almost as if the people in charge of this are idiots, they don't know what they're doing, or these naming schemes are just gigantic immature jokes. I assure you, all of these are true. Here's the naming scheme for future versions of the Shitty Add-On standard.

    Read more »

  • Introducing The Shitty Add-On V1.69bis Standard

    Benchoff02/25/2019 at 01:58 6 comments

    I would like to preface this by saying this is not the official, final release of the Shitty Add-On V.1.69bis standard. There are a few things still being worked out, especially concerning the function of the two additional pins. However, AND!XOR has already published some reference designs for a SAO using an I2C EEPROM, identical to the Tide Pod SAO of last year. Additional functionality that should be possible will be fleshed out in the future. The reason this is standard is being published now is because it’s better to put things out into the world than wait until something is perfect.

    By all accounts, the Shitty Add-On standard is a success, but it was not perfect. Mechanically, standard 2x2 headers aren't very strong, and that goes doubly so if you're using SMD male headers on the add-on. Not many people used the I2C bus, but there were a lot of people that wanted to extend their WS2812 or APA101 RGB LED strings.

    A standard isn't a standard unless there's a better one, so now the community of badge makers has settled on a newer, betterer standard for Shitty Add-Ons. It's Shitty Add-On V.1.69bis (SAO.69), and it vastly increases the capability of the Shitty Add-On standard while retaining backwards compatibility.

    • A New Connector!

    Because of the need for a low-cost connector, and the need to retain backwards compatibility, SAO.69 will use a standard 0.1" 2x3 connector.

    Badges use 2x3 female (non pinned) headers, 0.1” pitch. Similar to last year, but 6 pins. It is highly suggested that badges use through-hole connectors, lest SAOs rip off your pads. These may be keyed, but through-hole 2x3 keyed connectors are either impossible to find or absurdly expensive. The thing you want look for to find a keyed badge connector is, '2x3 Pin 6 Pin With Polarizing Key'. eBay will turn up results for that, but you can only buy 100 at a time. AliExpress reportedly has them, but they're $0.40 USD / piece.

    The best connector. It's unobtainable. I own 75% of the world's supply.

    Needless to say, the keyed badge connector is rare, expensive, and difficult to find. However, it perfectly solves the problem of Add-Ons coming loose. These connectors have been verified as fitting a standard IDC shrouded header. Use the best badge connector at your own risk.

    Add-ons use a 2x3 male, pinned, shrouded connectors. These are actually some of the cheapest and most ubiquitous connectors available, and if you have a device that has an AVR ISP header, this is the same connector. As with the badges, it is highly suggested you use a through-hole header for mechanical strength.

    • A New Pinout!

    The pin out for SAO.69 is exactly the same as last year's version, with the addition of two 'GPIO' pins off to the right. These will be used for various add-on types, support for addressable RGB LEDs, and serial connections.

    Of course, we expect most badges to only use power, and even here we have specifications: Maximum power draw by a Shitty Add-On is 1.1 millihorsepower. If a Shitty Add-on drives a GPIO pin, it MUST be through a resistor of at least 330 ohms. No signals may exceed 3.6V. For power-only add-ons, Utilize only VCC (3v3) and GND to do whatever you want. Other pins should be NC. Don’t exceed 1.1 millihorsepower draw on your SAO.

    With the addition of two new pins, we have some options for serially-addressable LEDs. For WS2812 (or NeoPixel) LEDs, badges can support WS2812-based SAOs by outputting a WS2812 datastream from the badge to an SAO to sync or drive an RGB pattern. Badges can either connect the end of their existing WS2812 strand’s data line to GPIO1, or connect a badge GPIO to GPIO1 to send a datastream meant purely for the SAO strand. Note that if you're extending the badge's strand of WS2812s, remember to add ~10 more to your 'strand length'.

    For APA102 (or DotStar) LEDs, drive them similar to how WS2812 works, except with...

    Read more »

  • Shitty Add-On V1.69bis Developer's Platform

    Benchoff02/24/2019 at 18:23 3 comments

    With the release of a new specification of the Shitty Add-On standard, it only makes sense to build developer's tools. To that end, we would like to release the following hardware:

    The Shitty Add-On Developer's edition puts two Shitty Add-On V.1.69bis headers on a Raspberry Pi hat. The board is self-documenting using the standard Raspberry Pi GPIO pinout, and includes a few neat features. There are two buttons and a single LED. As the guy who programmed a few hundred Tide Pods with a Blockchain last year, let me assure you, this is a necessary feature.

    This Raspberry Pi Hat is a shared project on OSHPark, and it is released under the IDGAF license. 

  • An oral history of the shitty add-on standard

    Benchoff08/25/2018 at 13:58 0 comments

    Before the Shitty Add-On standard, there were several independent conference badges with their own hats and add-ons. The 2016 Queercon badge came with hats, powered by two small expansion ports on the top of this cuttlefish badge. The expansion ports provided power, ground, and an I2C bus on a 1x4 connector, giving these cuttlebadges unicorn horns, an emo haircut, or a top hat studded with LEDs.

    In 2017, there was an obvious need for a standard for badge-addons, with even more standards created. Luke Jenkins published the MiniBadge standard for SaintCon, an impressive standard that implemented 5V, 3V3, I2C and SPI in less than a square inch. The results were impressive, with more than a dozen minibadges being built for the main SaintCon badge.

    Finally, we come to the 2017 / DefCon 25 AND!XOR badge which featured Hunter S. Rodriguez and a Futurama Brain Slug.The schematic for this Brain Slug is very simple, just an ATtiny85 microcontroller and a handful of WS2812b LEDs. It's blinky, it's bling, and since every board house can do green solder mask, you can make a Brain Slug PCB pretty easily. Only about ten or so of these Brain Slugs were ever made (although the Gerbers are right here so knock yourself out), but it was a precedent for add-on bling.

    DefCon 25 came and went, and a few lucky people walked away with Brain Slugs. Some time around February, 2018 -- the time of Chinese New Year, because that's obviously the best time to start any sort of electronic project -- a few members of the Badgelife collective started asking a few questions. The previous two years of badgemaking showed everyone add-on badges were a thing. The future would have minibadges, or other weird PCBs hanging off the big badges. What if there were a standard for Badgelife add-ons? What if these pieces of indie electronic art could host Brain Slug-like add-ons from multiple creators? The AND!XOR badge really only supplied power to the Brain Slug, but adding holes for pin headers on a badge is effectively free. The only thing you need for this is for the entire group to come to an agreement on a standard pin out.

    The official documentation of the Shitty Add-On V.1 standard. This was made in Microsoft Paint.

    After literal minutes of discussion, we had a standard. it was decided that the Shitty Add-On pinout should include 3.3V, Ground, and an I2C bus on four headers arranged on a 0.1" grid. The badges would have female sockets (or just through-holes), while the add-ons would have male pins. This is the first, and only, official documentation of the electrical and mechanical specifications of the Shitty Add-On standard. No one followed the standard, but everything worked out in the end.

    Why do I say no one followed the standard? Because I'm an idiot. After using Microsoft Paint for three minutes, I whipped up a quick board that would supply power to four Shitty Add-Ons. It's the Shitty Add-On Totem, available on OSHPark. This board is as simple as it gets, with two AA battery holders and four 2x2 headers. The design is pretty clever; two of the headers are rotated 45° clockwise, the other two headers are rotated 45° counterclockwise. This means more add-ons will fit on your totem.

    Because the first publication of the Shitty Add-On standard was.... lacking... I whipped up a quick improvement. The headers (now self-documenting on the PCB with the addition of a silkscreen circle) were copy and pasted from the OSHPark render of the Totem. This, unfortunately, is the documentation everyone used. No, the headers were never meant to be rotated forty five degrees, I was just lazy and didn't rotate what I copied and pasted from the OSHPark render. But even if the mechanical properties of the Shitty Add-On header were incorrect, at least everyone got VCC, GND, SDA, and SCL in the right place.

    The foundation was set for inter-operations between badges and add-ons. The standard was finalized in February, with Def Con a mere six months away. Dozens...

    Read more »

  • #badgelife DC26 shitty development board

    Zapp04/06/2018 at 20:44 3 comments

    Want to make your own add-on but all you have is a pile of through hole components and some ideas? Or maybe you're a l33t soldering machine, capable of soldering 200+ pin BGA packages to proto boards. Look no further than the #badgelife DC26 shitty addon development board.

    Of course you should know this meets the extremely high quality standards that all shitty addons are required to meet. Quality is so high, these are not tested prior to production.

    https://oshpark.com/shared_projects/GQSszwbF

  • The design of the Totem is complete

    Benchoff02/14/2018 at 01:02 1 comment

    This is a 'totem' that will hold four add-on badges as implemented in the DC26 shitty add-on standard. There are provisions for two AA batteries (optional, if you want to power them externally), a lanyard hole, and a 1x4 header breaking out VCC, SDA, SCL, and GND. Basically, it's the shittiest thing you can imagine.

    How does this connect to Badge add-ons?

    There you go. Gerbers available in this project. Also available as a shared project on OshPark: https://oshpark.com/shared_projects/uYwa5w3S

View all 6 project logs

  • 1
    Print it

    Have it printed.

  • 2
    Solder it

    Get out your iron and put the parts on

  • 3
    Power it

    Find some batteries in that one drawer that never opens because there's a potato masher or something in there.

View all 4 instructions

Enjoy this project?

Share

Discussions

grey_man wrote 07/17/2019 at 08:47 point

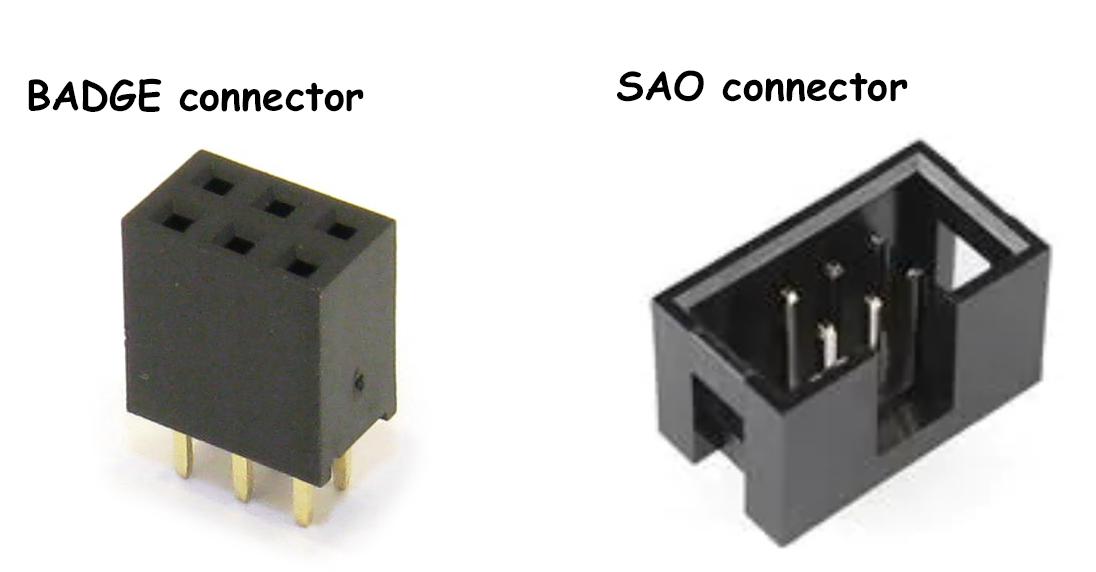
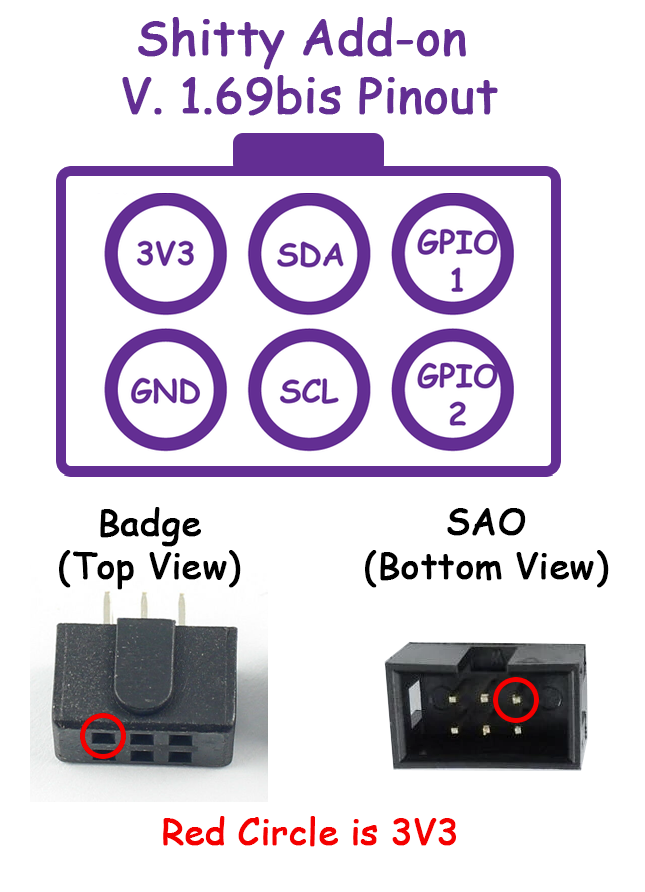
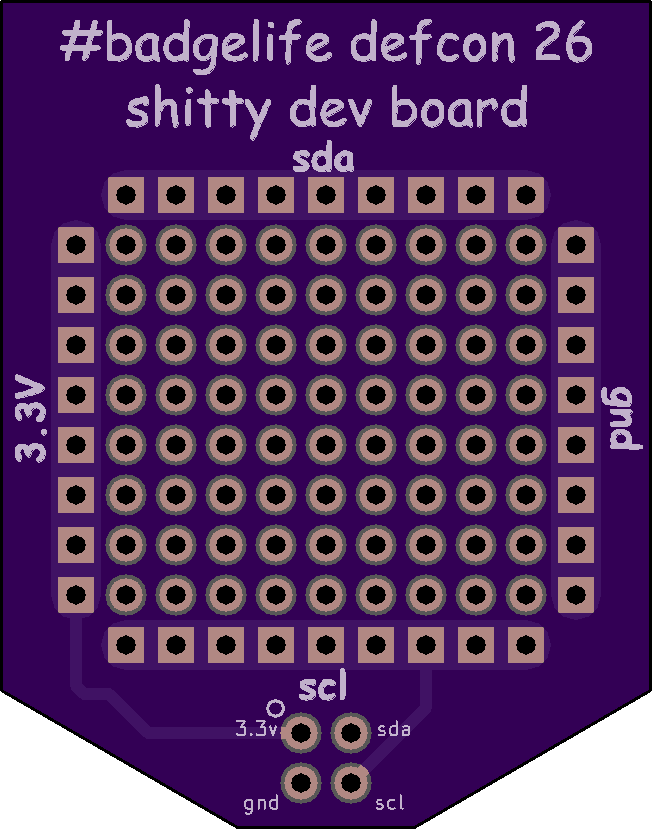
Will you please post the shitty_badge_connector.lib for the new 1.69bis? The one that's in here is the old 4 pin, not the new 6 pin.
Edit: I think I found it in the Badgelife_SAO_v169bis_20190321-0053.zip archive. Thank you!
Edit 2: Confirmed, found, added to the Component and Footprint libraries and it's showing up fine! You rock, this is great!

  Are you sure? yes | no

deʃhipu wrote 03/19/2019 at 21:23 point

So I was recently thinking... why is your business card not a shitty add-on?

  Are you sure? yes | no

Benchoff wrote 03/19/2019 at 21:29 point

Because business card PCBs are sooooo 2010

  Are you sure? yes | no

deʃhipu wrote 03/20/2019 at 13:10 point

They say the fashion makes a full circle every 10 years or so, so you would be ahead of the curve!

  Are you sure? yes | no

Gerben wrote 03/20/2019 at 14:35 point

We need a "shitty business card" standard.

  Are you sure? yes | no

timonsku wrote 01/05/2019 at 21:55 point

I heard there are plans to add some form of mechanical fastening to the standard? Anything specific yet? Got a project where I wanna support the pinout, some sort of optional fastening would greatly help in this application.

  Are you sure? yes | no

grey_man wrote 09/07/2018 at 14:00 point

I'm still new to circuit design so trying to wrap my head around I2C and how to use it. If I'm building a shitty add-on can I use the SCL signal as a trigger to blink lights or do I still need a 7555 or is there a better way to do that?

  Are you sure? yes | no

thelogicofpi wrote 09/20/2018 at 16:00 point

there are a lot of ic's that use i2c to communicate, what you want to find is one that is either a GPIO expander or something similar. The mr.meeseeks SAO uses a MCP23017 

  Are you sure? yes | no

thelogicofpi wrote 09/20/2018 at 16:03 point

Then once you connect leds + resistors to each pin. but this is all reliant on the badge knowing what your i2c address is and sending packets that the mcp23017 would interpret into led blinky patterns, ie. sending it binary values which correspond to ascii numbers, but when translated to binary represent each led as a bit of that byte. ie "3" would be 00000011 so whatever was connected to pin 0 and 1 would be on and everything else would be off. :) hope that helps to explain. 

  Are you sure? yes | no

grey_man wrote 09/28/2018 at 07:45 point

That helps a lot. I'm guessing the SAO connector on the official DC26 badge just provides power and doesn't send a blink pattern over the i2c. For a blink pattern I would probably need to have some control over the hosting badge as well, i.e. build my own badge with a SAO and then build my own SAO badges to plug into it? Or are some of the unofficial badges putting out blink patterns I could tap?

  Are you sure? yes | no

Gerben wrote 03/20/2019 at 14:42 point

People would need to change the badge firmware to drive the animations on your SAO. There is a bit of an chicken and egg problems with these add-ons.

I'd probably put something like an ATTiny on them, to drive the led animation. Then have the ATTiny implement I2C so the badge could change the leds (overriding the default animation).
That way, the leds are always blinking, even if the badge doesn't support your badge. But hackers can still change the badge and have their own animations running on your SAO.

  Are you sure? yes | no

thelogicofpi wrote 03/20/2019 at 20:55 point

@Gerben mcp23017 is the most standard of the i2c chips used. if you have special code for yours push it to badge makers and hope they add it in, or use the standard i2c commands that that badge is outputting. if you are including an attiny, it is a badge, but heres the link https://github.com/ANDnXOR/sao-reference-designs/tree/master/DC27/GPIO-16-MCP23017_sao1.69bis 

i have many pcb designs with coincell+mcp32017+attiny85+switch with leds and resistors being driven by the mcp23017 and placed to look good :) so that option works well. 

  Are you sure? yes | no

Sajin wrote 07/25/2018 at 16:15 point

Created shitty add-on scanner / debugger. This would print over UART all the "Friendly names" for the badges. Tries to read and write to all devices found.  https://github.com/sajingeo/b617/tree/master/gadget_test

  Are you sure? yes | no

oshpark wrote 06/06/2018 at 16:51 point

Please email drew@oshpark.com if anyone would like a batch of add-on's made for no cost.  Drew will be at Defcon and wants to make sure everyone is well stocked with fun add-on's :)

  Are you sure? yes | no

ReanimationXP wrote 02/23/2018 at 10:32 point

So obviously this is shitty, but power's a concern. I'd clarify 3v3 if that's a requirement vs VCC.. VCC is ambiguous and I suspect lots of badges will be 5v VCC.  It's also a lot harder to go back up to 5v than down to 3v3 from 5v.

  Are you sure? yes | no

Benchoff wrote 02/23/2018 at 18:39 point

As far as I can tell, most of the #badgelife badges are going to be 3.3V.  That's what we're settling on, I guess /shrug.

Also, this is the *shitty* addon. If you want guaranteed voltages and the ability to sink a set amount of current, make your own standard. This is the one where we go, 'yeah, that'll probably work.'

  Are you sure? yes | no

AVR wrote 02/22/2018 at 23:34 point

"Find some batteries in that one drawer that never opens because there's a potato masher or something in there." how do you know you've never been to my house lol

  Are you sure? yes | no

Ted Yapo wrote 02/22/2018 at 23:58 point

That's what you think...

  Are you sure? yes | no

Similar Projects

Does this project spark your interest?

Become a member to follow this project and never miss any updates