 Eric Cantrell
In the ground is simplest, just plant your stuff directly. We started with some strawberries in a bed in front of our porch (not pictured).
We moved next to a raised garden bed. I used an 8 foot 10x2 which I miter-cut for aesthetic reasons. This lets you add a mix of dirt and potting soil for a good bit of soil to start. Since you've got the ground/water table beneath you, water retention is good, but we've had issues with local pests eating up our vegetables. Weeds are slightly better than planting without the elevation. It's also easier to tend the garden and weed ... bringing things up 10 inches makes it a bit easier to reach.
Next we bought a simple elevated bed. I love that this gets it up off the ground. It's MUCH easier to tend, far fewer weeds grow, but it was extremely shallow limiting root growth. It also lost water much more quickly. That being said, if you don't have a yard to plant in, this is really your first step.
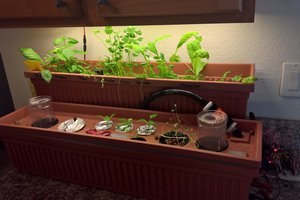
Most recently I built a frame for a container garden. I selected some large pots from Home Depot and built a frame based on those pots. This had all of the advantages of the elevated garden bed, but allowed for deeper roots and retained water slightly better. It also looks pretty fly. Another advantage here is that dirt is never in direct contact with the wood frame, so I don't need to worry about anything leeching out of the wood or the water deteriorating the wood.
NOTE: In the first draft of the container frame I used 2x4's for the frame and 2x2's for the top. Do not use 2x2's, they're not sturdy enough. I also used pocket screws for a better looking structure. I advise against this. The pine was soft and the weather soaked it occasionally. In the end, a full half of the pocket screws pulled straight through! I now screw things directly together right through the side.
FUTURE PLANS:
Given that you have to water elevated gardens more often, I think an automated watering system with a moisture sensor is warranted. I'm also curious to add temperature sensors ... the elevated beds are going to be warmer than something that's in the ground.
I'm curious if this could allow you to vary your garden for different climates, especially by adding heater elements or a water cooling system to change the soil temperature of parts of your garden.
If an arduino or pi was added to regulate the water sensor/watering system, I'd be interested to also tie in a PIR sensor and a speaker or some kind of animated scarecrow to handle the blasted animals eating my hard wrought veggies.
 Jared Sanson
 Brandon Hart
 DeepSOIC
 Morning.Star