J. Peterson
Hardware to buy
Almost all of the hardware for the Pyball is available off the shelf at Adafruit. Feel free to shop around though; these are generic items and you might find better prices at Amazon or one of the big-time suppliers like Mouser, Digi-Key, etc.
Here's the list:
- Raspberry Pi 2 Model B
- It's worth spending the extra $5-10 to get the upgraded Pi 2, Model B. It has substantially more compute horsepower, which will come into play for analyzing the images on the fly or sending video.
- Raspberry Pi Camera
- USB WiFi
- If your mounting location has acccess to hard-wired Ethernet, this isn't necessary. If your Pyball is mounted some distance from a WiFi station, getting a WiFi adapter with a long antenna makes a substantial improvement in the connection.
- 5V 2A Micro-USB power supply.
- You'll want the 2A version to make sure the Pi has enough juice to run the peripherals (camera & WiFi). Adafruit specs the power supplys up a bit (5.1V) to account for power loss in the cord. Not a bad idea.
- Case
- I used the Adafruit weatherproof case, but really, look at where you'll be mounting it. If you can see what you want from an office window, you might not need a case at all.
- Camera mount
- I found the Pimoroni Camera Mount useful for mounting the camera in the case.
- 16G Micro-SD card
- These are available for cheap from Amazon. You'll want at least 16G to have working space for your captured data. Even 16G is still less than $10.
All tolled, the hardware runs about USD$100.
Software Setup
The Raspberry Pi comes without any software or boot media. Installing Raspbian is just the first step of many for getting the system put together. I installed Raspbian (vs. NOOBS) because I'm not experimenting with any other OS configuration.
For the first Raspbian boot-up, plug the Pi into a screen and keyboard. You'll be presented with a dialog to install various system components. You'll want to add ssh support, for remote access, and definitely enable the camera drivers and configuration.
My router requires the hardware MAC (media access control) address for authentication. To get these, use the command:
$ ifconfig | grep HWaddr
 eth0 Link encap:Ethernet HWaddr b8:27:eb:ea:7c:b9
 wlan0 Link encap:Ethernet HWaddr ac:a2:13:39:ce:f1
 $
The hex numbers give the hardware addresses; eth0 is the wired address and wlan0 is for the WiFi. Note: I learned the hard way the Rasp Pi can't easily support two network connections. If you're using WiFi, unplug the Ethernet cable, and vise-versa.
You'll need to set up new users. You should add whatever user you choose to the "sudoers" list, so the adminstrative command sudo is available:
$ sudo bash
 # cat >> /etc/sudoers eyeball ALL=(ALL) NOPASSWD: ALL
 ^D
To make sure you're running the latest software:
$ sudo apt-get update
 $ sudo apt-get upgrade
To set your time zone (important for this project):
$ sudo cp /usr/share/zoneinfo/America/Los_Angeles /etc/localtime (Substitute your favorite time-zone city for Los_Angeles, use ls /usr/share/zoneinfo/*/* to see the full list)
To make sure enough USB power is available to drive the Wifi, add the line
max_usb_current=1 to the file /boot/config.txt and reboot the Pi.
The camera fails if the user taking the picture isn't a member of the video group. Fix this with
$ sudo usermod -G video <username>
 $ sudo usermod -G video www-data
The second line is to make sure the web server can access the video hardware. Note: May need to do the second step after installing the apache2 web server; see below.
Finally, I removed some software I had no use for (Scratch, a toy programming language & Supercollider, an audio tool):
$ sudo apt-get remove scratch
 $ sudo apt-get remove supercollider
 $ sudo apt-get autoremove
Hardware Setup
Once you've collected the items from the shopping list (under "Components") the configuration of the hardware largely depends on where it's deployed. If you have a comfortable office or home window overlooking what you want to watch, you may be able to get away with something a simple as duct taping...
Read more »
 Brenda Armour
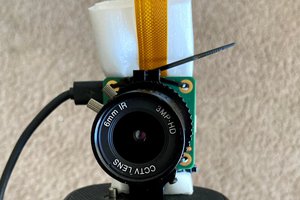
 Huan Truong