Thomas Bladykas
-
Wiring Day
04/17/2018 at 23:36 • 0 commentsEverything that I had to do today was seriously just wiring. List of what I got done includes:
- Soldering LED, resistor and wires to heatbed
- Replace fried diode on RAMPS board
- Scavenge some Powerpole connectors from miscellaneous boards
- Assemble auxiliary fan controller MOSFETs
- Replace the stock wiring in a blower fan for DuPont connectors and RPM output
- Take off the RAMPS screw connectors (and replace with something better, especially the bed output)
-
Heatbed Arrival
04/13/2018 at 23:36 • 0 commentsQuick and tiny post, I finally got the new heatbed in! It's a 300x200mm bed and should work perfectly for this application. Unfortunately, I do have to re-do my previous bed design because it was meant for the standard 200x200 MK2A beds, but it should only take me a tiny bit longer. Another cost that I have to eat is getting a new bed holder plate CNC cut or waterjetted- the CNC machine at my school is far too small to handle that, so I am just going to have a professional deal with it.
-
Wiring; SPI PCBs assembled and installed
04/11/2018 at 17:55 • 0 commentsSorry about the long delay, I am still waiting on the 300x200 heated bed as well as the Taurino Power I need. I designed an SPI breakout PCB for the drivers and to my surprise everything works now! The motors are now running and I am ready to do some advanced firmware testing as well as some air prints.
If anyone has any knowledge on how to get a TMC2130 to act as a Z_max endstop just like on a Voron/Ultimaker setup, please let me know. I don't want to have to deal with rigging any endstops up for this project, just due to the fact that they are nonexistent.
Thank you to all the project followers! Some special people have made my life so much easier, and might get some progress on actually reverse engineering some MakerBot electronics. Stay tuned... -
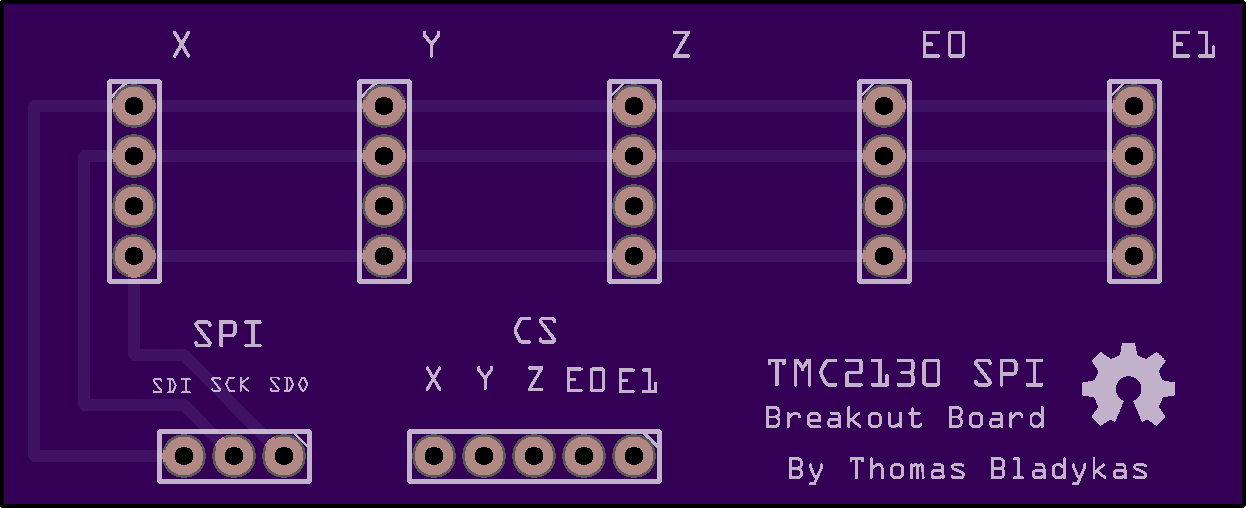
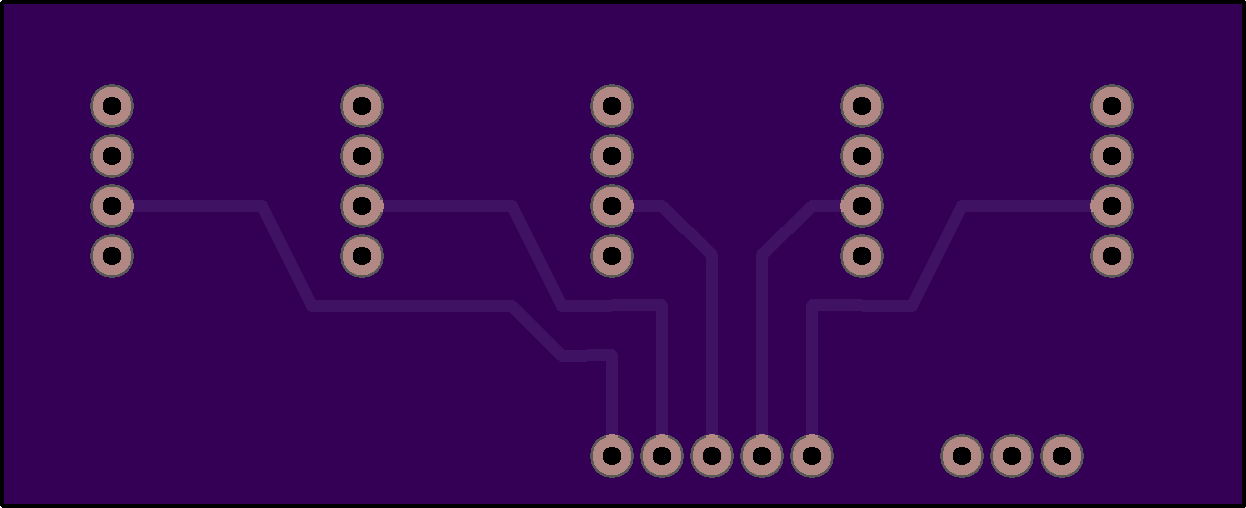
First PCBs designed and ordered!
03/23/2018 at 23:26 • 0 commentsWell, since a redditor pointed out my SPI communication issues with the TMC2130 drivers, I decided that my absolute abysmal proto-pcb soldering job was the problem. I put down my soldering iron and opened up Fritzing to make a basic PCB that's a lot cleaner than my soldering jobs. It supports up to 5 individual drivers and comes in lovely OSHPark Purple.
![]()
![]()
![Order from OSH Park]()
-
Progress Update: First bootup
03/19/2018 at 22:50 • 0 comments -
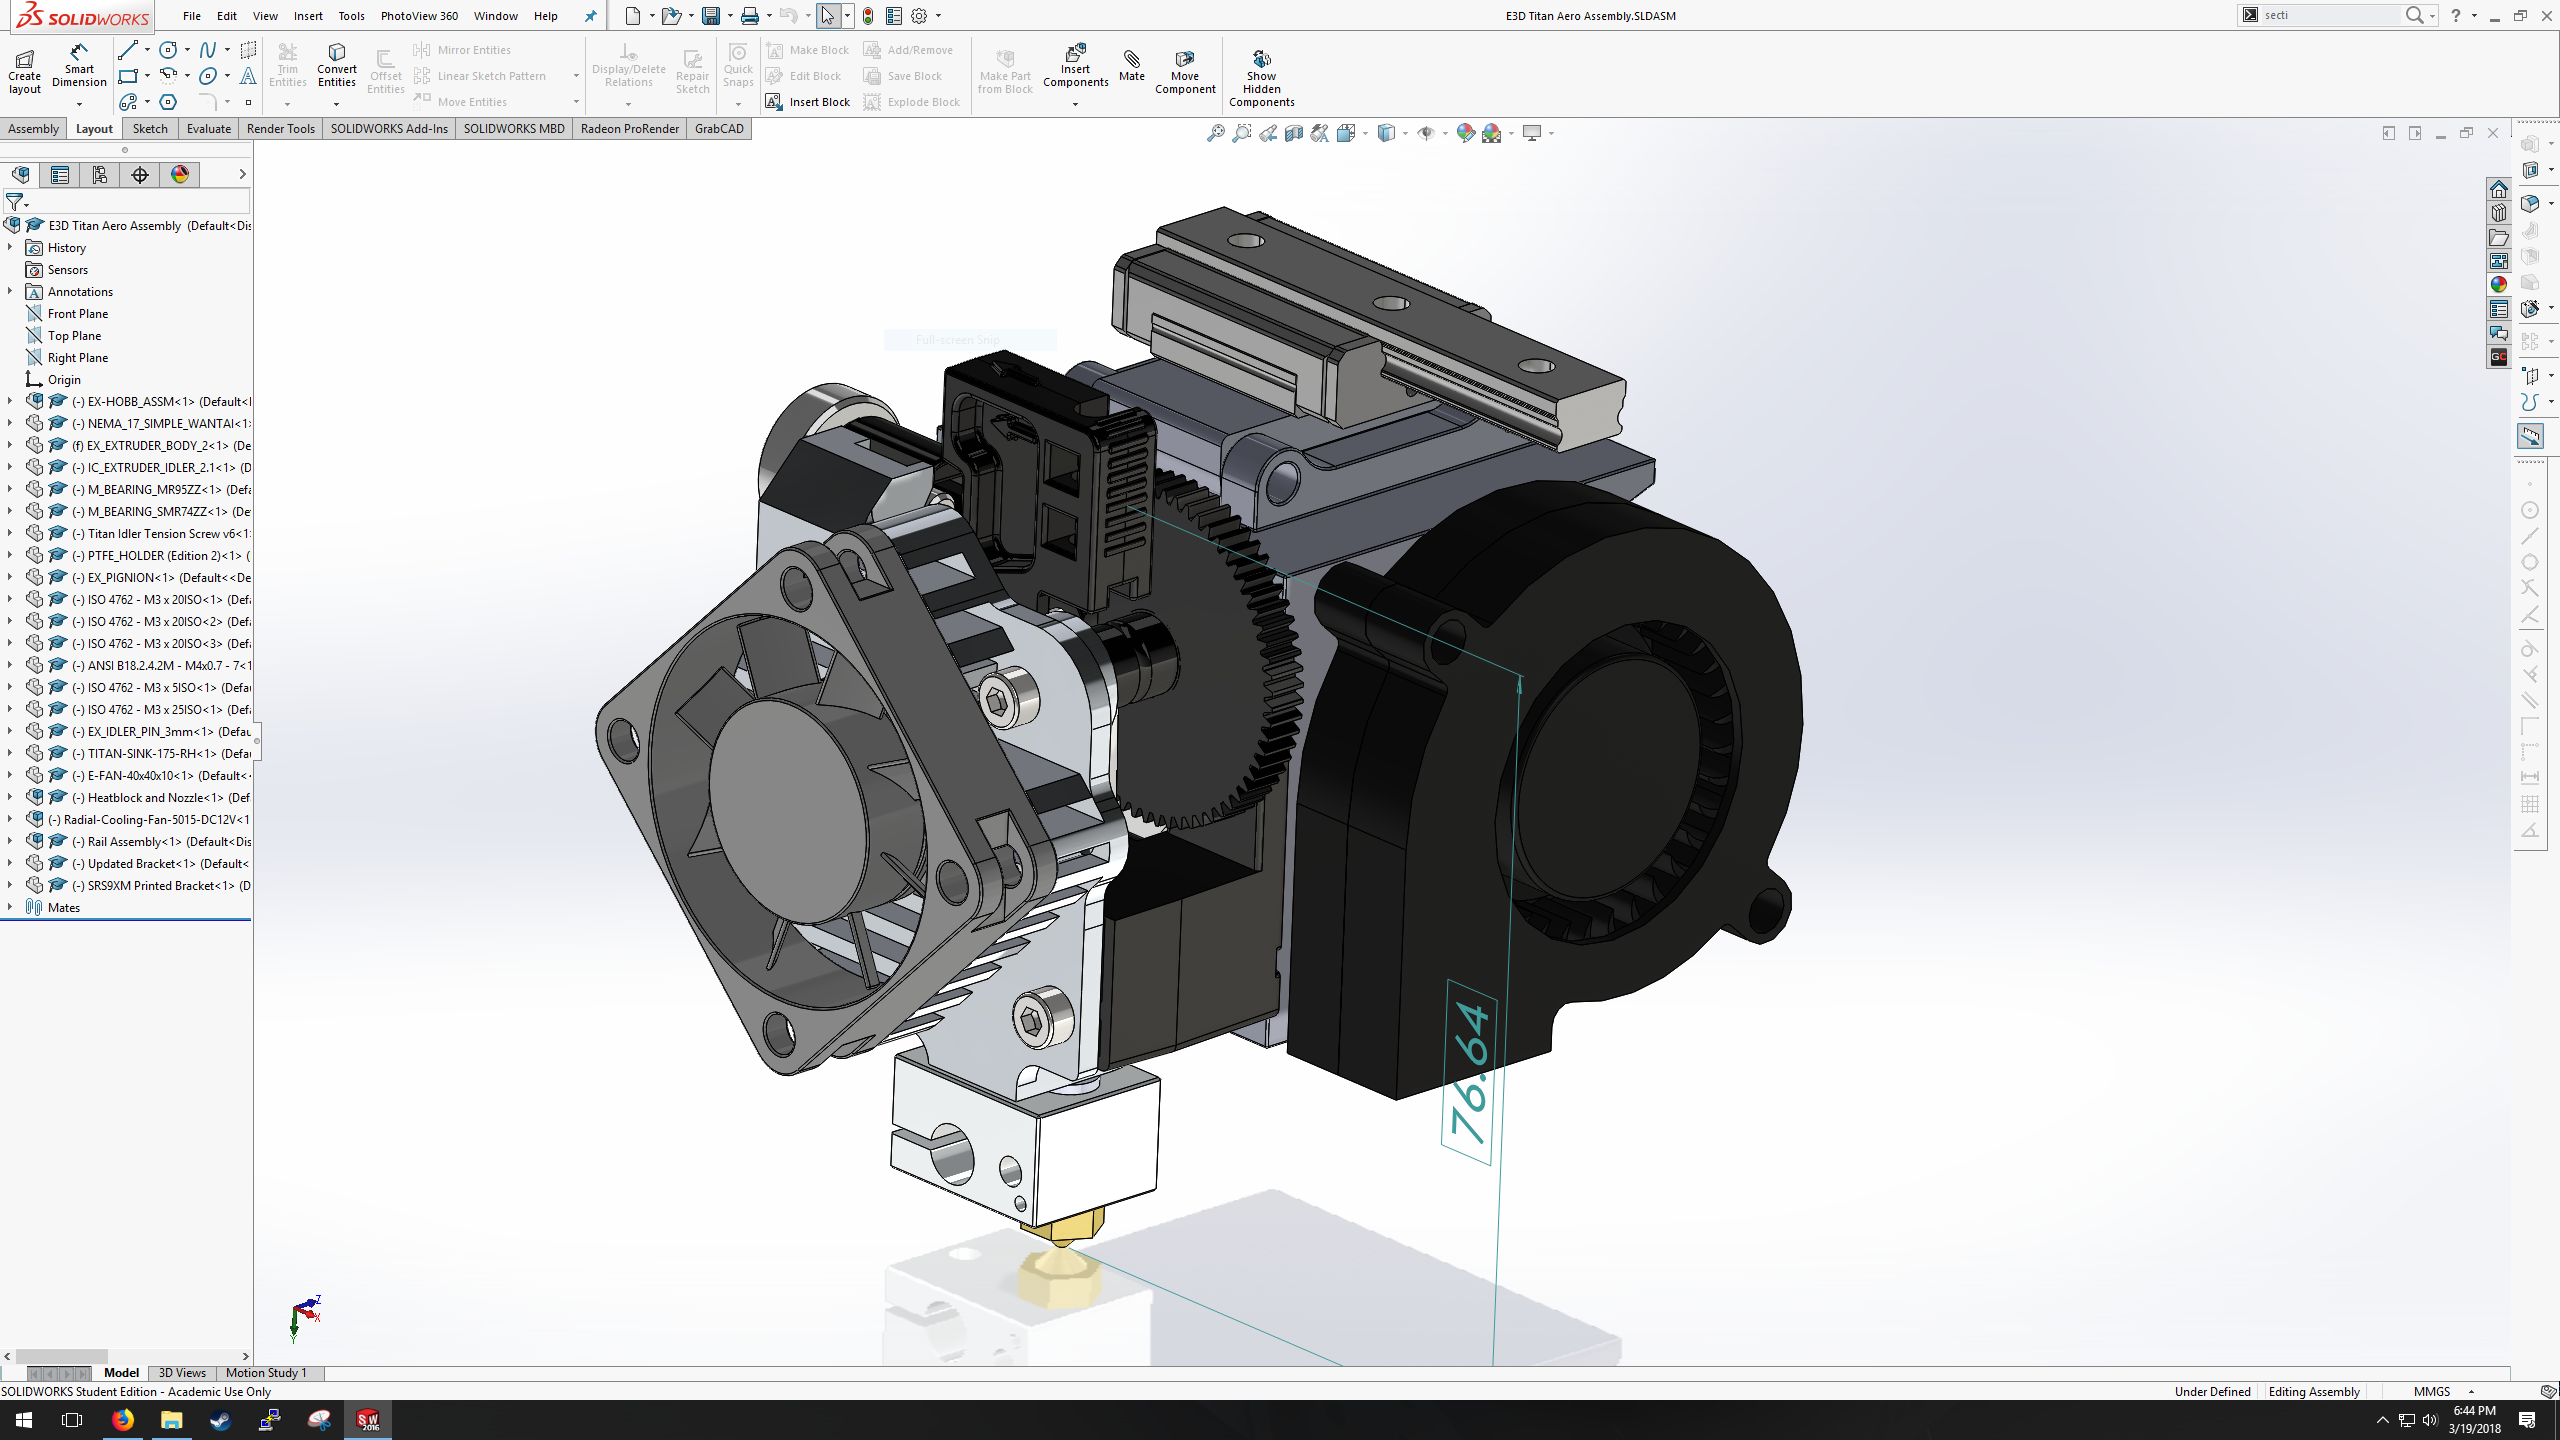
Hot Stuff: Titan Aero update
03/19/2018 at 22:46 • 0 commentsJust a quick photo dump with some captions. If you want build photos hot off my phone, look at this Google Photos Album: https://photos.app.goo.gl/VdJNGIAT1JMBVVTN2
Fully assembled hotend on the SRS9XM linear rails. Note the completely overkill stepper motor. Mounts in a two-part system: one piece screws to the linear rail, and the Titan holder attaches via two fan screws. ![]()
Assembly in Solidworks. Still need to design a proper fan shroud or re-use the stock one. Ideas? -
Electronics: RAMPS & TMC2130s
03/19/2018 at 22:24 • 0 commentsSo, in the last month, there have been a lot of parts deliveries: namely the hotend and most of the electronics (still waiting on the damn stepper motor wires and heatbed to show up). I spend the time mainly just assembling them and doing mockups of the new machine's systems.
Unfortunately, I was really put off at first by how complicated this looked. Breaking out the SPI conenctors from AUX-3 on the ramps and then soldering stuff to the board would just make it look bad, and at worst was permanent. I wanted to go for a nice and tidy approach, keeping all the functionality of the board with no major adjustments. Meaning if I blow up a RAMPS, I just change it out.
I finally settled on a removable breakout board. Here's the internal layout of the electronics:
Layout of the electronics. Note the broken out SPI connections- The individual CS pins are wired into the spare endstops, and the main signals are run through the Mega 2560's ICSP port to make it look nicer. This retains full functionality without soldering much except the external (removable) breakout board. Here's how it looks mounted in the chassis, courtesy of double-sided tape. The controller fan and MOSFET are nice to have.
So, from here, I am waiting on a few things.- My cloned Taurino Power board: It accepts a 24v VIN, and allows me to run it standalone through the RAMPS' D1 diode.
- Heated bed: Can't decide between 200x200mm or 300x200mm. Near impossible to find the 2nd but I'm gimping the printer with the 1st.
- Heat bed holder: Still need to machine a plate that holds it all. I already tried but using a CNC router is a terrible idea for rookies... Help?
- Stepper motor wires: Literally the most insignificant thing about this project but I don't think it was ever ordered... whoops.
- Print cooling fan: I killed my last blower fan and need to get another one.
-
Bed Plan Sneak-peek
02/17/2018 at 04:01 • 0 comments -
Electronic Teardown Summary- Hoboken
02/17/2018 at 02:37 • 0 commentsTL;DR: There is little hope of keeping the original control panel and having it interface with any modern control board. There are way too many weird electronics to even bother making an interposer board for. Read the chip info in my reddit post. I'm sticking with running the TFT screen separately or putting in another panel.
If you want to see the majority of the Replicator torn down, I would recommend you follow International3D's writeup here, here and here. They have much higher quality photos than I can make, and my machine is a little less... picturesque than theirs. This will primarily focus on what they didn't focus on, like the front panel LCD. The purpose of this is to see whether or not I'm able to salvage at least some of the original boards, even with reduced functionality.
Board Pictures:
Hoboken. Nothing on the internet acknowledges this board even exists except for a broken webpage on Makerbot's store. Front View Back View Chip Identification:
-
Parts List and Breakdown
02/17/2018 at 02:17 • 0 commentshttps://docs.google.com/spreadsheets/d/1x0yTgxc10Bb92yVwpBYvwvL-jVIOmlBNQK2AtzP5Mug/edit?usp=sharing
Let's break down the part rationale. These are weird choices for weird reasons but overall they will work in this case.
- The electronics are being switched to 24V. This is so I can run the stepper motors quieter and faster, as well as running a heated bed with a much faster heatup time.
- The electronics are extremely rudimentary, but I'm okay with that. If any complex issues arise, I have no problem swapping to an MKS board.
- The TMC2130 drivers are used for a niche feature: endstop-less homing. Weirdly enough, the Replicator does not actually come with endstops; it relies on measuring back EMF to see whether or not the motors are on a hard endstop.
- Yes, the Titan Aero is a very expensive part, and I definitely could have used the money better elsewhere. However, with the extra Z-height, flexible performance, and compact package it gives, I don't have to worry about retrofitting an extruder assembly into an already weird mounting area.
- The 10mm linear bearings will be used to upgrade the bed: I am planning on making a new bed assembly to use instead of the original Z-axis.
RepRap-ified Makerbot Replicator 5th Gen
What happens when you want a Makerbot to actually work?