 jens.andree
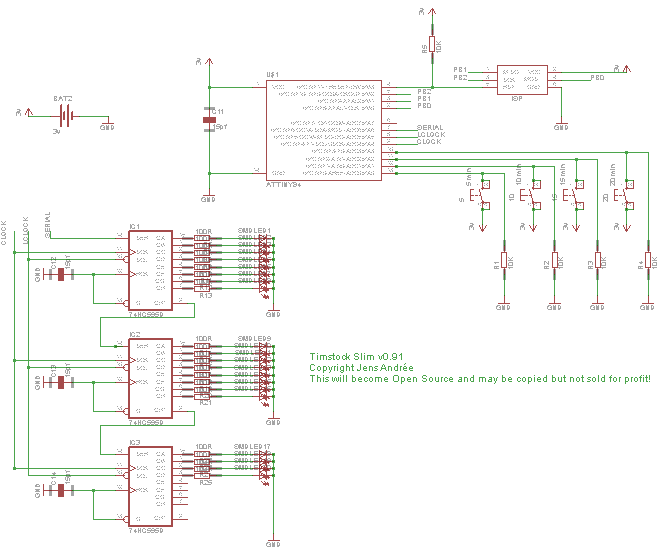
The current prototype version is 0.91 and here is the current design.
I have used Eagle CAD to make the project so far, and to keep it Open Source without software that costs money I'll stick with Eagle.
The picture should give you an idea how it works. An attiny84 with three 74hc595 to control the leds, and four buttons to interface with the tool. A ISP header is exposed for upgrade or customisation by the end-user. All driven by a +3v battery.
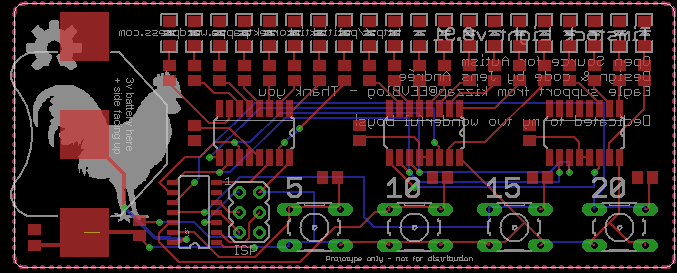
Here is the current layout. The second prototype was a lot smaller but due to the size of the 12 mm battery I had to make it larger, and to be honest - it couldn't be any smaller than it is now from a handling perspective... The previous version was using a smaller battery, but it had too short lifetime so a bigger one was needed. Did consider a rechargeable battery but that was adding a lot to the final cost, and mini-usb connectors tend to break off easily... Normal 12 mm button cell batteries are cheap and easily available.
The leds will not be situated as high up on the pcb in the final version, but usability testing will determine the best location. Maybe it will be ok after all?
There will also be a drilled hole for a lanyard or similar so it can be hung around the neck if needed, or wherever the user wants to hang it. There are no components on the back side so it can be easily glued onto a flat surface. (like inside a binder or on top of the daily schedule)
I will make an optional slim plastic enclosure to it as well but it will add to the total cost and I don't know how much it costs to manufacture custom plastic parts? I really don't want to have to order a few thousand enclosures and be stuck with them later since I stride to make no money out of this, but that also means that I will have to try to spend as little money as possible up front. I can manufacture the pcb in small series which'll make it easier to forecast the demand, but custom injection moulded plastic parts are impossible to do that way unless you have a lot of money to burn...
However, those who want to 3D-print their own enclosure can do so with the available 3D models.
Problems are there to be solved and for now I focus on functionality and usability and worry about packaging later!
When I'm functionally happy with this prototype and the necessary changes have been made I'll make the schematic and code available on GitHub. Then the chase for pushing the battery consumption will begin ;)
When I started to make the first prototype my Eagle skills were less than great to say the least so I humbly asked for some guidance at the EEVBlog forum. The user kizzap amongst many was really helpful and gave me superb support with pointers in layout and routing! Since then the board has been respun two times and his parts have been redone, but as a big thank you for all the help in the beginning I've left a personal message to kizzap on the backside! :)
Discussions
Become a Hackaday.io Member
Create an account to leave a comment. Already have an account? Log In.