Close
0%
0%

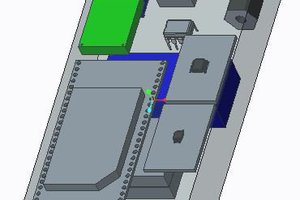
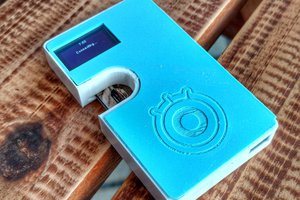
Free Presidential Style Hotline

Using Google Voice and TI Launchpad

Similar projects worth following

Overview:

With all the parts of this project up and running; when you receive a Google Voice call the red and green LEDs on the LaunchPad alternate flashing on and off. Then if you press the on-board button the call will be answered. This is an interesting experiment in itself, but there is also value in each of the independent parts.

A dedicated phone line is a staple for any presidents desk. And now that Google is giving away phone numbers anyone can have a single use line for free. Using a TI Launchpad to interact with it is just fun.

  • 1 × Cortelco 8211 Single Line VoIP Analog Terminal Adapter ($10.99@Amazon) Check this out if you want to use Google Voice and your new Yate server to get free home phone service.
  • 1 × Cortelco 2500 desk phone in fire engine red ($35.00) Unnecessary but awesome.

  • Fail

    linus01/27/2014 at 00:35 0 comments

    ​In the photo attached you can see the telephone handset I wanted to use with this project. The handset was sonic welded completely around the edge and on the supports. Ended up having to slice it in half with a hack saw, not my finest work. I connected the microphone to a double A battery and a stereo headphone jack. Then using the displayed splitter I separated the microphone singal out to a sound card. At this point the signal is so weak as to be unusable. I had intended to use the battery to amplify the signal to the speaker as well, but when I discovered that the circuit wasn't powerful enough to drive the microphone I lost interest. 

View project log

  • 1
    Step 1

    MSP430G2231 Code:

    For a starting point I used this excellent project from Stefan Wendler. MSP430G2231 Software UART. The code below replaces main.c from his “timer-a-uart” branch.

    #include <msp430.h>
    #include <legacymsp430.h>
    #include "uart.h"

    #define BUTTON BIT3 // Port 1.3
    #define REDLED BIT0 // Port 1.0
    #define GRNLED BIT6 // Port 1.6

    void uart_rx_isr(unsigned char c) {
    uart_putc(c);
    P1OUT ^= (REDLED + GRNLED); // flip LED output
    }

    int main(void)
    {
    WDTCTL = WDTPW + WDTHOLD; // Stop WDT
    DCOCTL = 0x00; // Set DCOCLK to 1MHz
    BCSCTL1 = CALBC1_1MHZ;
    DCOCTL = CALDCO_1MHZ;

    // LED initial setup
    P1DIR |= REDLED + GRNLED; // set P1.0 and P1.6 as output (1) pins
    P1OUT |= REDLED; // Enable REDLED
    P1OUT &= ~GRNLED; // Disable GRNLED

    // Button setup
    P1DIR &= ~BUTTON; // button is an input
    P1OUT |= BUTTON; // pull-up resistor
    P1REN |= BUTTON; // resistor enabled
    P1IES |= BUTTON; // interrupt on low-to-high transition
    P1IE |= BUTTON; // interrupt enable

    uart_init();

    // register ISR called when data was received
    uart_set_rx_isr_ptr(uart_rx_isr);

    __enable_interrupt();

    uart_puts("\n\r***************\n\r");
    uart_puts("MSP430 softuart\n\r");
    uart_puts("***************\n\r\n\r");

    while(1) {
    }
    }

    interrupt(PORT1_VECTOR) port1_isr(void) {
    P1IFG = 0; // reset interrupt
    uart_putc('[');
    }

    I also included some code from TI MSP-430 LaunchPad Button & LED-Blinking Demo.

  • 2
    Step 2

    Python Code:

    import serial
    import subprocess
    
    ser = serial.Serial()
    ser.port = "/dev/ttyACM0"
    ser.baudrate = 9600
    ser.open()
    value = 0
    blinkcount = 10
    
    while 1:
    	p = subprocess.Popen(["linphonecsh", "status", "hook"], stdout=subprocess.PIPE)
    	result = p.communicate()[0]
    	if "hook" in result :
    		continue
    	else :
    		if blinkcount  > 9 :
    			ser.write("n")
    			blinkcount = 0
    		else :
    			blinkcount = blinkcount + 1
    			continue
    		value = ser.read();
    		if value == "[":
    			p = subprocess.Popen(["linphonecsh", "generic", "answer"], stdout=subprocess.PIPE)

    This project is very portable. It could be used to signal a results from any program that can be poled from the command line. Or execute any designated command on a button press.

  • 3
    Step 3

    Yate(Yet Another Telephony Engine):

    Answering Google Voice calls that are forwarded to Google chat is tricky if you don't want to use the Gmail chat application. I found the most functional results were achieved by using Yate, to create an SIP server that handles the communication with Googles servers.

    These tutorial will get you up and running with your own SIP server. The first tutorial shows a fuller installation, but the second is a little newer so they are both useful. Google Voice Calls Through Yate server - using your SIP account & Yate Server: Free Google Voice Calling. On Ubuntu 12.04 you will need a newer version of Yate then is in the repositories. Check out this PPA ppa:vpol/yate. Make sure you install all the packages; yate, yate-qt4, yate-core, yate-openh323, libyate4.3.0.

    At the end of the first tutorial there is a section "SIP account logged in YateClient". For some extra explanation on this section. Run Yate Client then in the setting menu select accounts. Now click new and fill out the form like this.

    use provider = none
    protocol = -sip-
    username = username
    password = something
    server = 192.168.0.5

    These same settings can be used to register your SIP server with Empathy to send and receive calls, or with other softphones.

View all 4 instructions

Enjoy this project?

Share

Discussions

Similar Projects

Does this project spark your interest?

Become a member to follow this project and never miss any updates