jupdyke
-
Bulk Injection Molding
01/19/2016 at 14:41 • 2 commentsWell it has been a crazy two weeks. We got slammed with inquiries about our track system. It seems that the FIRST robotics competition announced the contest goals early January. Which lead to a lot of teams contacting us about our track system. Within 2 days we had sold our entire stock of parts, and everything we had raw material to make as well.
While being awesome that we sold everything we had, it also meant that we needed to get more parts ASAP. The custom pins are the big kicker. All the other raw materials are at least somewhat stock items. But the pins are completely custom and take some time to make and ship to us. So we ordered 10,000 pins! This is 10 times what my original order was when I started this project. The are supposed to ship Jan 25, so we should have them a few days later.
The key aspect of this rush of orders is that teams are competing in this FIRST competition and they only have 6 weeks to build their robots. So they need parts fast. We have scaled up our in house production over the past few months to deal with the small number of orders in a timely manner. We now have 3 molds running parts and can make about 15 parts per hour. This is not terribly fast, but when I first started I was making 2 parts every 4 hours.
So it was time to scale up production again and move to a getting parts injection molded. Back in February I had talked to several injection molding companies to get budgetary quotes. I wanted to know if this idea was even practical from a cost point of view. I knew that I could make parts in small volume and that the product worked. But could this idea be scaled up and could we sell the track for a reasonable price. I also wanted to test the market at that reasonable price. So I did the research, talked with companies, and got quotes.
It is lucky for me that I had all this work done already. It would not have been possible to get a run of injection molded parts done as fast as I am, without already having a lot of these questions answered. So last week I called up my supplier and pulled the trigger. As we speak a production injection mold is being machined and the goal is to shoot the mold Feb 1st. We are getting 5000 parts made ASAP, and hope to increase that order.
It is a wild ride, that is for sure.
-
Actual Robots
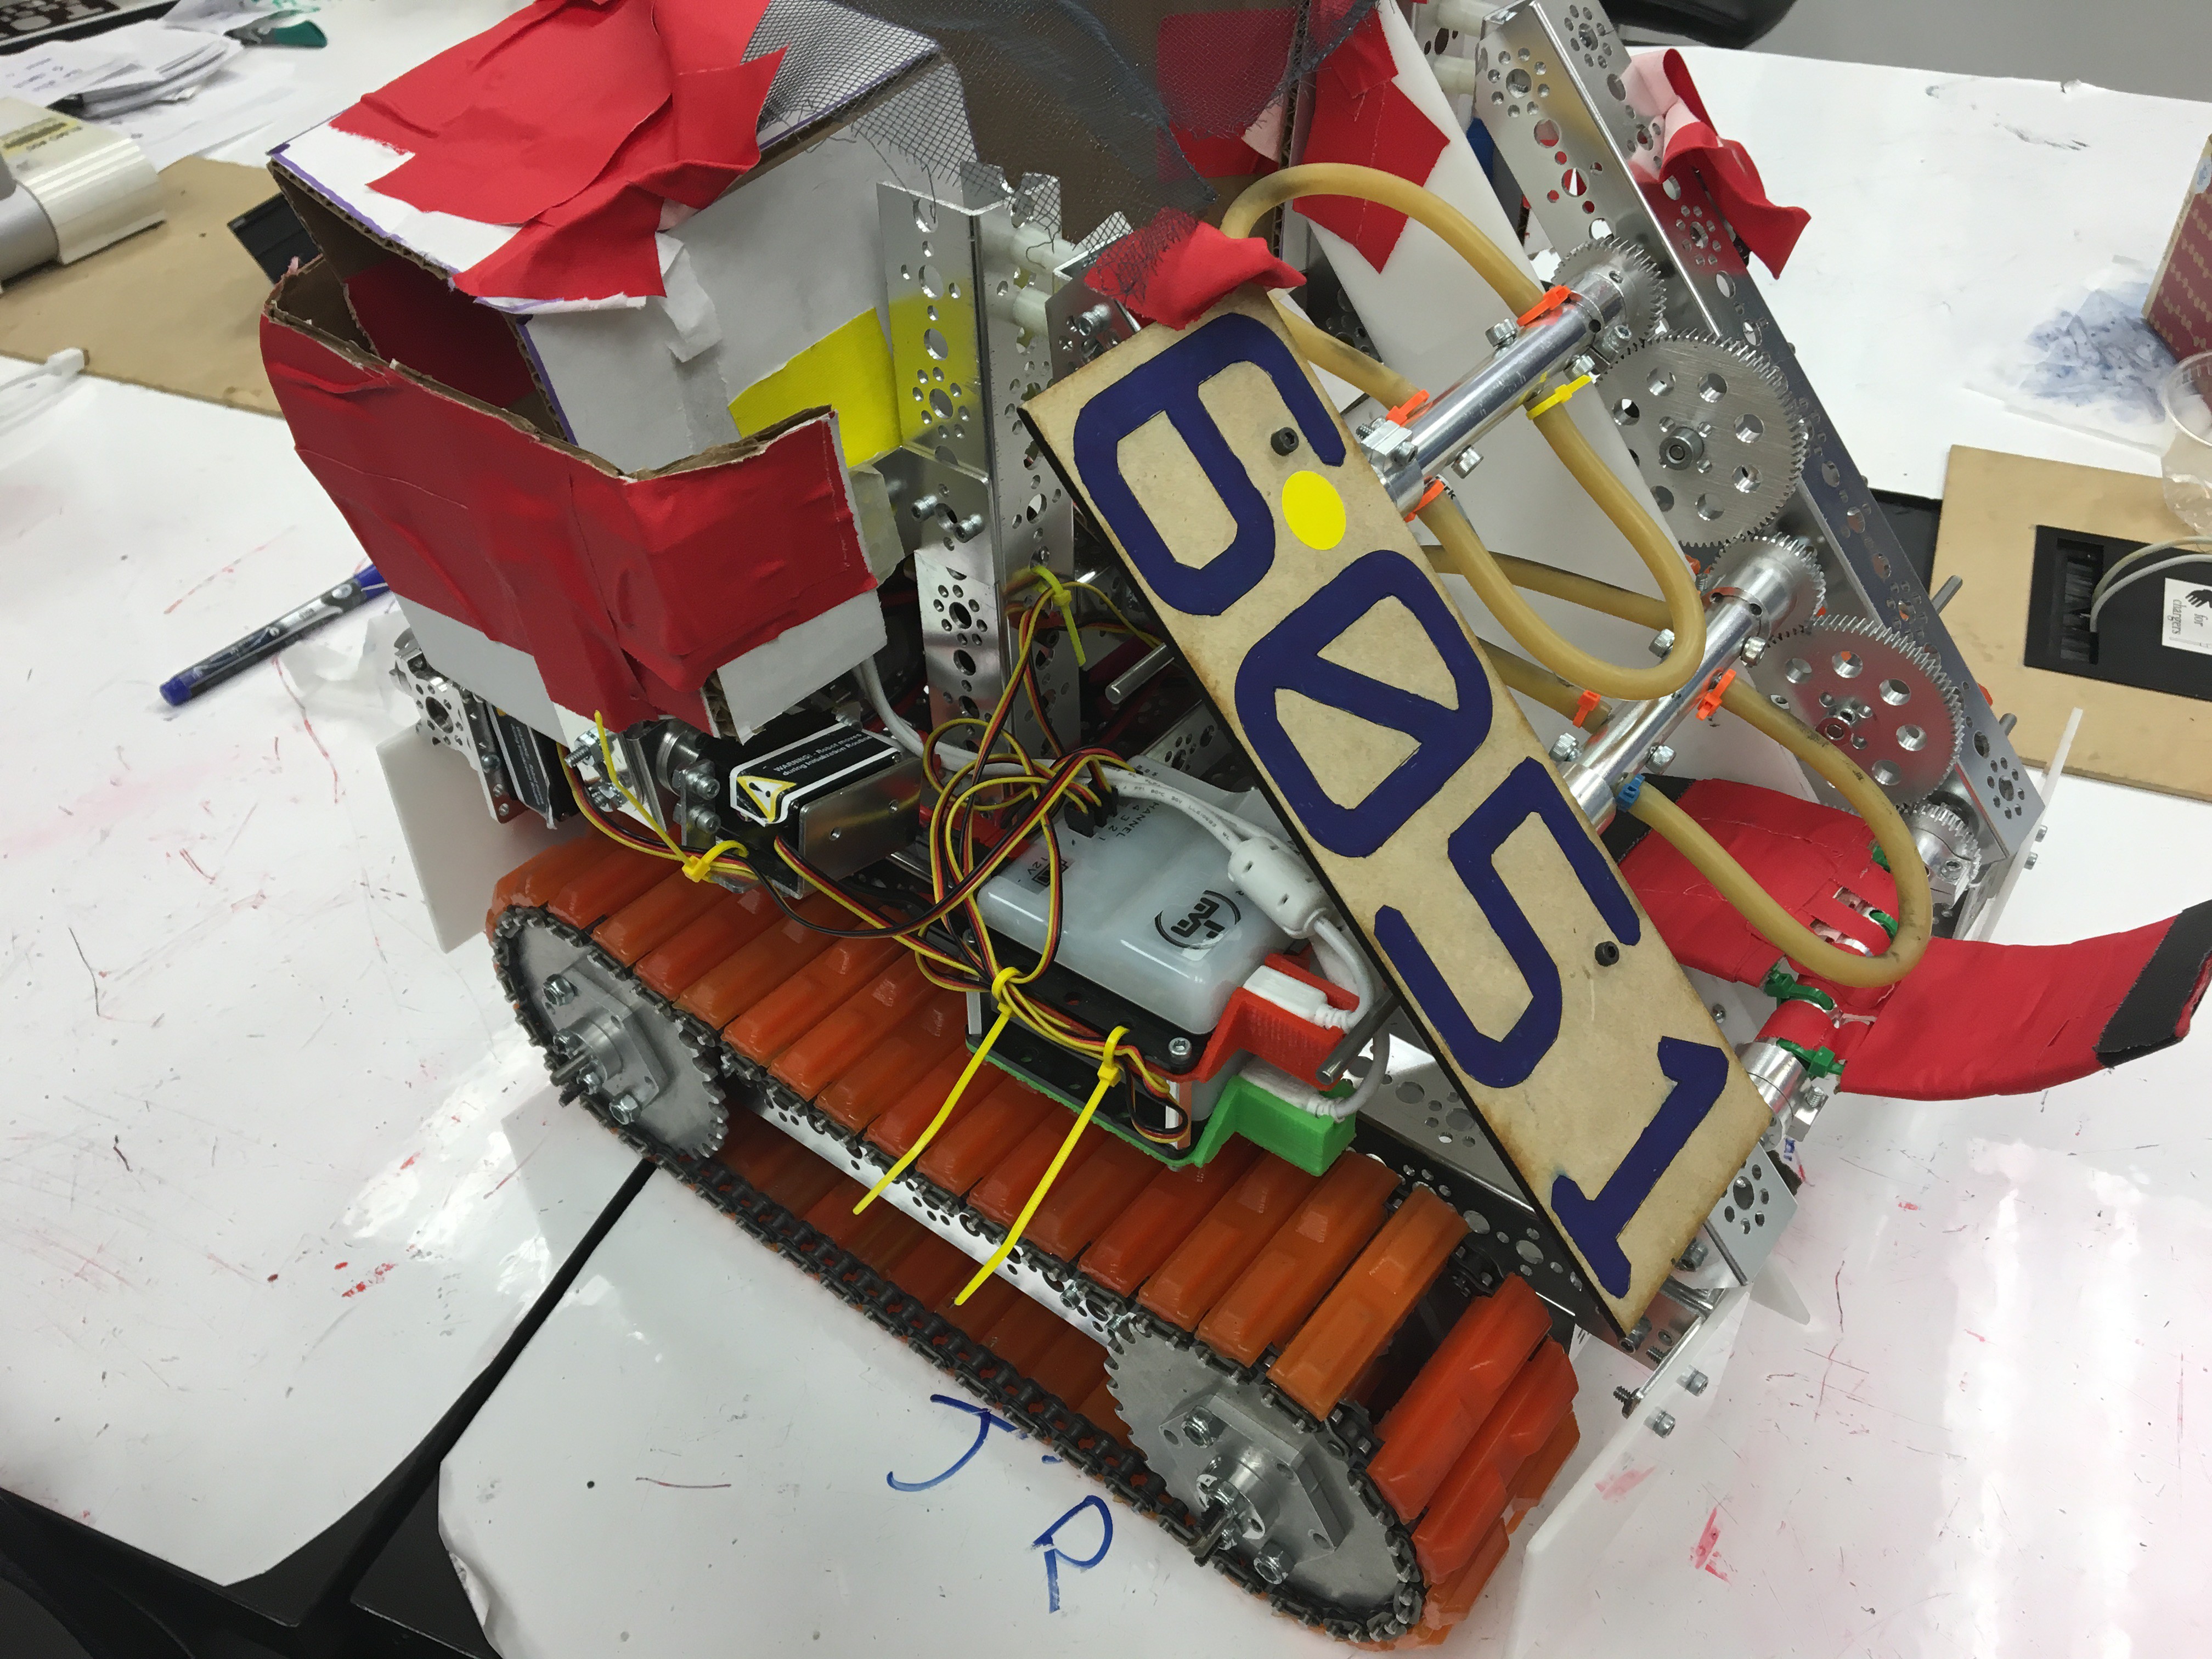
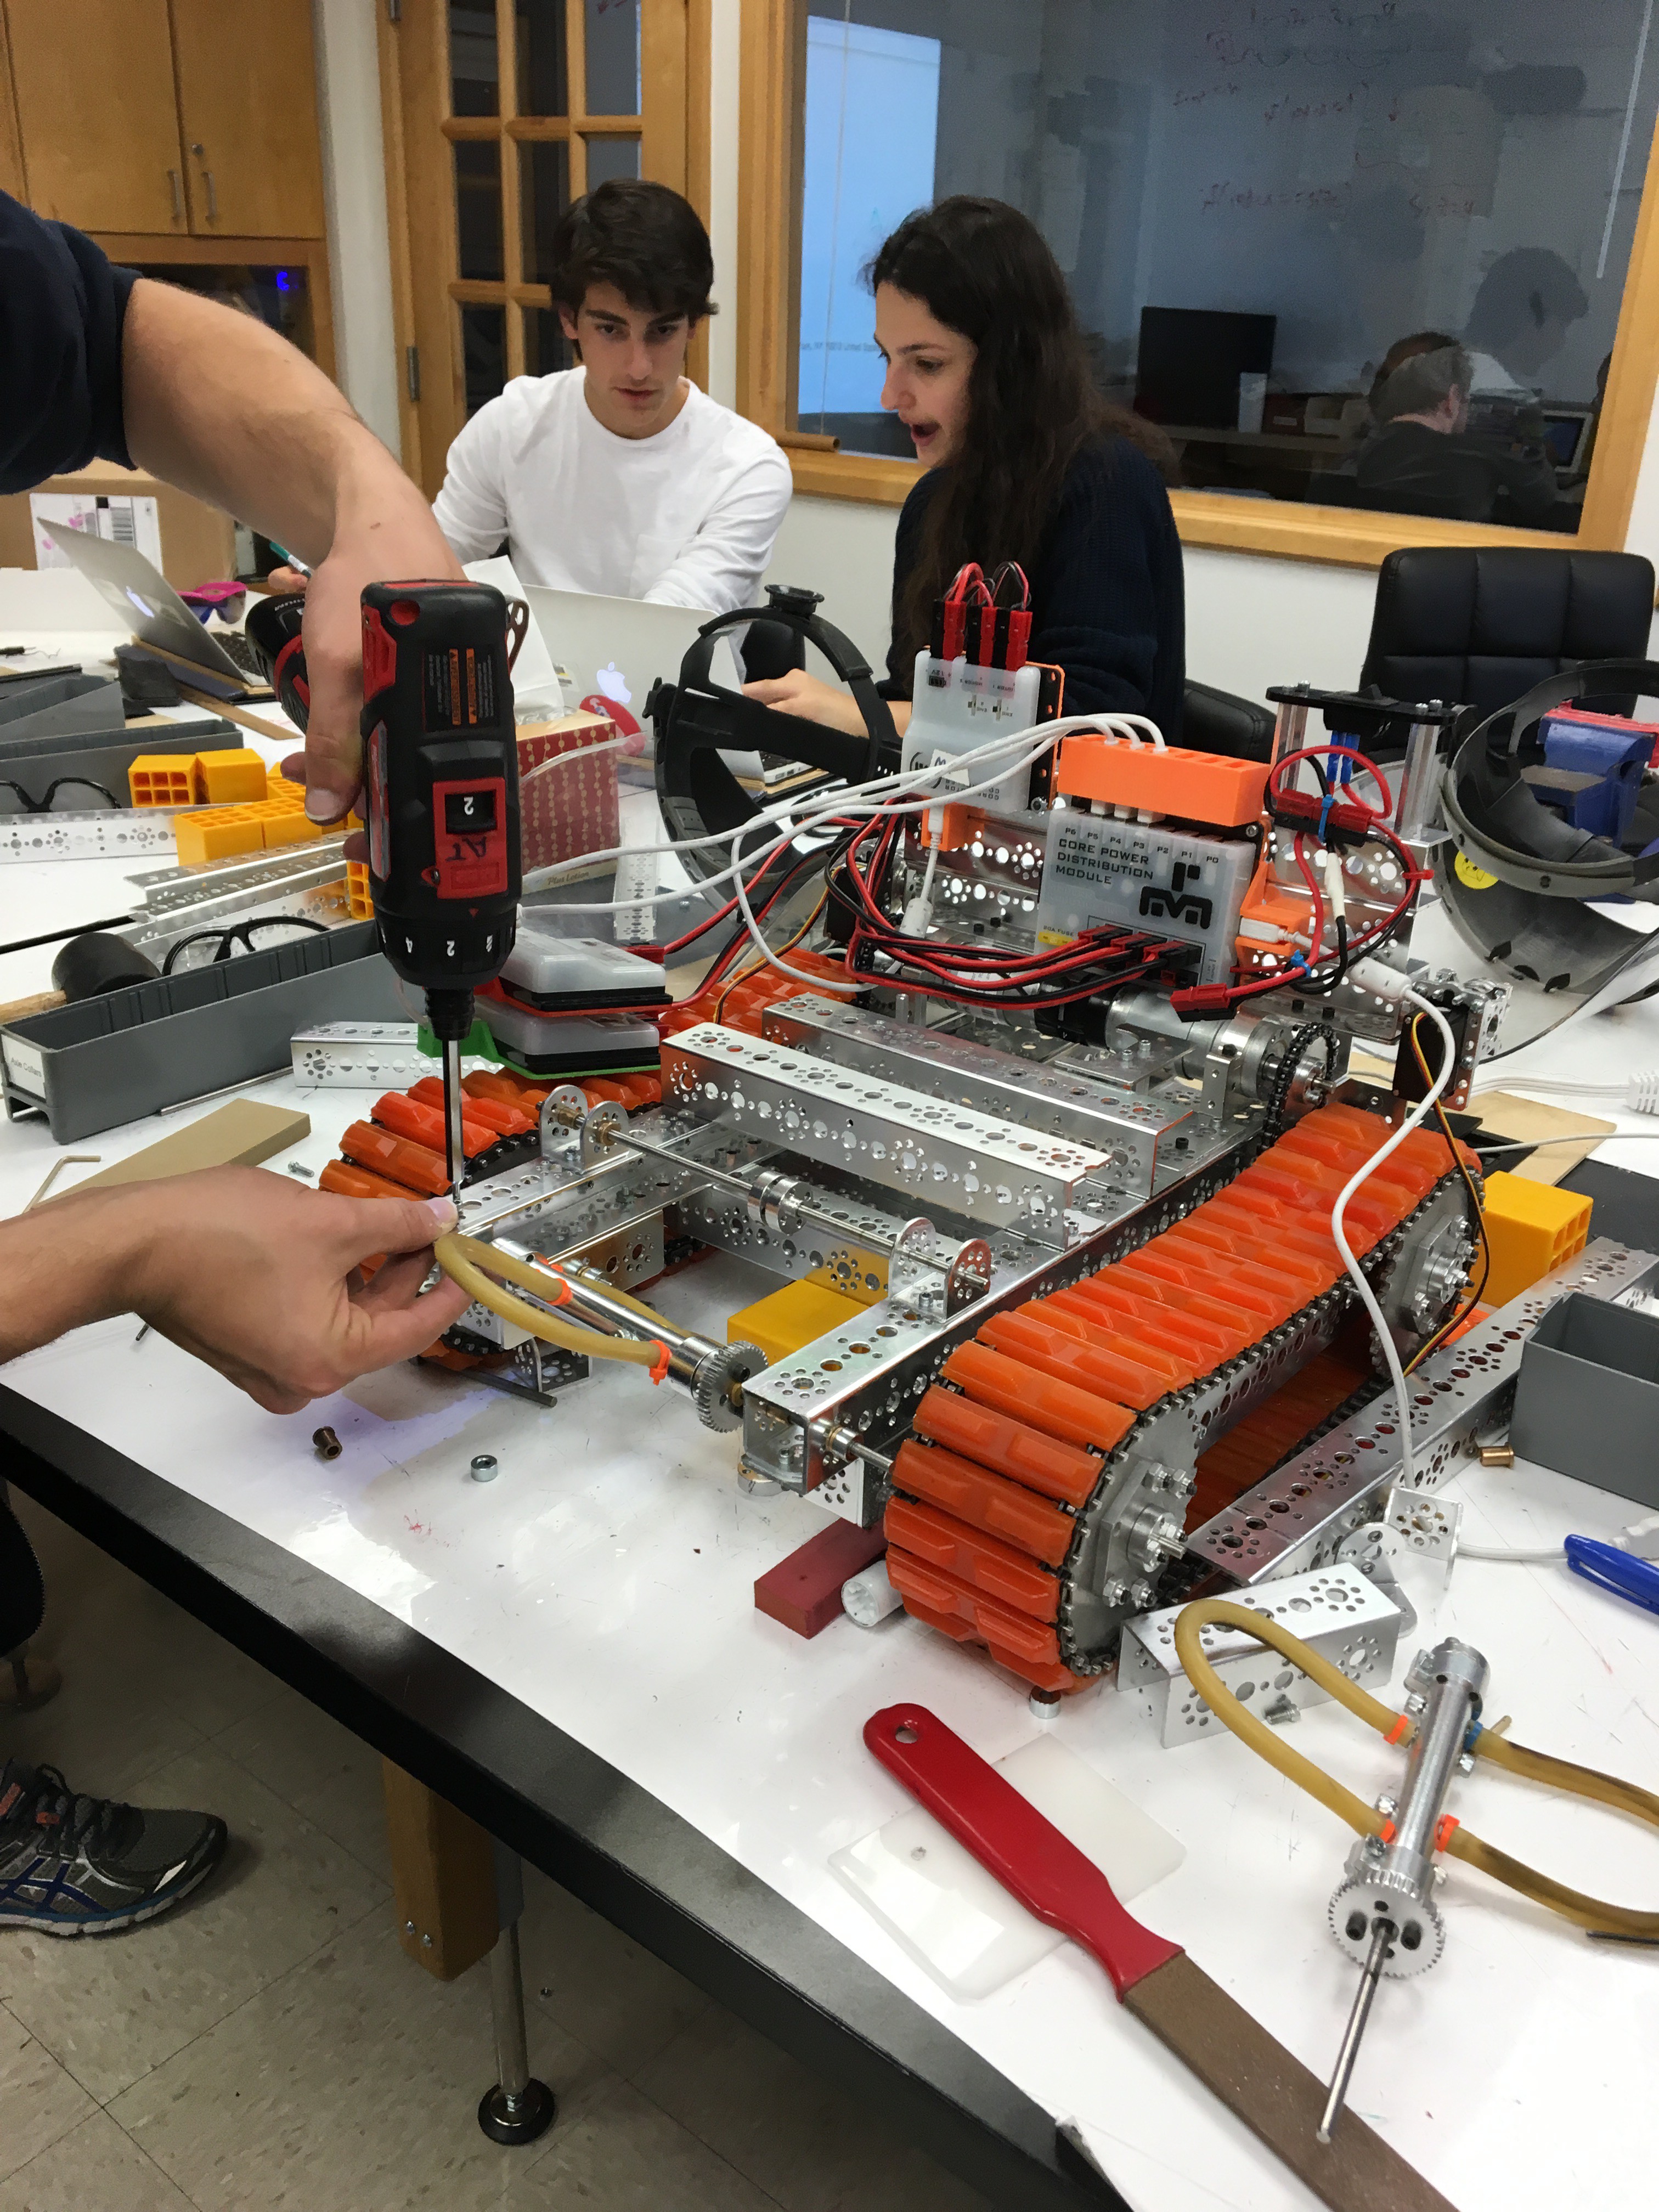
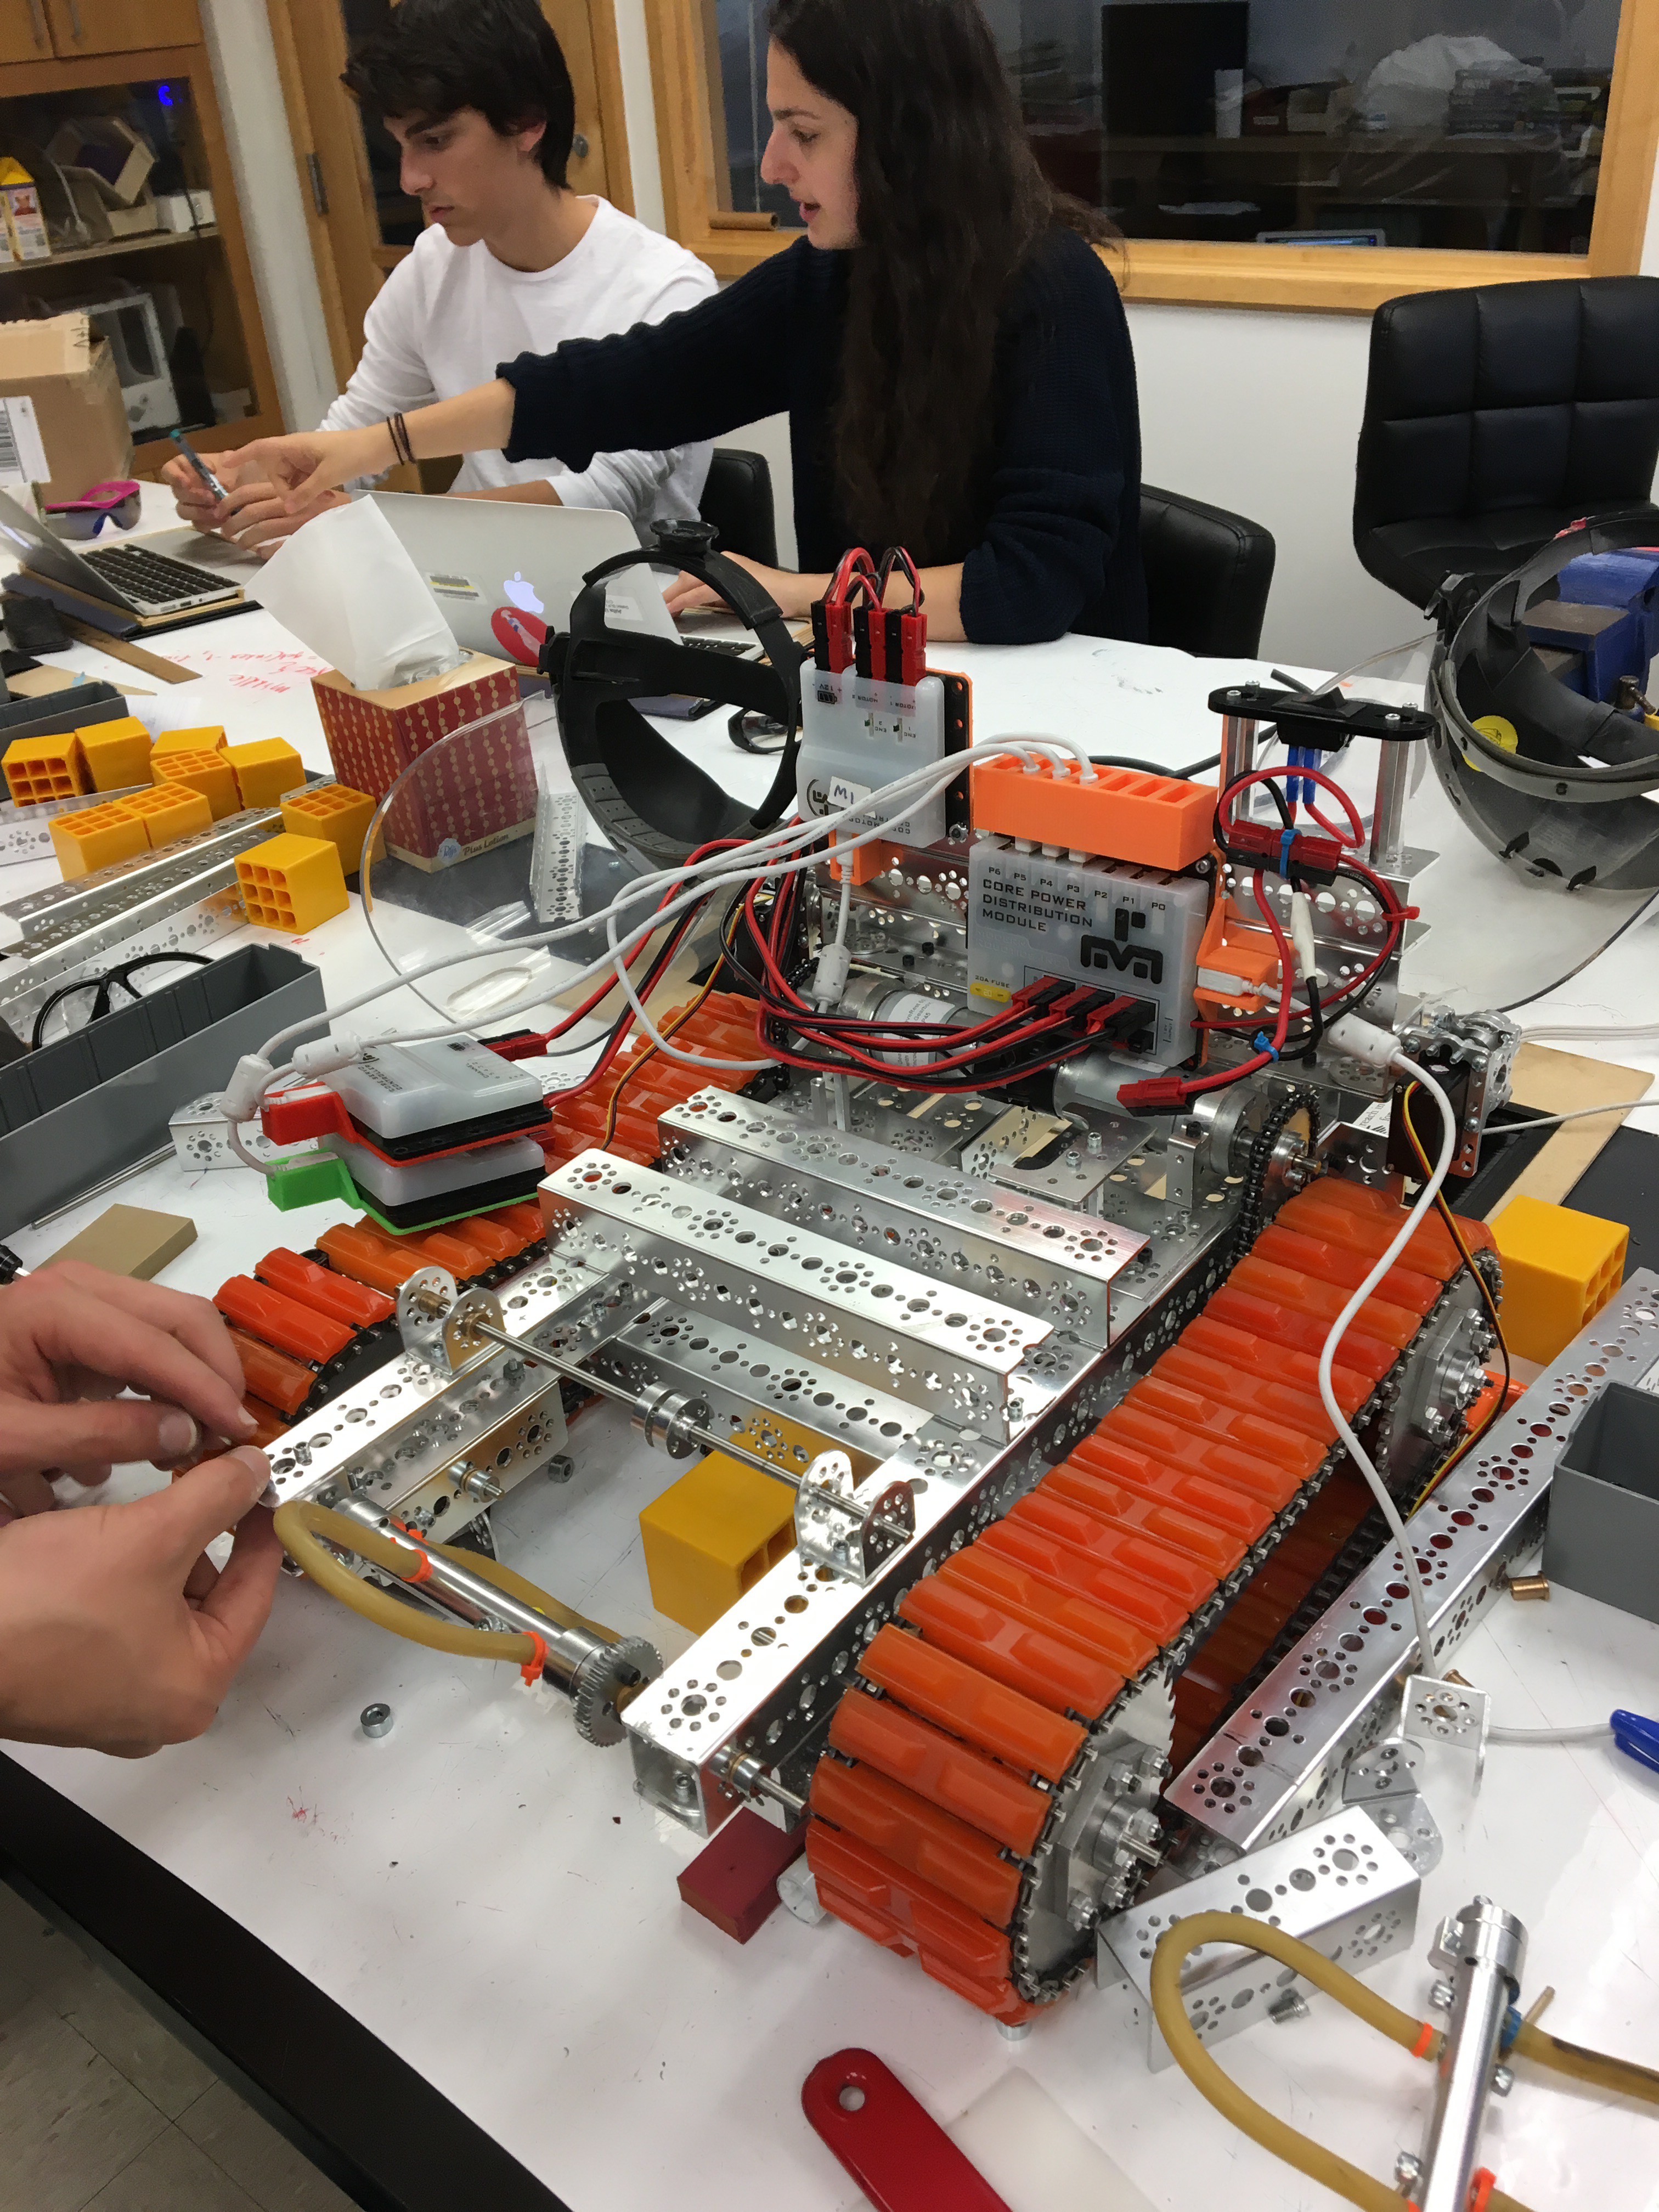
01/17/2016 at 19:45 • 0 commentsOne of our very first customers was The Dalton School in NY, and competed in the FIRST FTC competition. They were kind enough to send me some pictures and video of there robot. The are working on making some longer videos but they send me this teaser video to start with.
Congrats to the team for building such an awesome robot.
![]()
![]()
![]()
-
Laser Cut Robot Chassis
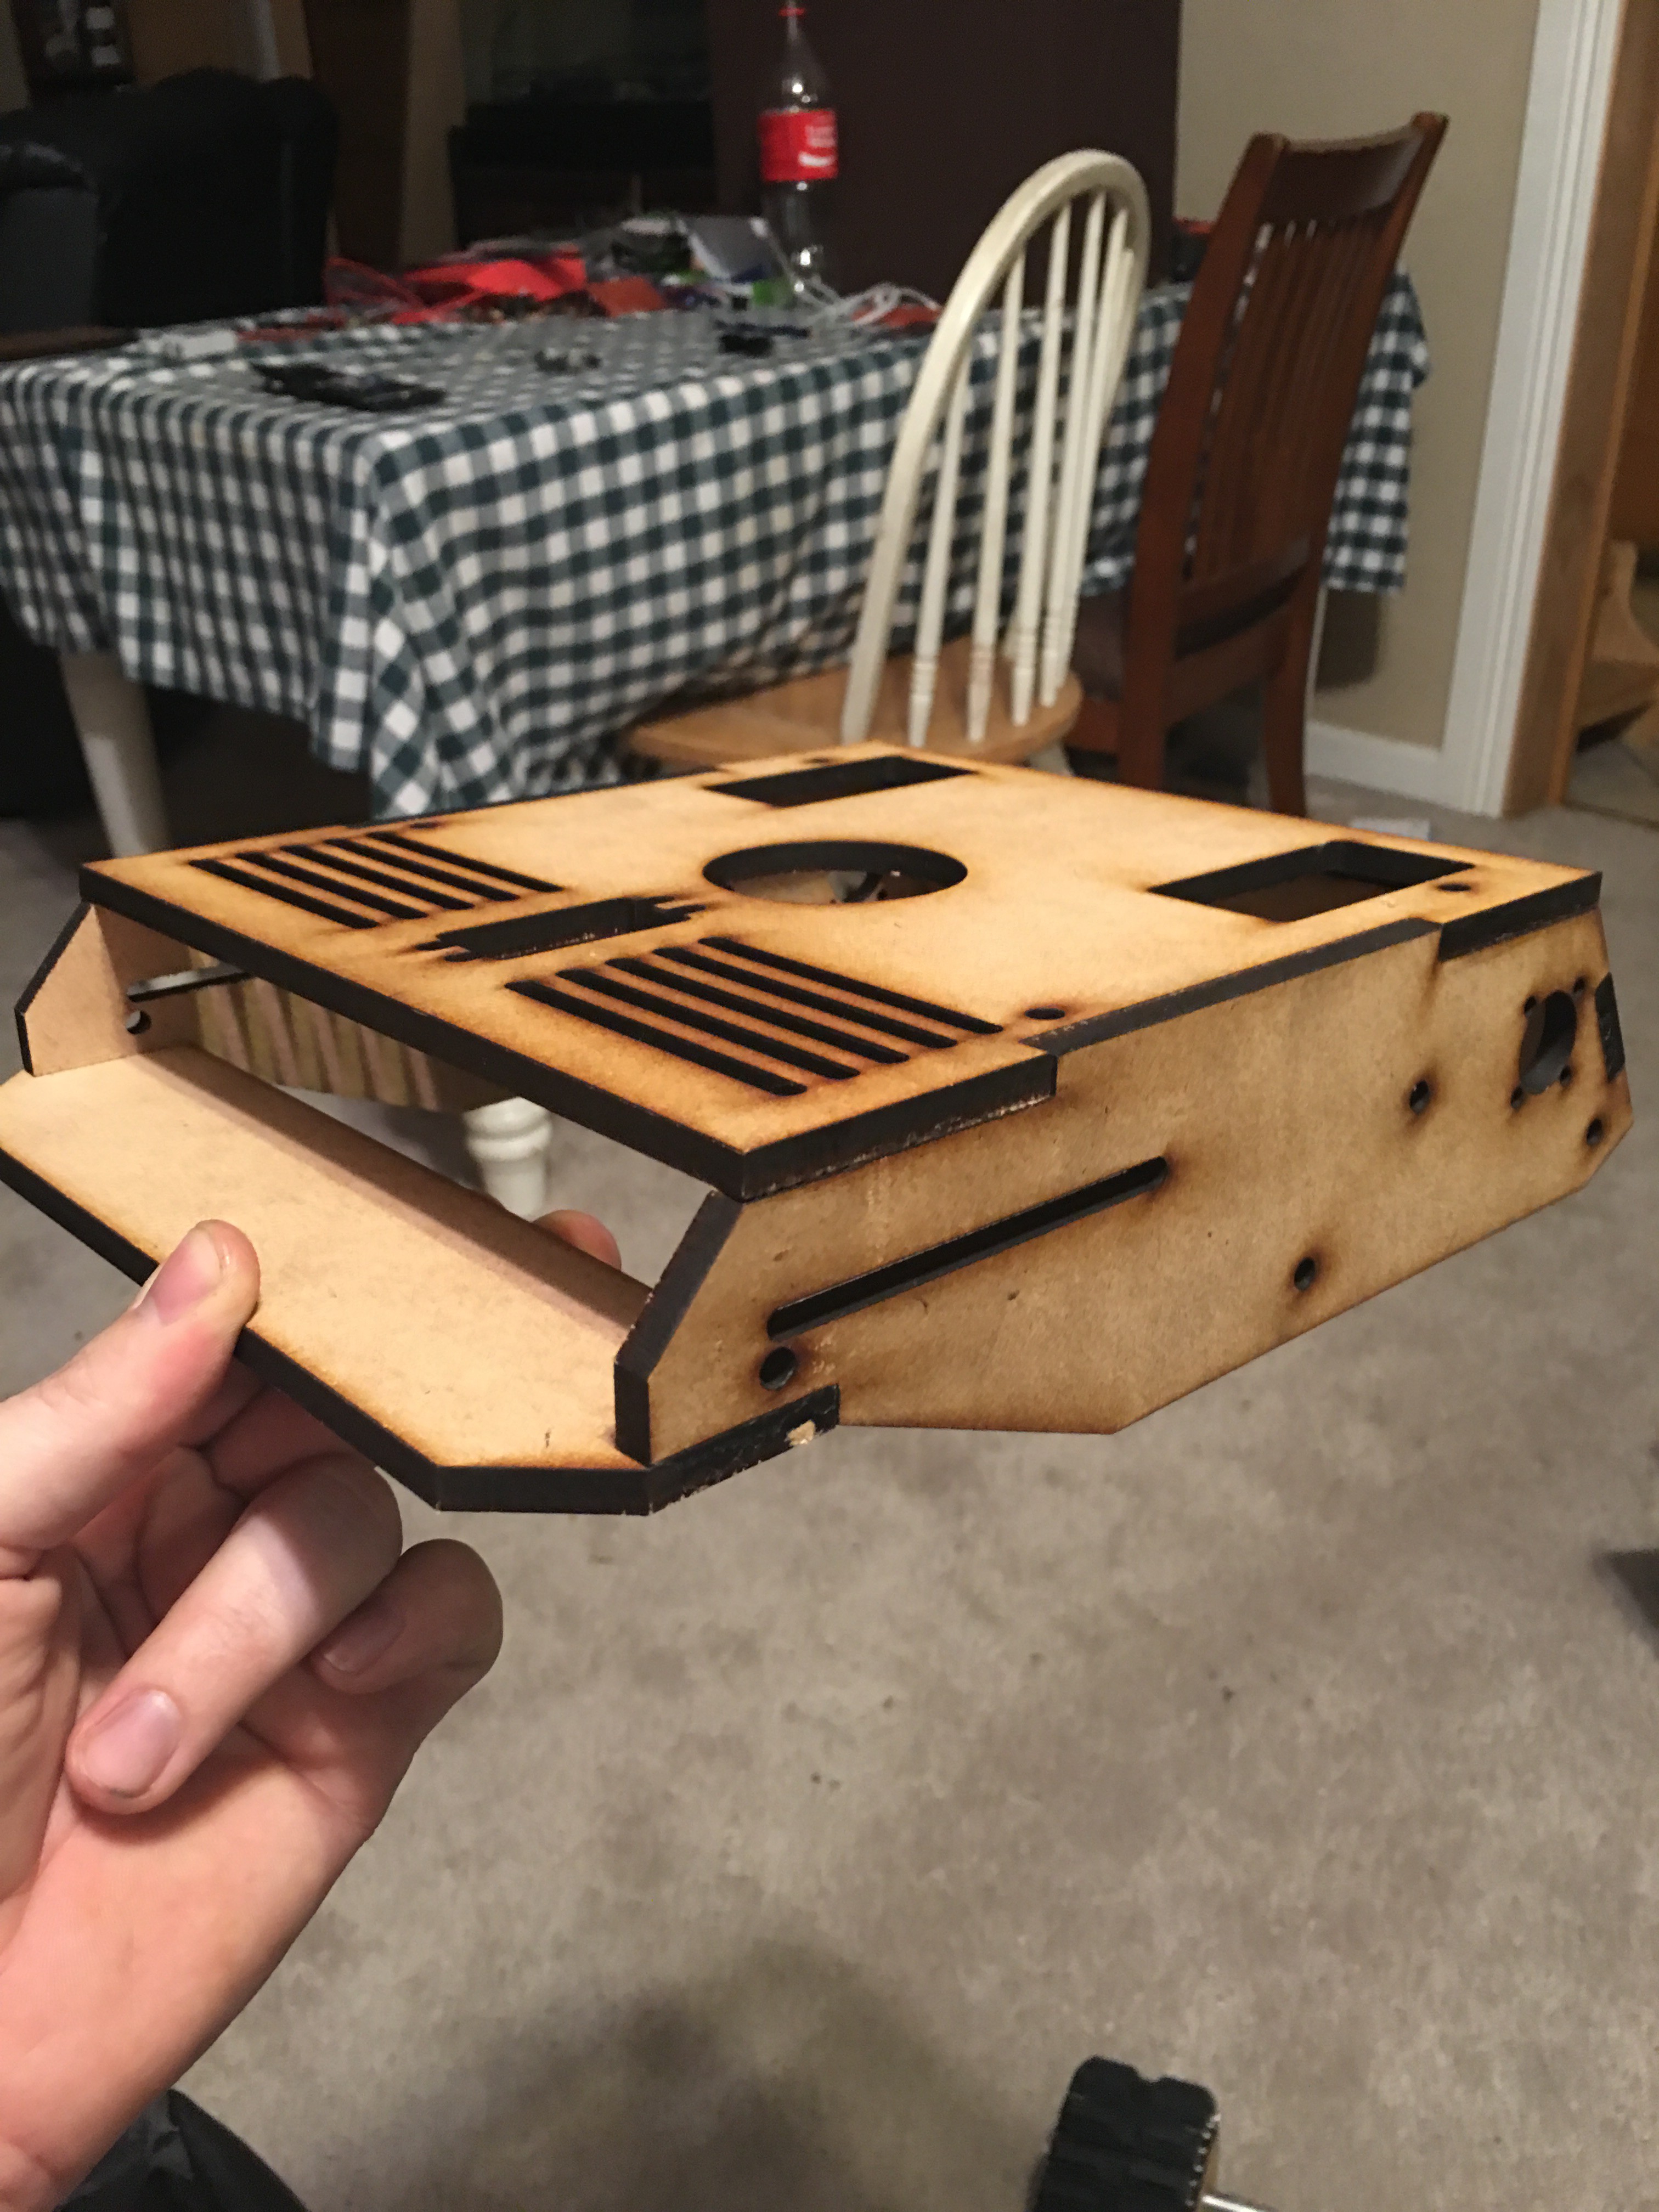
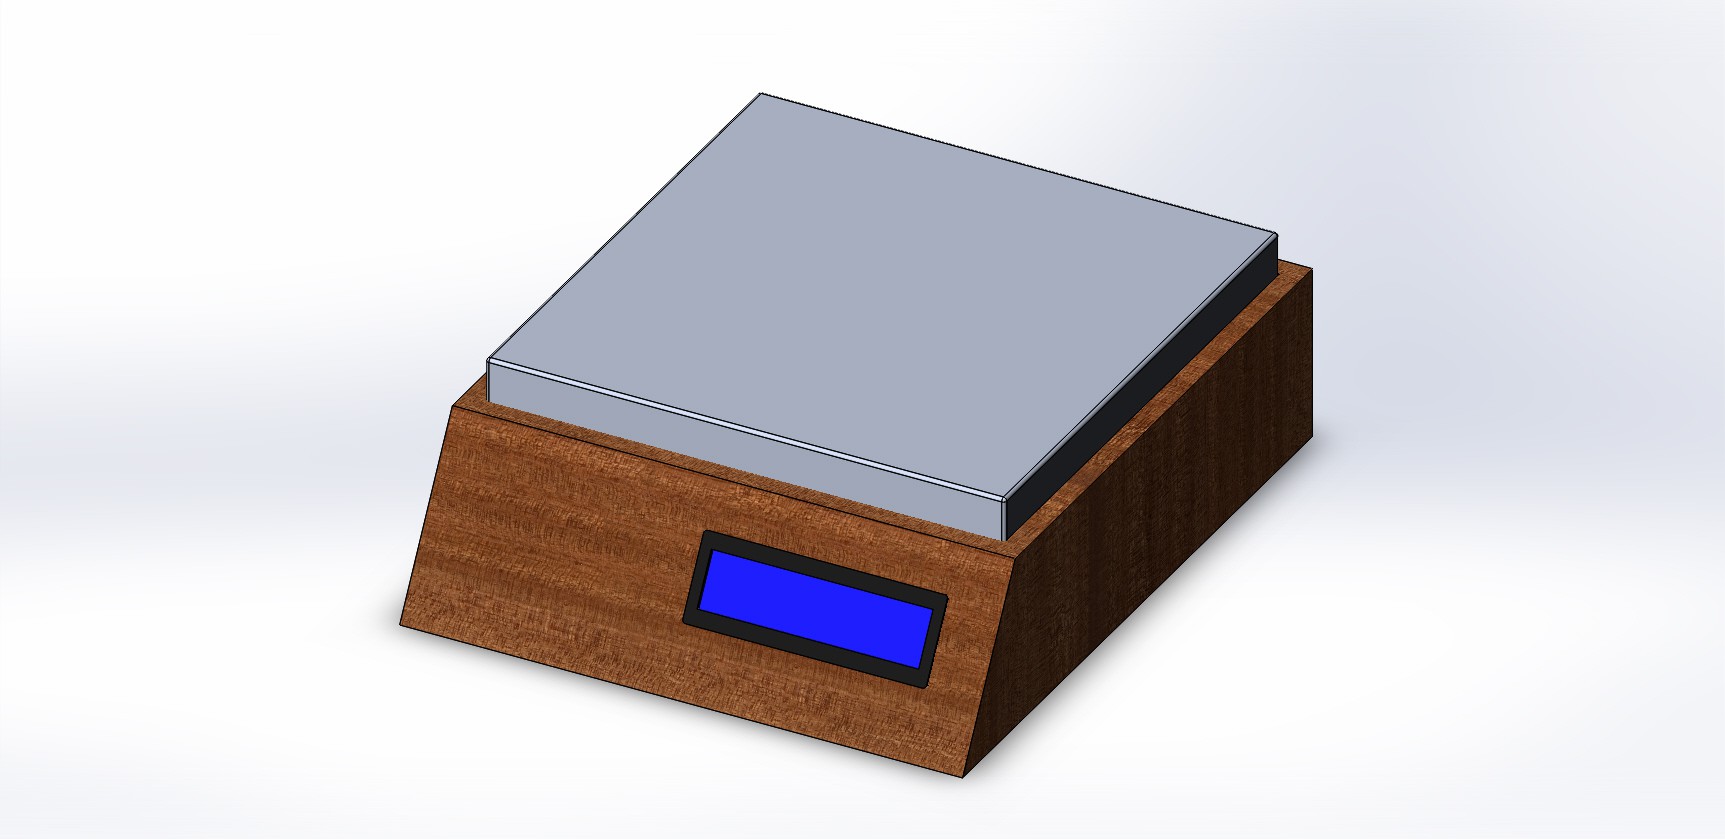
01/03/2016 at 02:33 • 0 commentsI spent some time on the laser cutter to make cases for the hotplates which will be used to heat cure my molds. While I was there I laser cut a prototype chassis for making some tank robots. It is cut from 1/4" MDF and glued together. It is actually quite sturdy for being made from MDF. Down the road I plan to get some laser cut from sheet steel, but this is a good way to test the concept first.
![]()
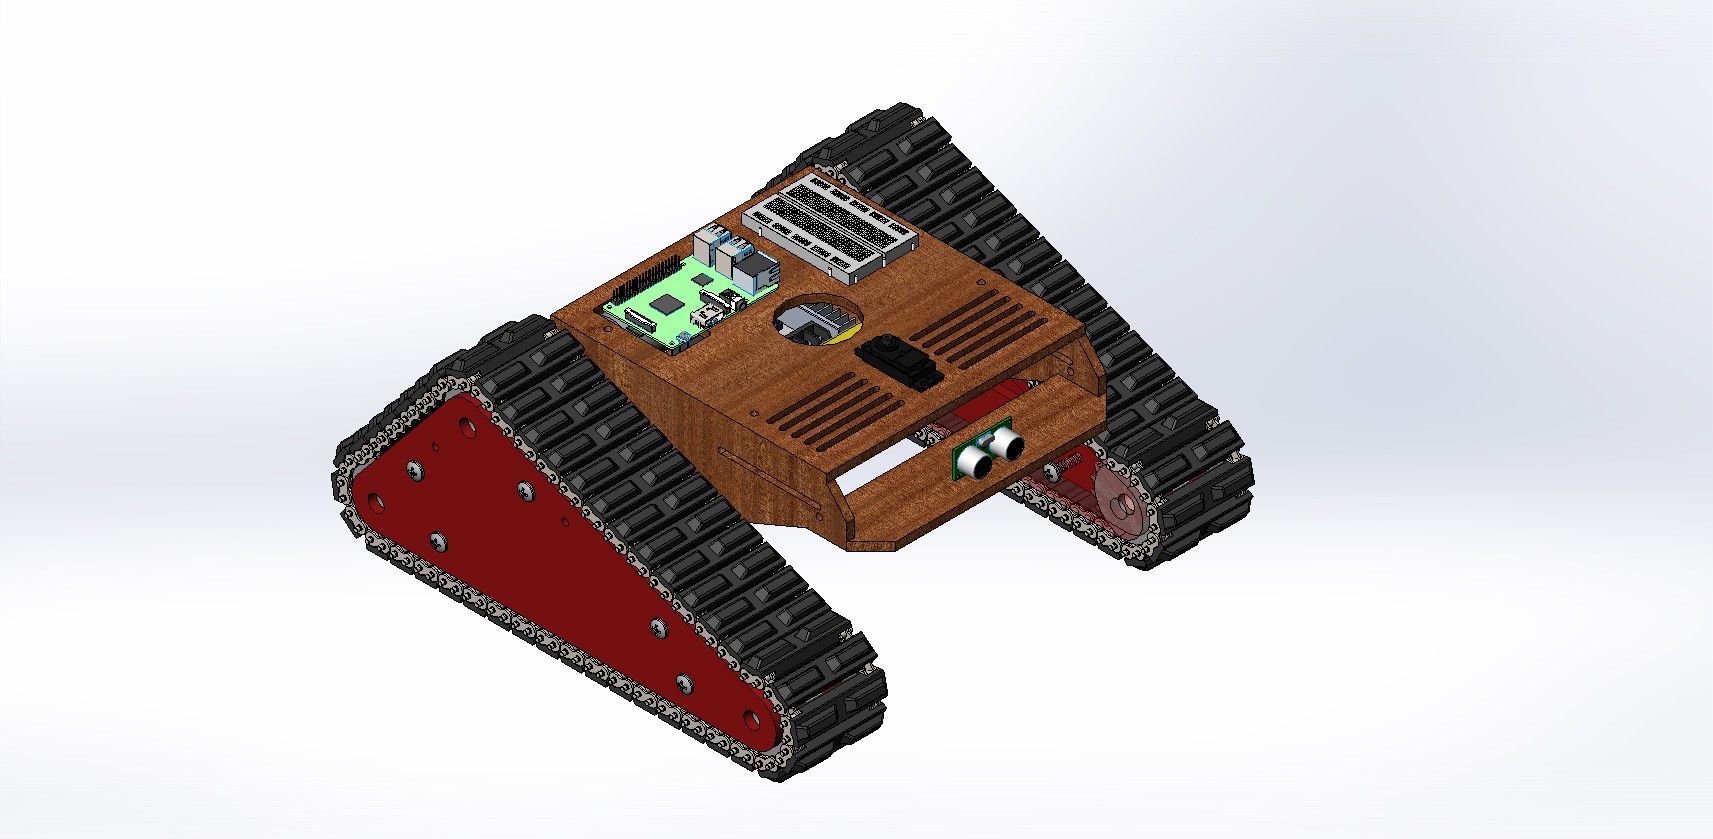
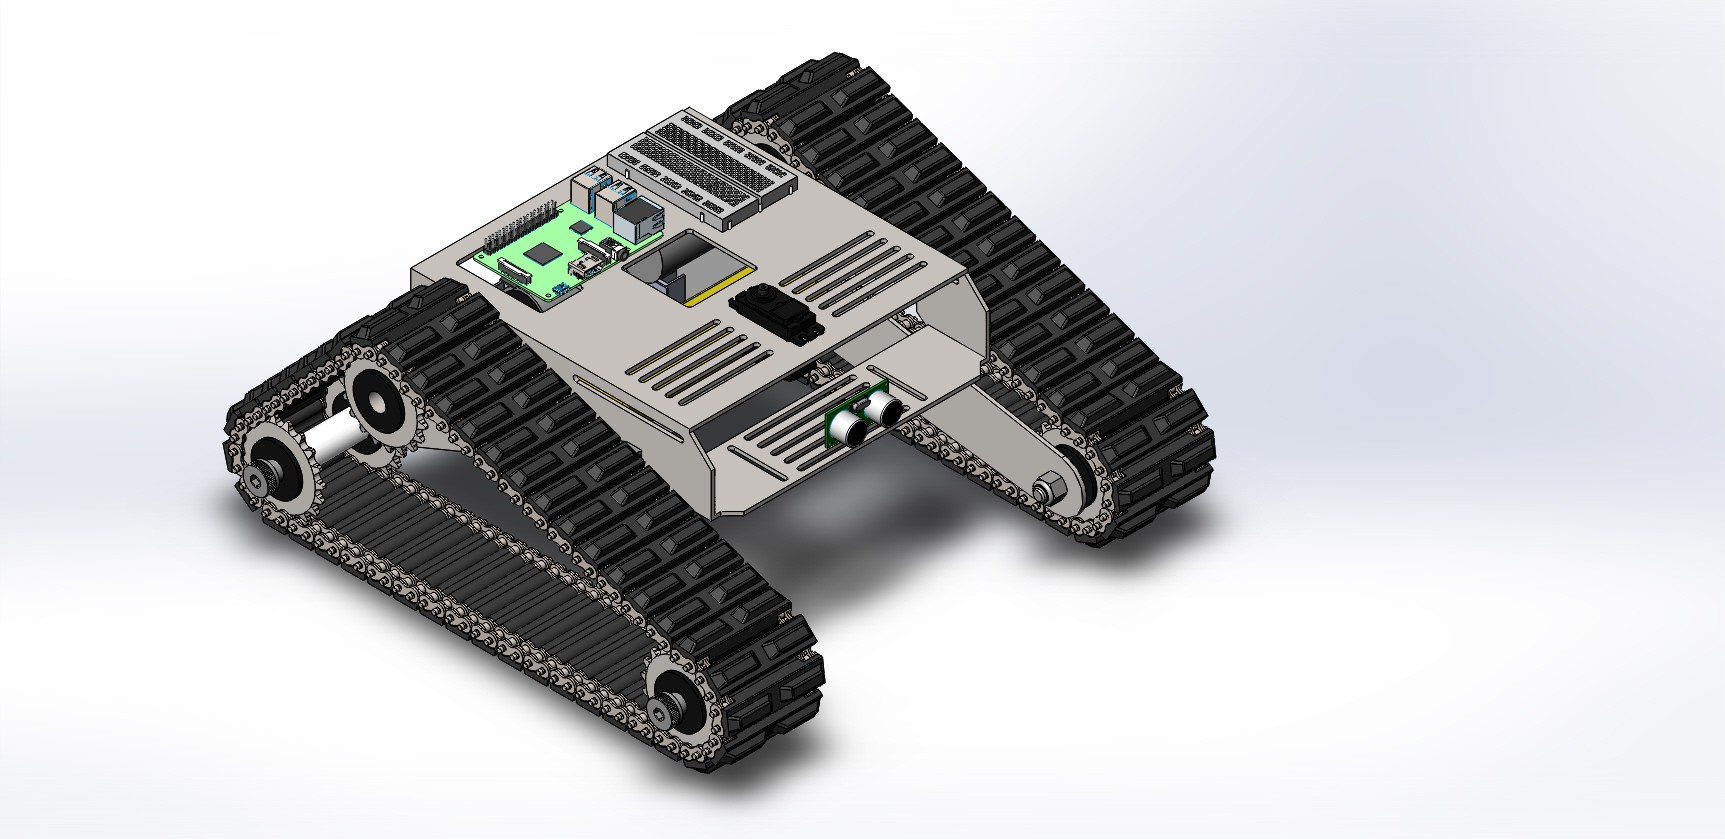
And here are some CAD renderings of what it will look like when I get the high clearance tracks mounted.
![]()
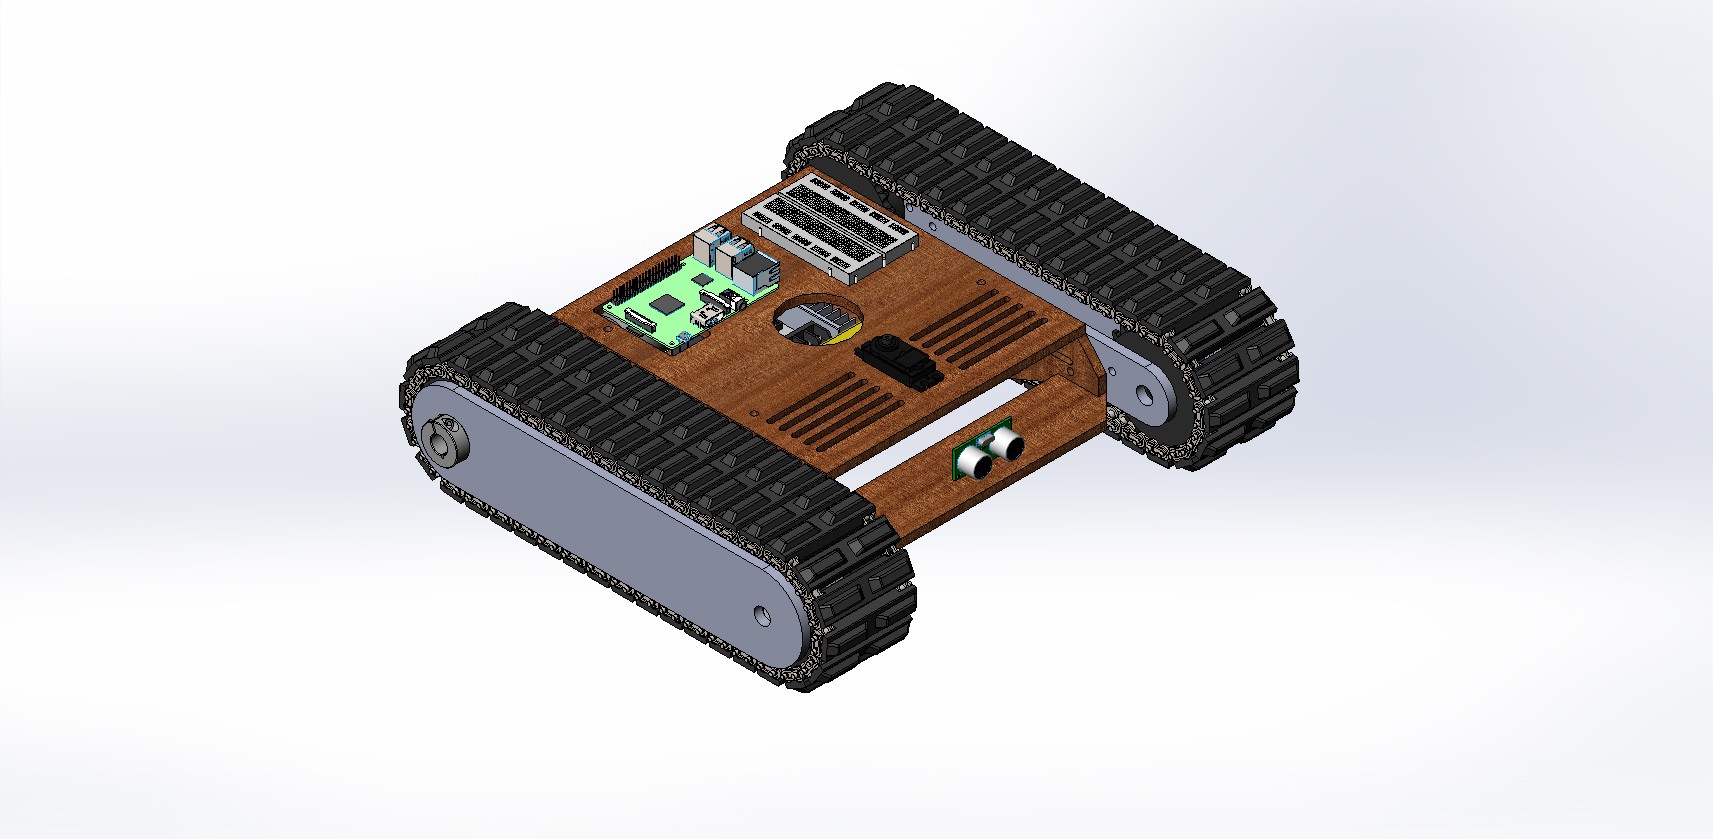
Or with simple low clearance track.
![]()
-
Increased Production and Hotplates
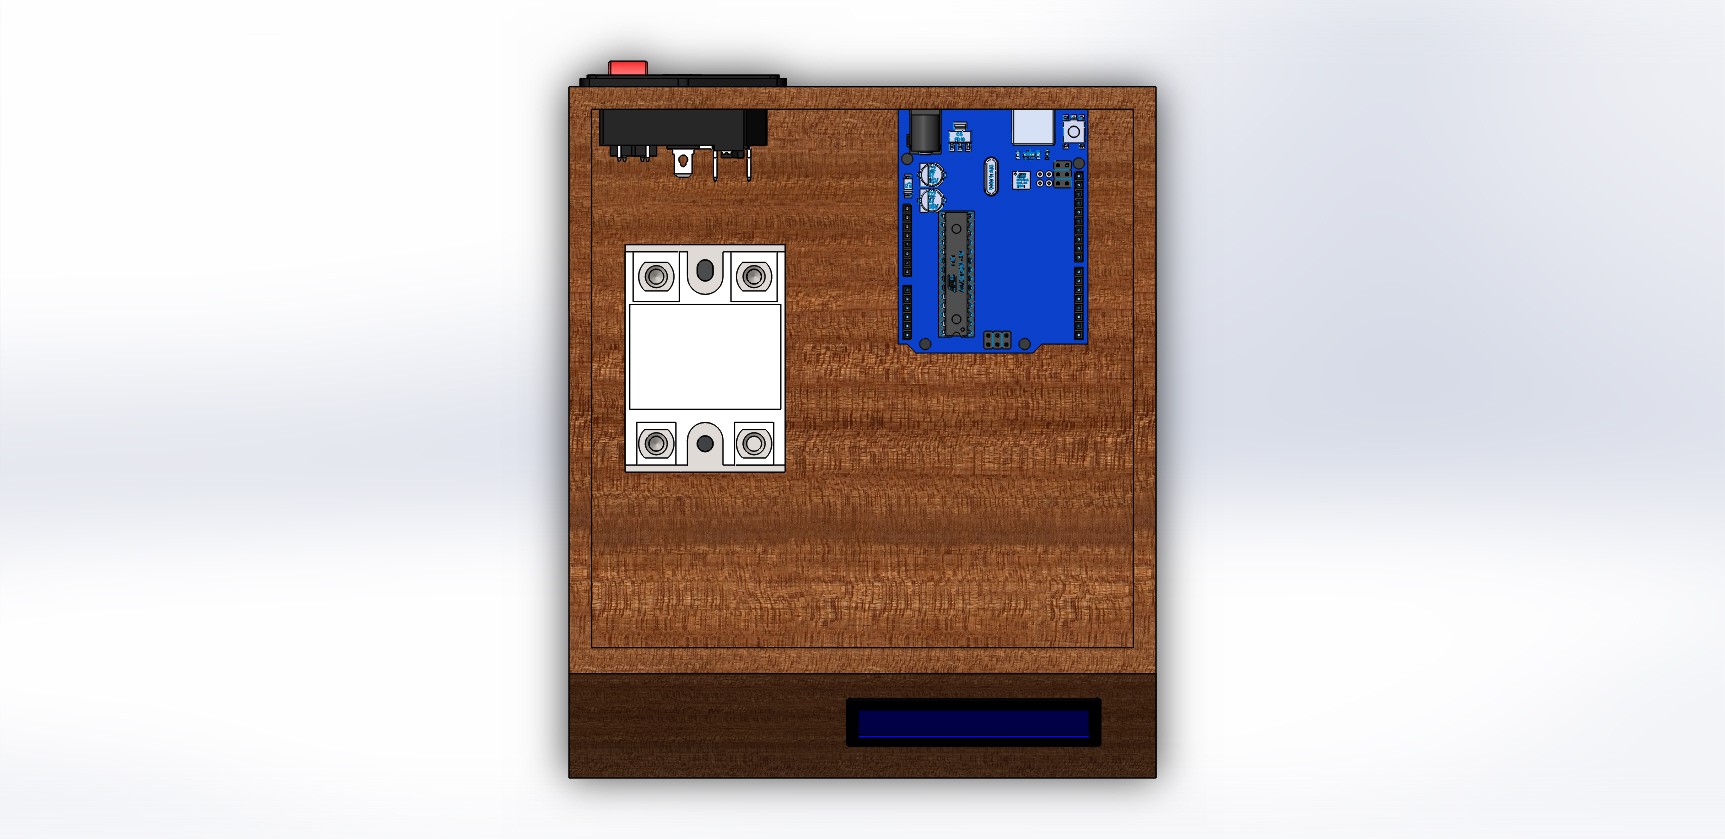
12/26/2015 at 22:16 • 0 commentsThis projects has continued to grow and I am very pleased that the first few sales have started to fund other projects related to this. I recently finished my upgraded resin dispenser which is working flawlessly. I had two more molds machined and have tripled my production rate. As the production rate increases bottle necks have been found that slow things down. One of these is the heating of the molds. I originally mounted two heater coils into the mold and connected those to an arduino and a solidstate relay. This works fine for a single mold and I left the design open to be able to control 3 such molds. However, now that I have been working on this project I see that this might not be the best way to go.
First, it requires me to mount the heaters into the mold. As I get more molds this means that each one would have an additional $16 worth of heaters and a thermocouple built in. It does not make sense to do it this way. So my current plan is to separate the heating from the mold. This is actually quite common in injection molding machines.
Another problem with having a single control box to run 3 sets of heaters was that they must all be close together or have long wires running around. A hotplate fixes this as well. It will be slightly more expensive because I will use 3 micro-controllers but these parts are not very expensive.
I made an new project for the hotplate and you can check it out here:
And here is a quite computer rendering while I wait for the parts to arrive.
![]()
![]()
-
Resin, Shelf Life and R134a Refrigerant
12/21/2015 at 19:26 • 2 commentsI have almost used my first batch of 3 gallons worth of resin. It has been a learning experience working with this much resin and trying to find a way to reduce waste. One problem is that the resin is sticky and a pain to clean. Spilling it not only is annoying but also costs me money. It is cheaper to buy it in bulk, but harder to work with too. My resin dispensing system that used garden sprayers was an okay solution and I think with some tweaks could be a viable option for others too. But one problem that I ran into was the resin will set up without being mixed.
After a couple of weeks I noticed that the top layer of resin in my garden sprayer had hardened. This was a big problem. If the resin could not be stored for very long it would make it difficult to work with. So I started looking at the data sheet for my resin. Smooth-On PMC-770 Datasheet
One interesting section states the following:
"IMPORTANT: Shelf life of product is reduced after opening. Remaining product should be used as soon as possible. Immediately replacing the lids on both containers after dispensing product will help prolong the shelf life of the unused product. XTEND-IT® Dry Gas Blanket (available from Smooth-On) will significantly prolong the shelf life of unused liquid urethane products"
This was quite encouraging because it meant that this was a common problem and documented solutions existed. The mention their product Xtend-It Dry Gas Blanket. So I decided to take a look at the datasheet for that.
From the technical bulletin my best understanding is that the resin is reacting with moisture in the air. This product is a gas which is heavier than air and displaces the moist air and creates a barrier above the resin. For the average user dumping the resin from a 1 gallon bucket this product is just okay. But in my situation is is even better. Since I load my resin inside a keg and never let the air out, I could potentially use this product one time every time i fill the keg. My kegs can easily hold 4 gallons of resin with pleanty of headroom.
I decided to take a look at the SDS and it says that this product is >99% 1,1,1,2-tetrafluoroethane. I recognized this name from somewhere but could not place it. So I did a quick google search to find out this is common A/C refrigerant R134a. This is also used in some gas dusters (AKA canned air). What is nice about this is that it is quite easy to get this from an auto parts store. It also can be pumped into my keg through the gas in line. I put of this in with my resin when I filled the kegs. Now all I can do is wait and see.
One thing that came up was that fact that I am using this under pressure. The Xtend-It product is designed to be sprayed into a bucket for storing the resin. The fact that mine is under pressure posed a few good questions. First of these was will the R134a remain heavier than air while under pressure? Since R134a is used quite often there are some very helpful tools like this one:
Calculation of thermodynamic state variables of tetrafluorethane - R134a
You can put in the temperature and pressure and you get a page worth of details about it. One of these details is the density. I checked the range of pressures up to 130 PSI and found that R134a remains about 3 times as dense as compressed air. The second question was at what pressure does R134a become a liquid? It would probably be bad if the pressure in my keg caused the r134a to become a liquid and sit on top of the resin. One nice part of that online calculator is that it shows the state of aggregation of r134a. I choose a temperature of 65f and a baseline because I thought that was about as cold as I would ever let the tanks get. For this the r134a becomes a liquid between 75 - 80 psi. So as long as I keep my pressure under that I should be good. For now I am getting good results at 35 - 40 psi.
This raised an interesting question for me though. If the main issue is moisture in the air, can I solve this problem without the use of R134a at all. Could I use a moisture trap to remove the moisture from the air coming out of my compressor. Would it be possible to use something like this:
They claim 98%+ moisture removal. I have seen this type of filter / moisture trap sell for anywhere from $15 up to a few hundred. Anyone have experience with them? I was thinking that it wouldn't be a bad idea to use one of these to clean my compressed air anyway. Even if I continue to use the r134a.
Another option would be to use CO2. CO2 is what most people use to dispense beer in these kegs. So it would be quite easy to set up. But this would cost more than just filtering my compressed air. Another option would be to go all the way to nitrogen. But again I think this is over kill and more costly.
But it does pose an interesting experiment. Put a known amount of resin in a contain with each of these options and record how long until the resin hardens. Standard air, compressed air, filtered compressed air, CO2, nitrogen and r134a. Maybe that is a project for another day.
-
Keg Based Resin Dispensing
12/21/2015 at 07:28 • 4 commentsI have been quite busy with making track and trying to grow this business. I have received 10 orders in the past 45 days, which add up to over 1200 tracks. This has been quite a big increase from the first 50 that I made for my own use. I was aware that if this started to take off I would need to be able to scale up my production. Before I offered to sell any of these I had a rough plan for how I could keep up production while managing the costs. I tried to identify where the bottle necks would be and have an idea of how to solve the problems before I got to them. One of those problems was working with the resin.
The resin comes in two sizes. Pint bottles and 1 gallon buckets. Weighing out the resin without spilling takes some practice and is difficult. In order to do this in a production environment I needed something better. My standard approach to this type of problem is to look at what the commercial solution is. This is not a new problem and someone else solved it already.
I am a huge fan of this company Nordson EFD. They make awesome products and I have used them for my day job. The products are high quality and they sales team were very helpful. The standard solution for dispensing resin is a Fluid Reservoir like this one.
![]()
It is a simple pressure vessel, with a regulator built into the top and two connections. One connection is for air to go in and pressurize the vessel, the other connects to a tube that goes to the bottom of the tank for the fluid to come out. Simple enough. The only catch is that one of these things costs around $1200 or more. Since I am working with a two part resin that would mean that I need two of them. Sadly my company is not earning enough money for that. But it did give me an idea of what I should be striving for. This is the top of the line system. So it is a good thing to try and emulate.
My first idea was to use a garden sprayer. I removed the sprayer and connected it to some clear hose and a ball valve. This worked quite well. The garden sprayers only cost about $20 each. So for about $50 I had a decent set up.
![]()
But there were a few problems. The first was I made a mess from the beginning. I got too eager and did not have tight enough connections and spilled resin a lot. The second was that the tube that goes inside the sprayer is quite small. It had about 1/16" ID. This makes sense for spraying very thin fluids like weed killer, but the resin was thick. So while it worked, it was slow. I tried modifying it a little to increase the size of this tube, but in the end there was only so much I was willing to do. I did not want to waste too much money or time trying to turn this into a better system. Another problem was that you had to pump it up by hand. This get old really quick. But this setup taught me a lot.
- The resin could be managed in this manner and you only needed about 30-40 psi (max of the garden sprayer) to move it though 1/4" ID tube.
- The connection must be very tight. Resin under pressure will find any way out it can. Then you have a mess.
- The resin will harden even without being mixed if left in the container too long. (about 2 weeks)
So while this worked and allowed me to make several hundred parts. It was time for something better. This is my current solution to the problem, and I am quite proud of it.
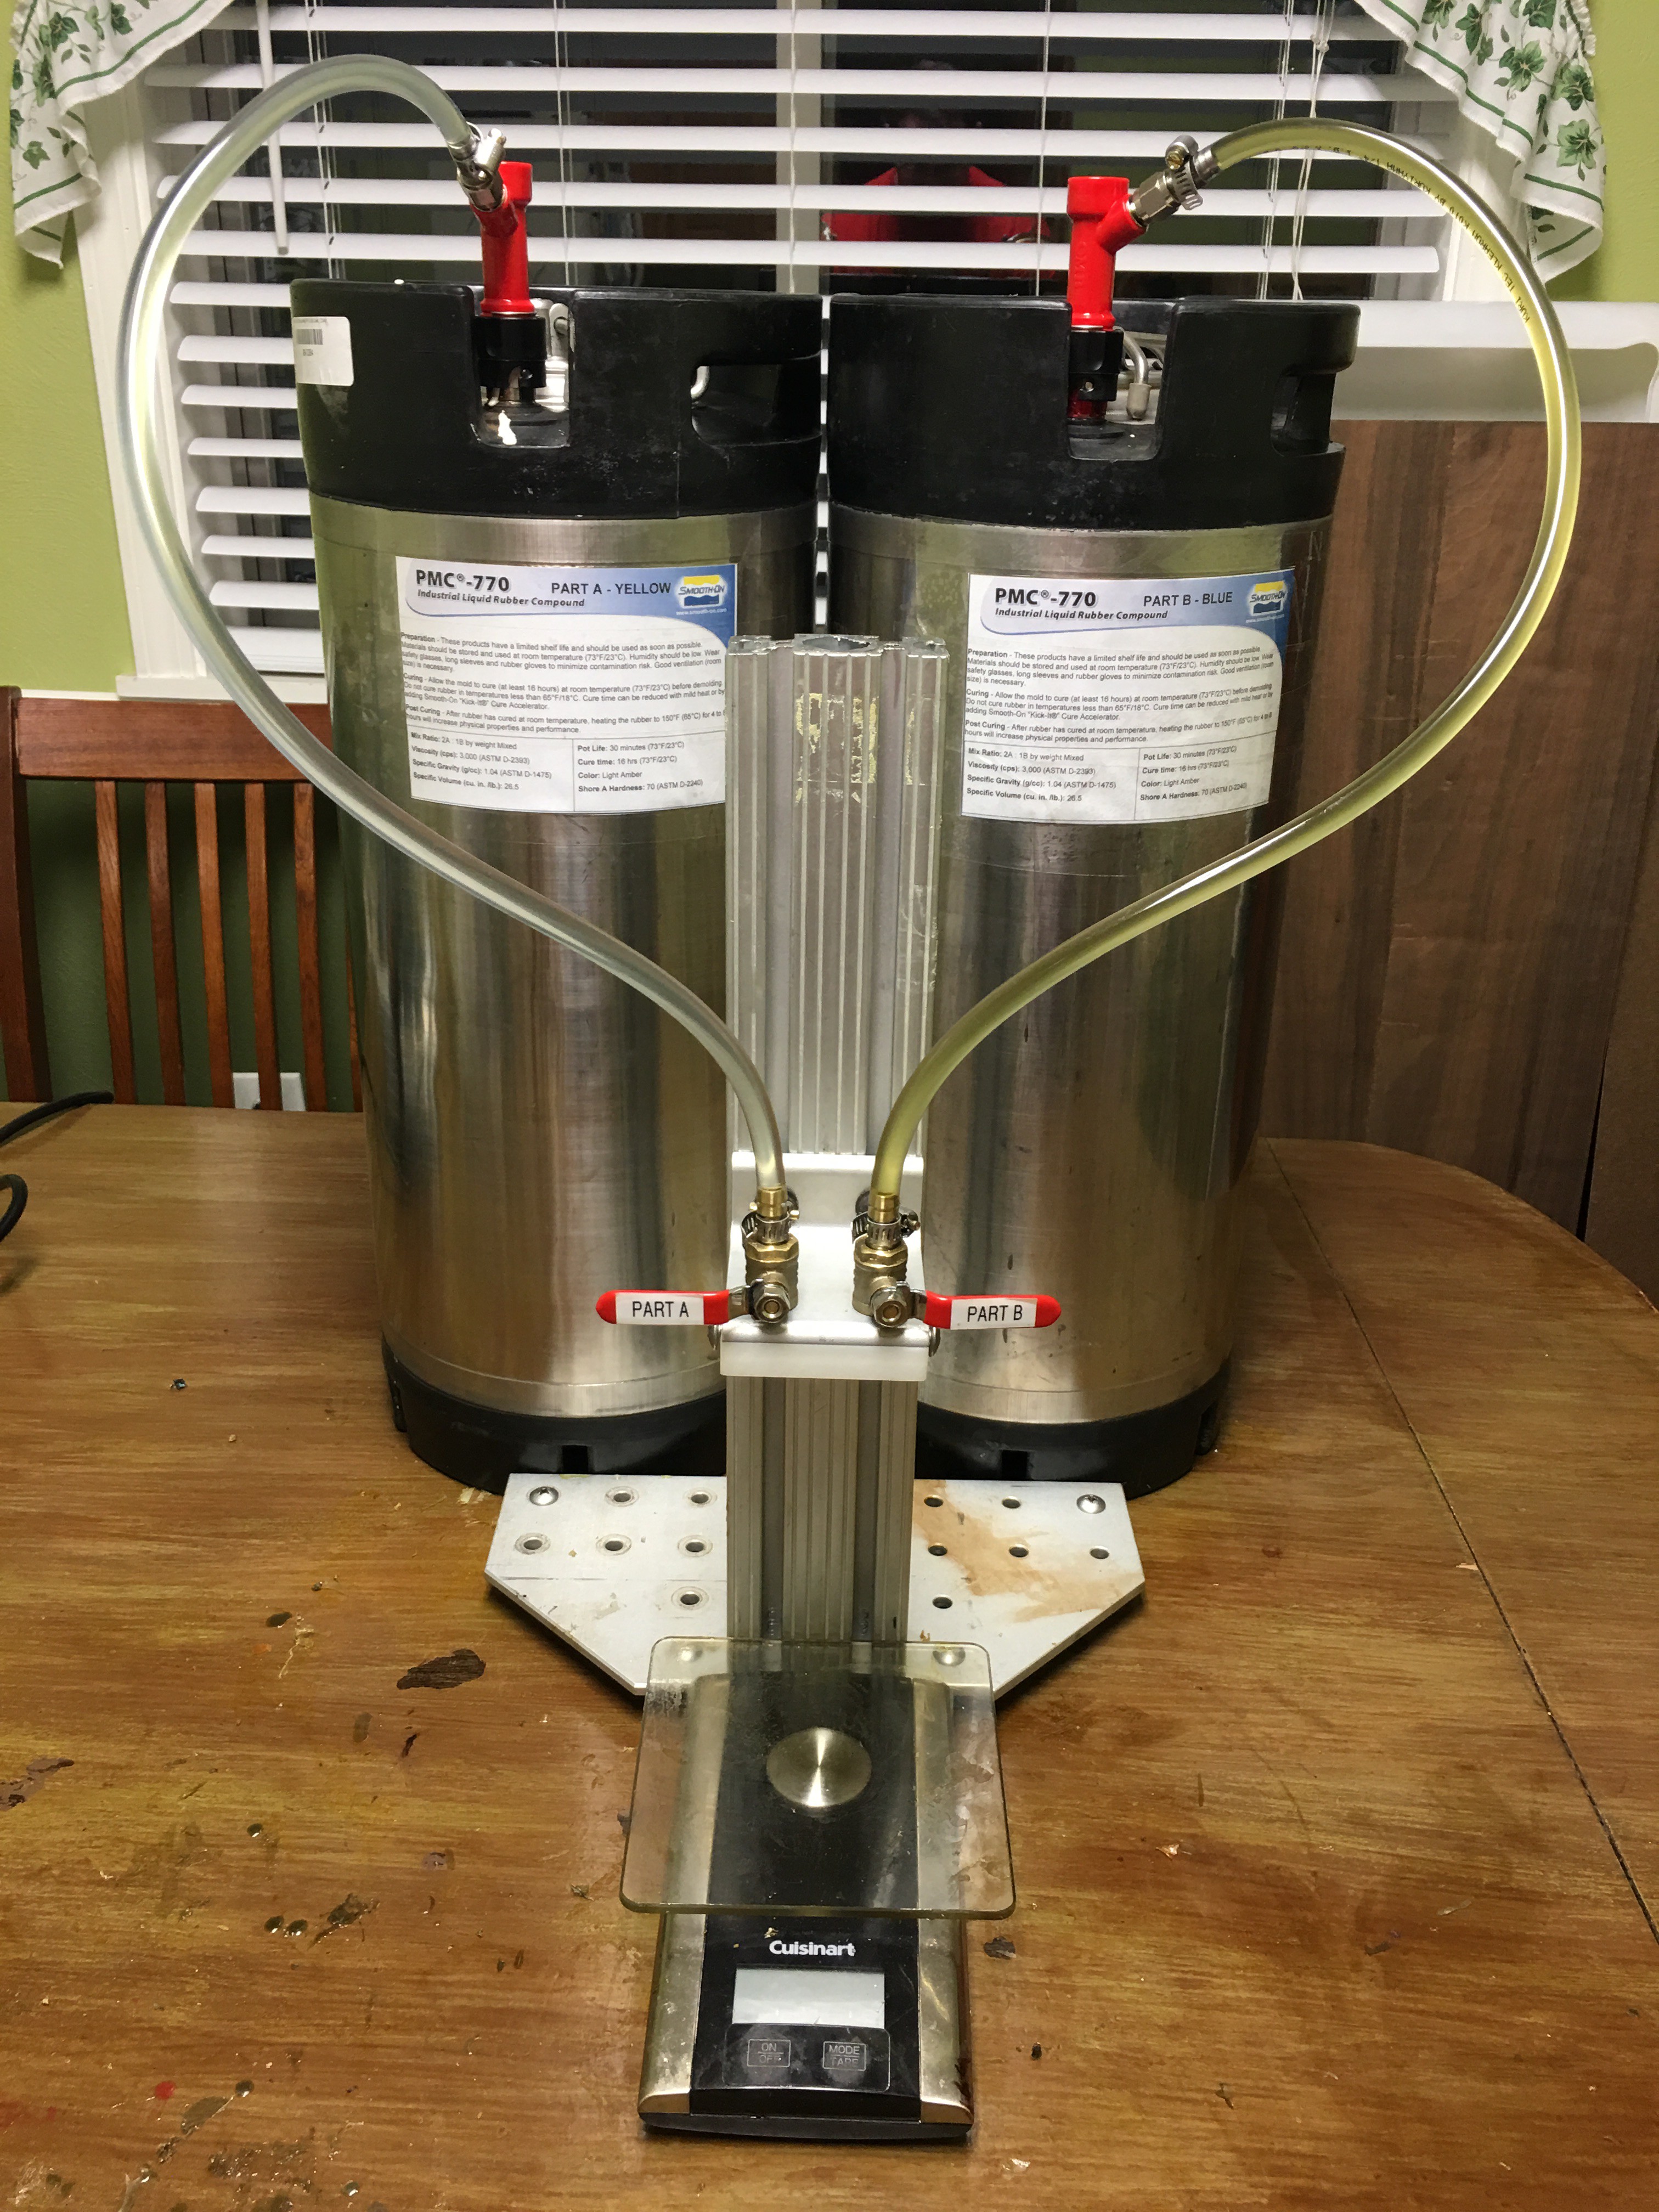
I have two friends who brew beer and they suggested I look at Cornelius Kegs. These are often used for home brewing of beer or dispensing soda in a restaurant and they worked great. These are 5 gallon versions, but they also come in 3 gallon versions. The 5 gallon ones are quite common place and I bought used ones to save money. I got these two from Adventures in Homebrewing.![]()
Before I ordered them I compared them in every respect to the commercial solution.
All in all they seemed to be quite similar. The commercial version is shorter and fatter, with a lid that is fully removable. This makes it easier to clean and also might make it possible to put the resin in without removing it from the shipping container. For me this would not be an option because I could not fit 2 gallons of resin in it. The corny keg on the other hand could hold two full batches of resin at a time. This would be 4 gallons of resin in one, and 2 gallons in the other. (2:1 ratio resin). The smaller opening does make it harder to clean. But hopefully I wont have to clean it ever, and worst case I can buy a new one.Characteristic Commercial Version Corny Keg Volume 0.3 and 1 gallon versions 3 gallon and 5 gallon versions Rated Pressure 100 psi to reservoir and 150 psi to regulator Max working pressure 130 psi Cost About $1250 New $75, used $39.99 One other issue with the corny keg is you can not draw a vacuum on them. The lid is designed in such a way that the pressure seals it. So I can not vacuum degas the resin in the kegs. Well not yet anyway. I think I have a easy solution to fix that down the road.
![]()
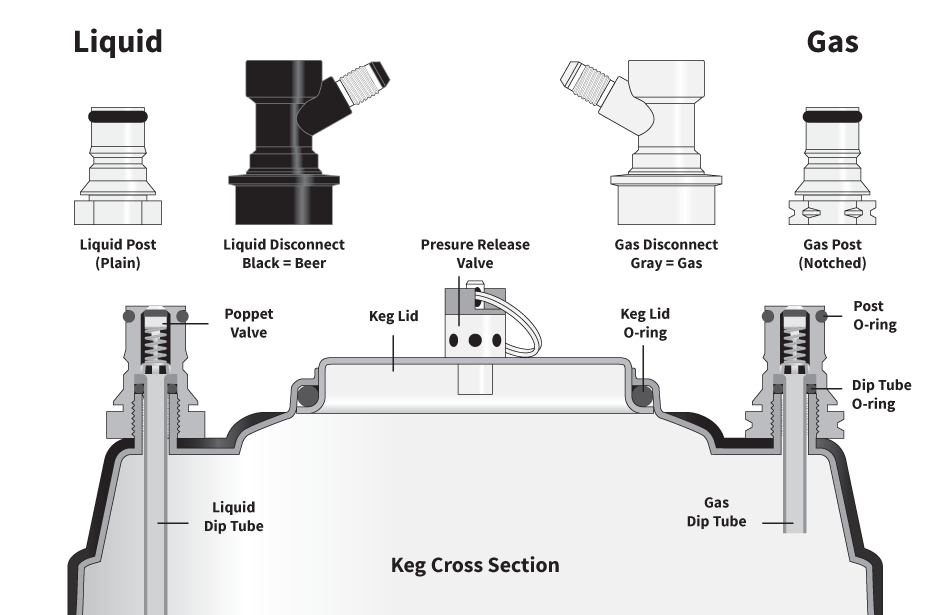
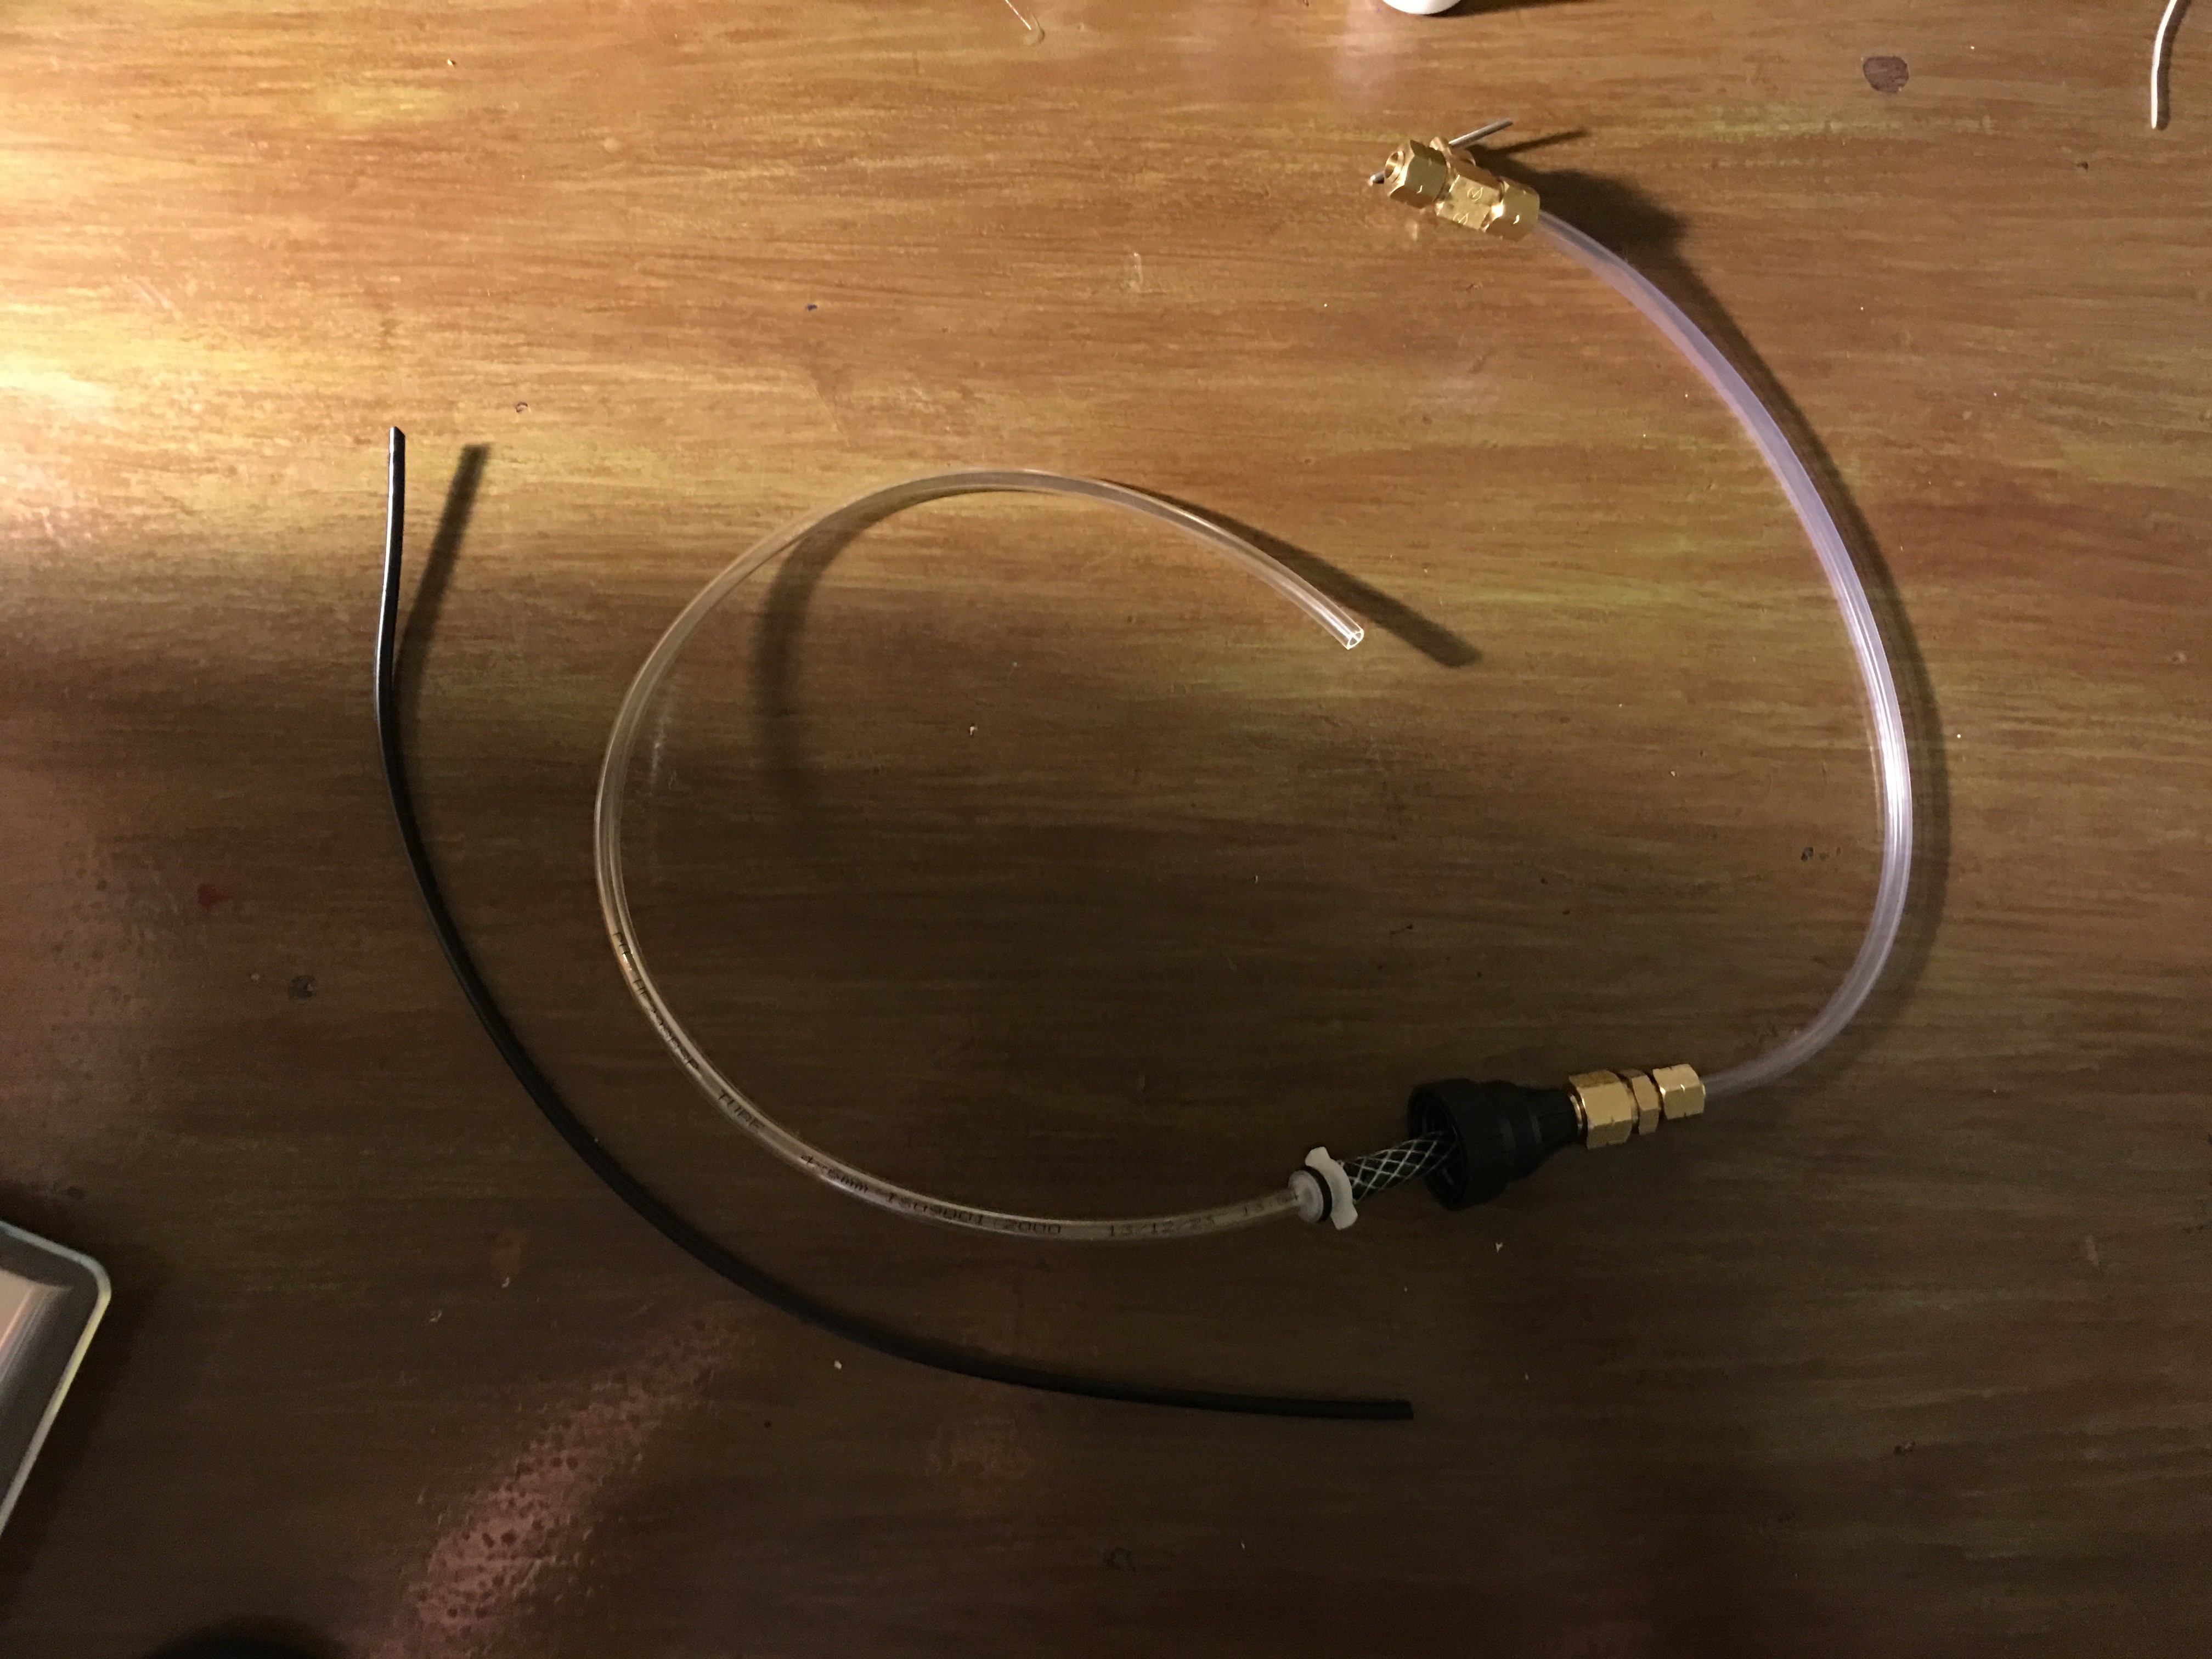
Another concern was the way the kegs dispense the fluid. The keg posts have a part called a poppet. This is basically a pin with an o ring held in place by a spring. The keg disconnects lock on and press down this pin. This is similar to the valve on car tires. And allows you to remove the hoses from the keg without depressurizing it. I was not sure if the poppet would cause a problem. The resin is quite thick and anything in the way could restrict the flow. But they do sell a conversion part to removed this and replace it with a standard 1/4" male pipe thread. I figured I would give the default design a shot and if it didn't work I would replace it.
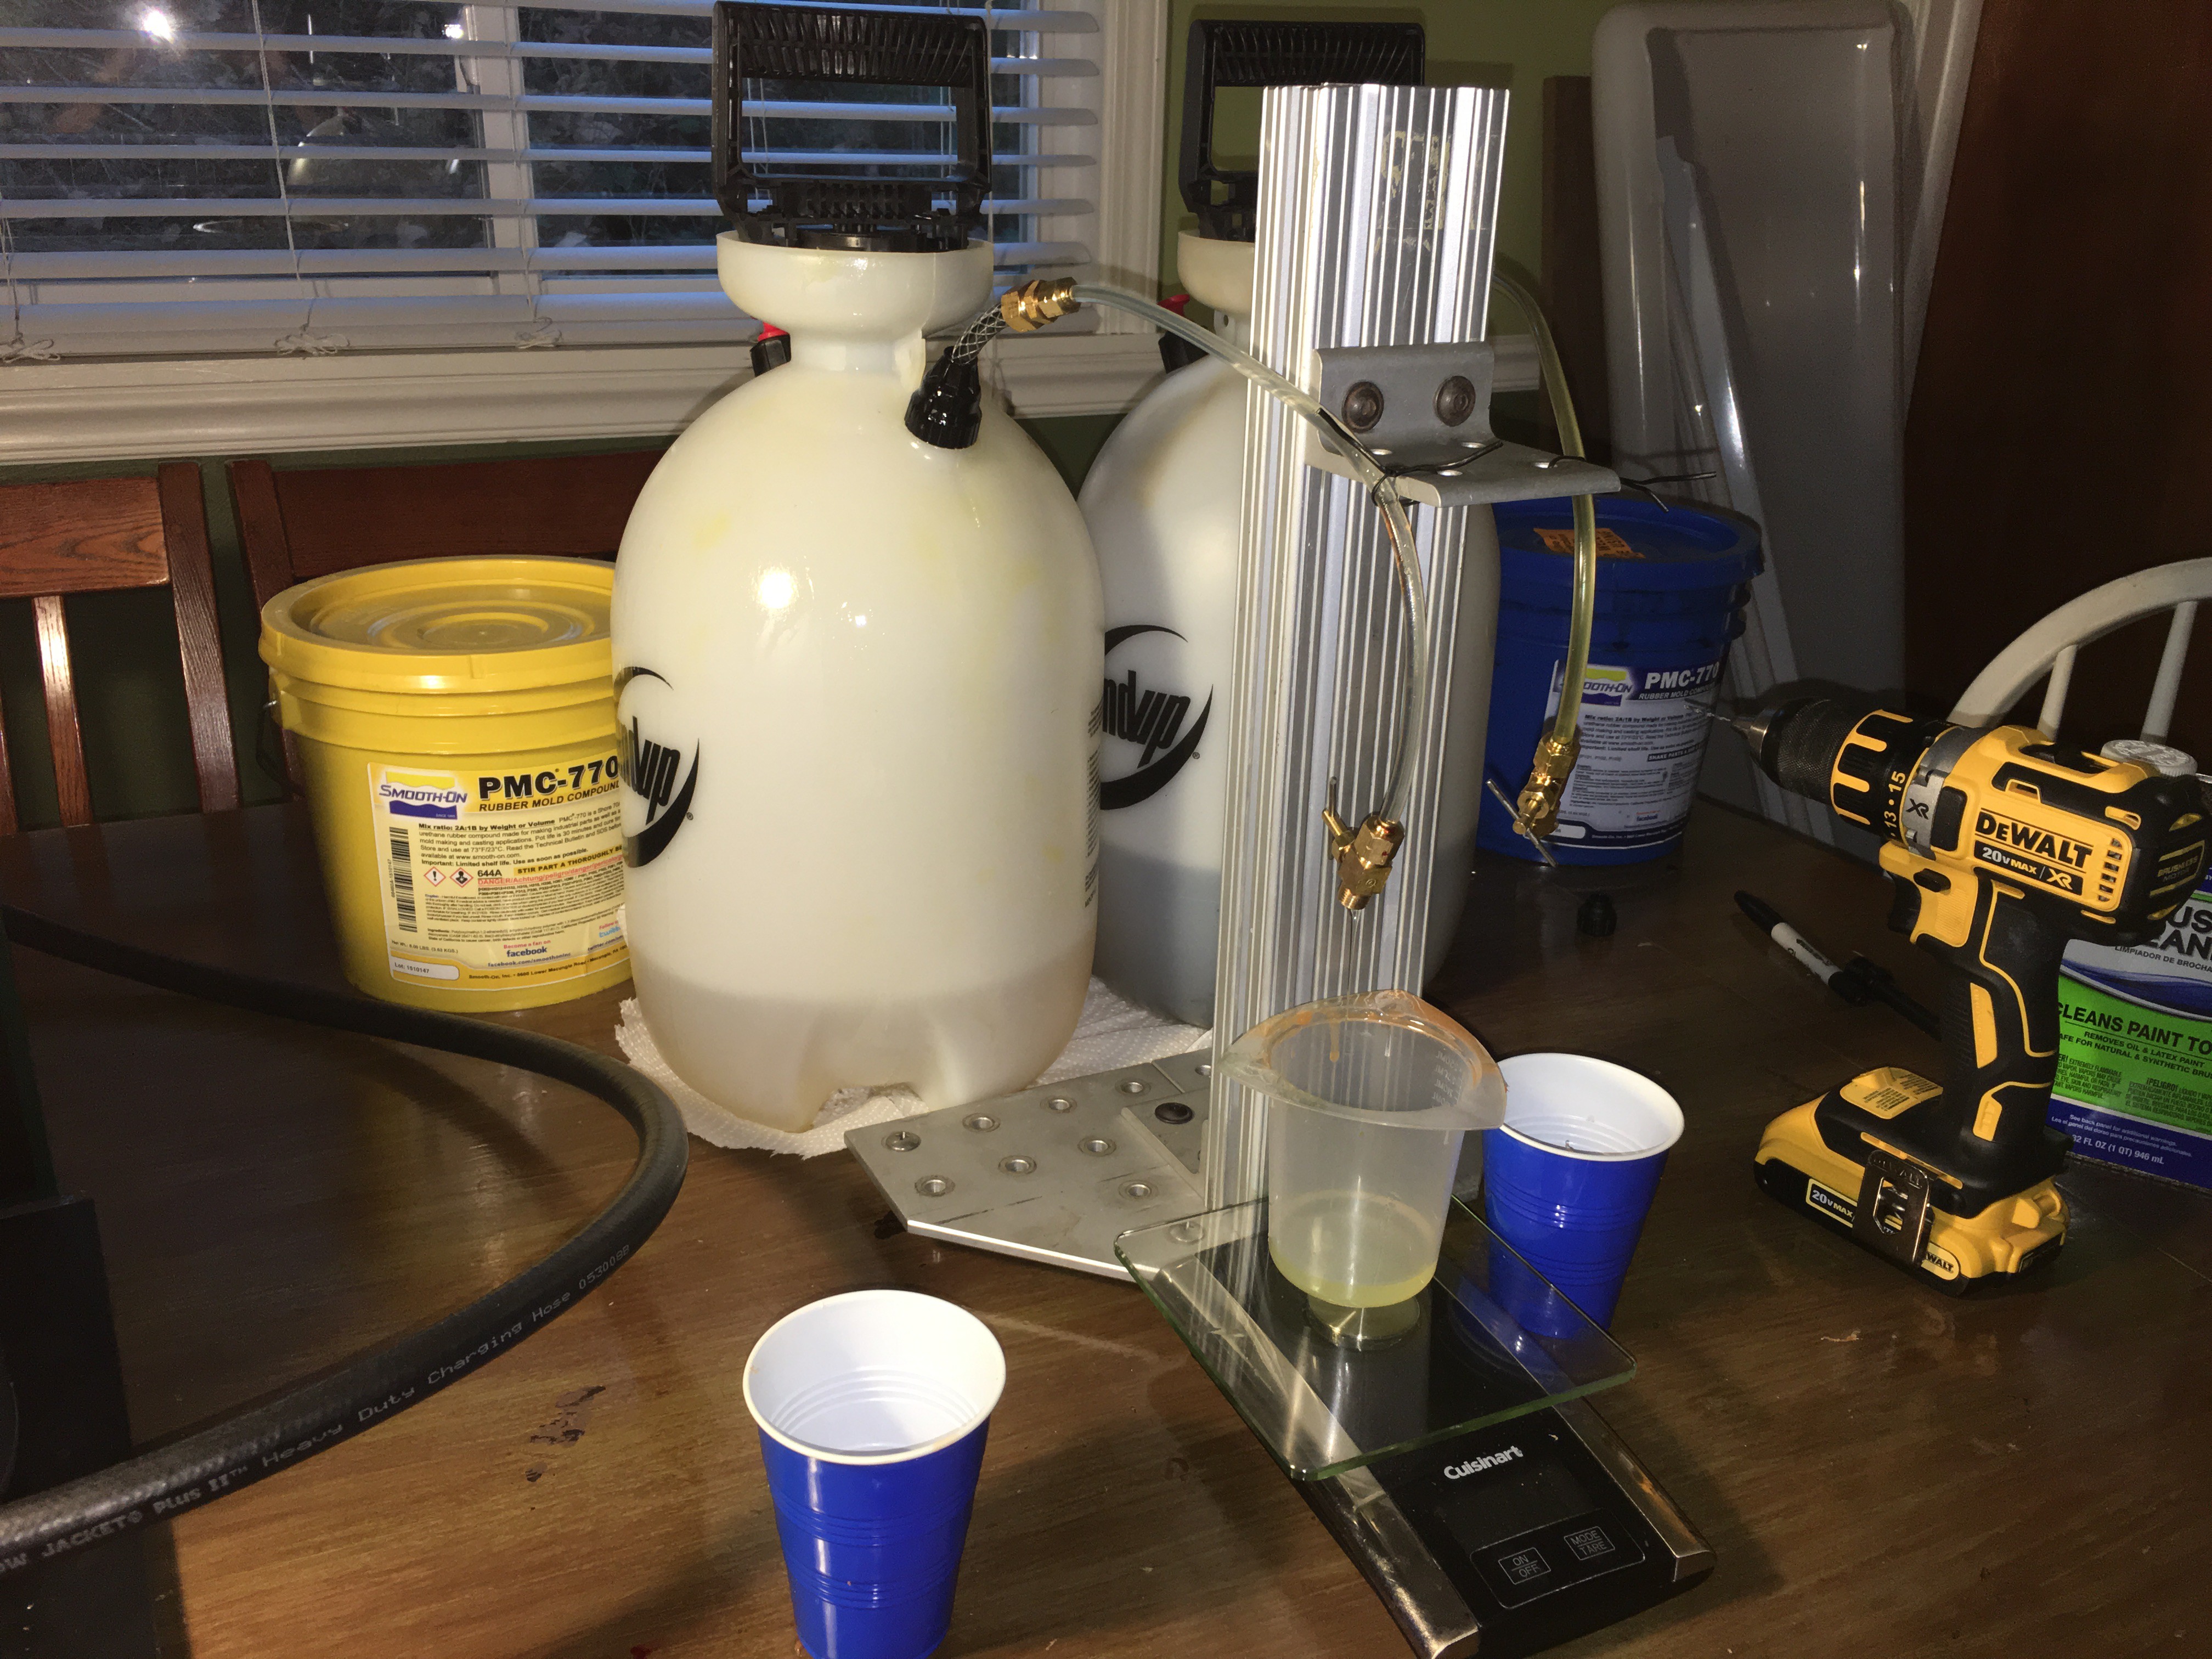
I ordered two sets of these disconnects that came with barb fittings. This made it quite easy to connect the keg liquid side to my previous ball valve based dispensers. For the gas side the disconnect has a male flare fitting, which happens to be the same size as the flare fitting on my vacuum degassing chamber. When I ordered the hoses I got a three pack which is common for A/C recharging equipment. I used a few fittings to make a compressed air quick disconnect to male flare fitting adaptor. So using that I was able to connect my air compressor to the kegs gas side. It worked quite well and because I was using the keg disconnect I only needed on to presurize both kegs.
I pressurized the kegs to 35 psi and they seem to dispense the resin quite nicely. All in all I think this is a really good system for working with large amounts of resin. The parts are all inexpensive, commonly available and replacement parts are easy to find. I would be interested in anyone comments or ideas for improvement.
-
New Vacuum De-Gassing Chamber
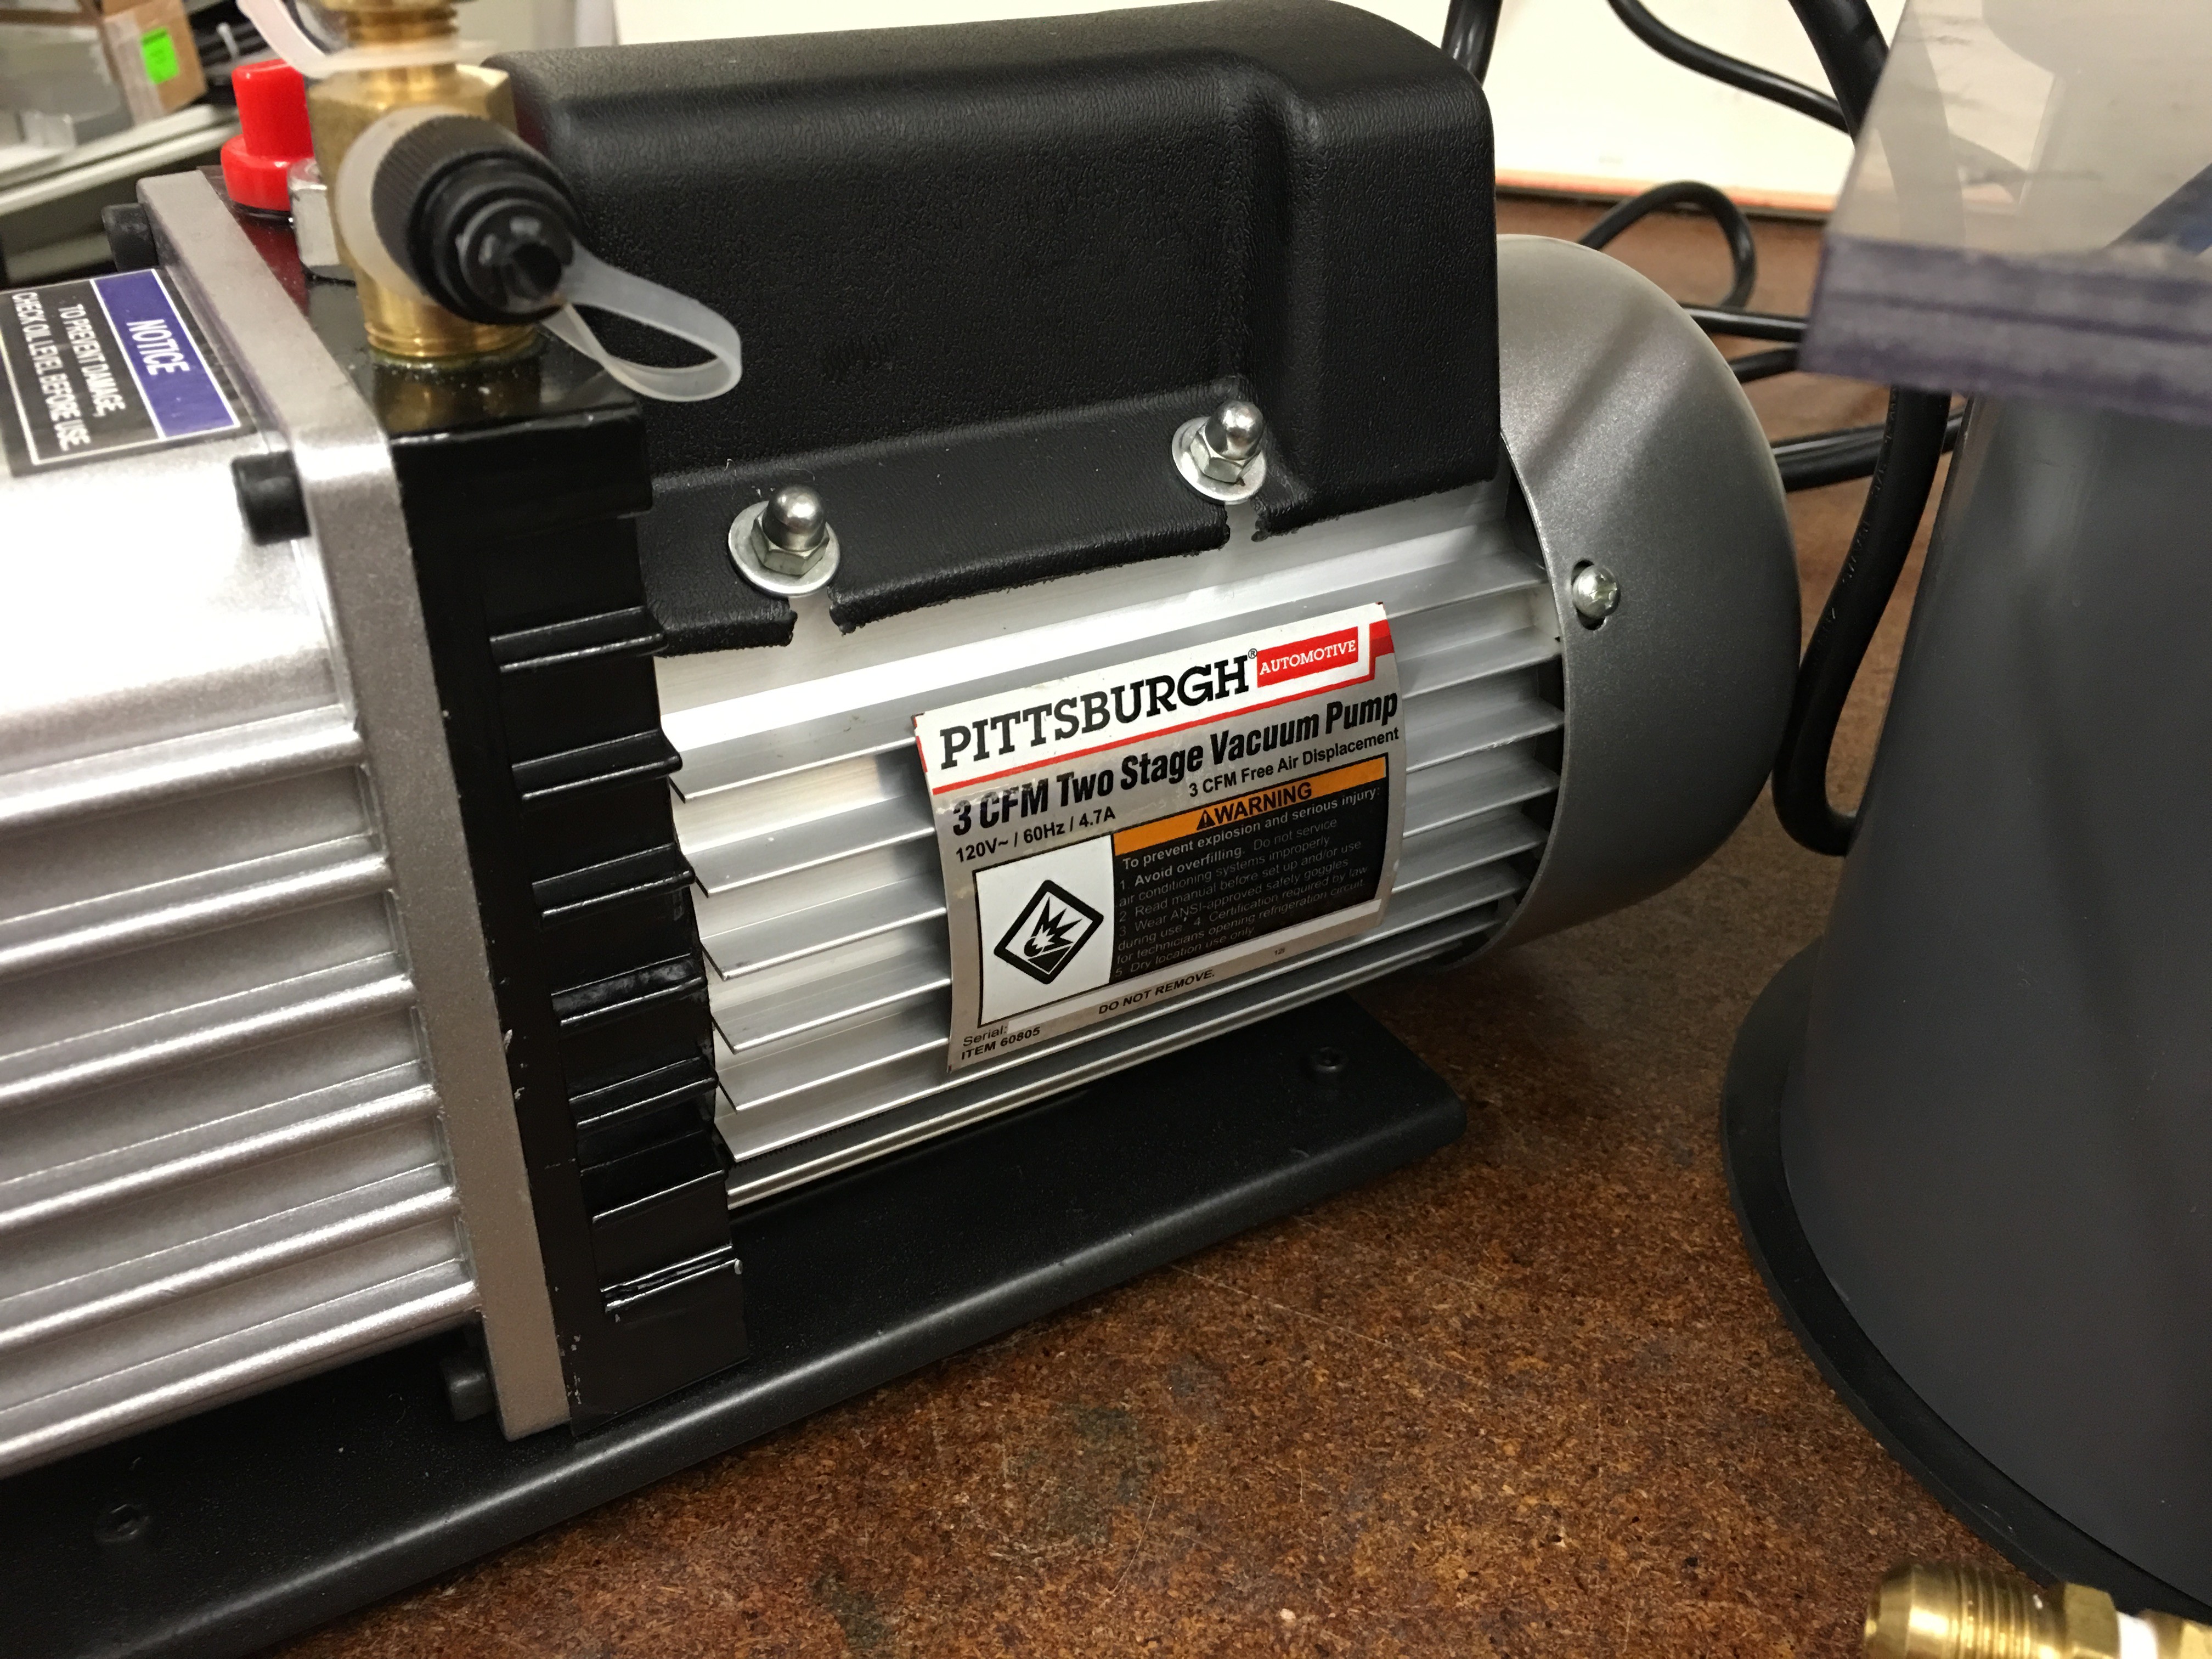
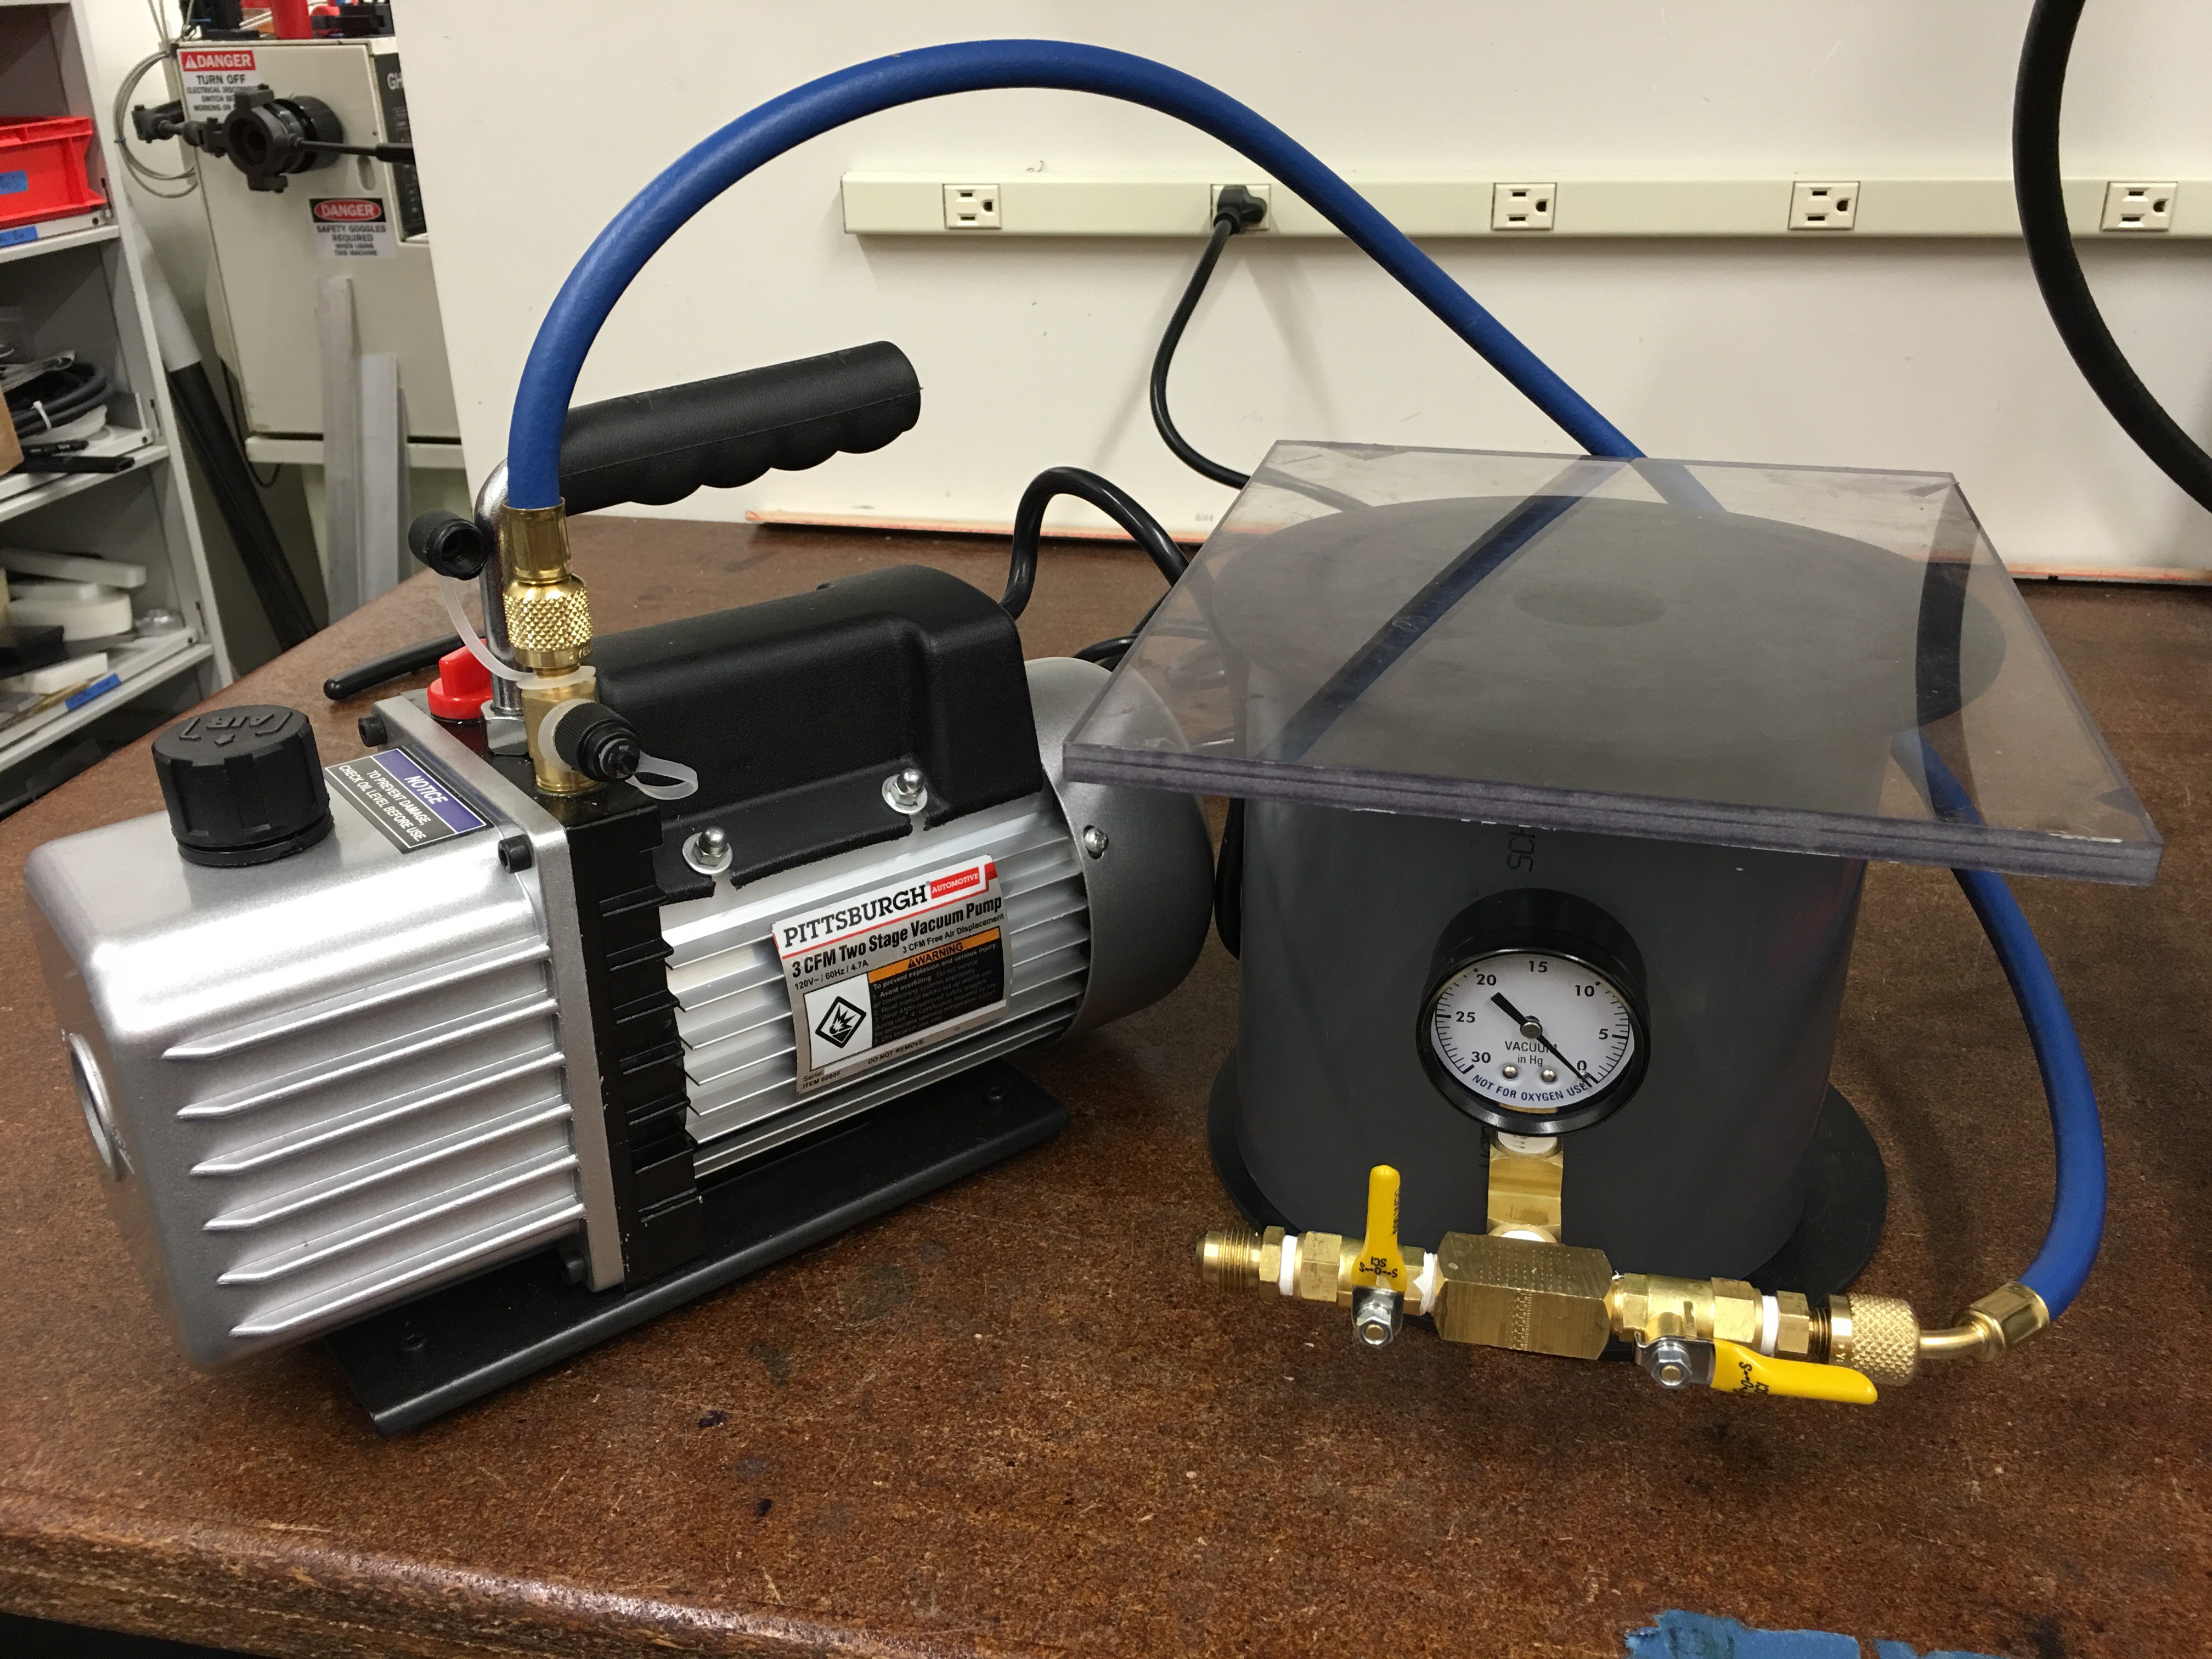
12/12/2015 at 02:35 • 0 commentsWell I finished construction on my new vacuum chamber. The one I have been using is actually my friends and I was getting tired of moving it around all the time. I picked up a vacuum pump from harbor freight with one of those 20% off coupons. It is a 3 CFM, two stage, oil pump. Here is a picture of the specs.
![]()
![]()
The chamber is made from a section of 6" CPVC pipe that I had left over from another project. I cut it to 6.5" in length and then turned the ends smooth on a lathe. It functions just the same as the larger one I was borrowing, but pulls a vacuum a little faster because there is less volume inside. I am only vacuum degassing about 250 ml at a time, so the other chamber had a bunch of empty space.
If you want more details on building a vacuum degassing chamber, or just a vacuum chamber in general. I created a separate project for this on hackaday.io.
-
Long Time No See
12/08/2015 at 19:44 • 5 commentsI am sorry for the delay in my posts. It has been a really hectic few weeks. This project has really started to expand now that I am getting my first few orders. As of my last post I had sold two orders. Which was barely enough to order another batch of resin. But it was the beginning of good things. Since those two orders, I have sold 6 more orders. For comparison, my first two orders totaled 180 links of track. These 6 orders combine to almost 900 links of track. WOW. Keep in mind that when I filled the first two orders I used my single mold which could make 5 parts per hour. That equates to 36 hours of work.
However, this was something I planned for. Before I started selling my track system I made sure to think about scaling up and what I would do as the orders increases. I started working with a small machine shop to machine more molds. They finished up the first mold and sent it to me for inspection. It was close, but the pins did not fit quite right. So I sent it back to them and they reworked it. I then placed a second order for another mold. So hopefully this weekend I will triple my production and be able to make 15 parts per hour.
One of my customers also requested a narrower track. So I am working on a 1.5" wide track system to compliment my current 3" wide track. A lot has been going on and hopefully I will be able to post some more content soon. Here is a sneak peak at some upcoming topics.
- Lessons from manufacturing. What I learned as I tried to ramp up production
- Additional 3" molds and new 1.5" molds.
- Upgrading my heater controller to support 3 molds at a time, plus a timer and display.
- New smaller vacuum chamber
- Pressurized injection
- prolonging resin life with refrigerant.
- Custom Robots
Thanks for following along, and as always leave me some feedback. I love to hear from you guys. A post is too boring without some photos. Here is some CAD work I am doing for a custom robot platform.
![]()
-
Pumpkin Spice Tracks
11/11/2015 at 22:39 • 0 commentsSince it is November and everything seems to be pumpkin spice flavored, why not Tank Chain as well. I present Pumpkin Spice Tracks.
![]()
-
Resin Dispensing
11/11/2015 at 02:13 • 2 commentsHello again all. Things have been going well for the project. Very busy, but I wanted to share some of the progress. The new website is growing with more products. Check it out if you feel inclined.
I got my first few orders and have been ramping up production. I knew when I started getting orders I would be getting the resin in larger batches to reduce the cost. I can get it in 1 pint bottles and 1 gallon buckets. The pint bottles are nice to work with, but trying to pour out a small amount of resin from a 1 gallon bucket was gonna lead to a big mess. That is one of the things I hate the most about this project. If you are not careful and play every step out you end up with resin everywhere. It doesn't just wash off either. You will be sticky for hours if not days.
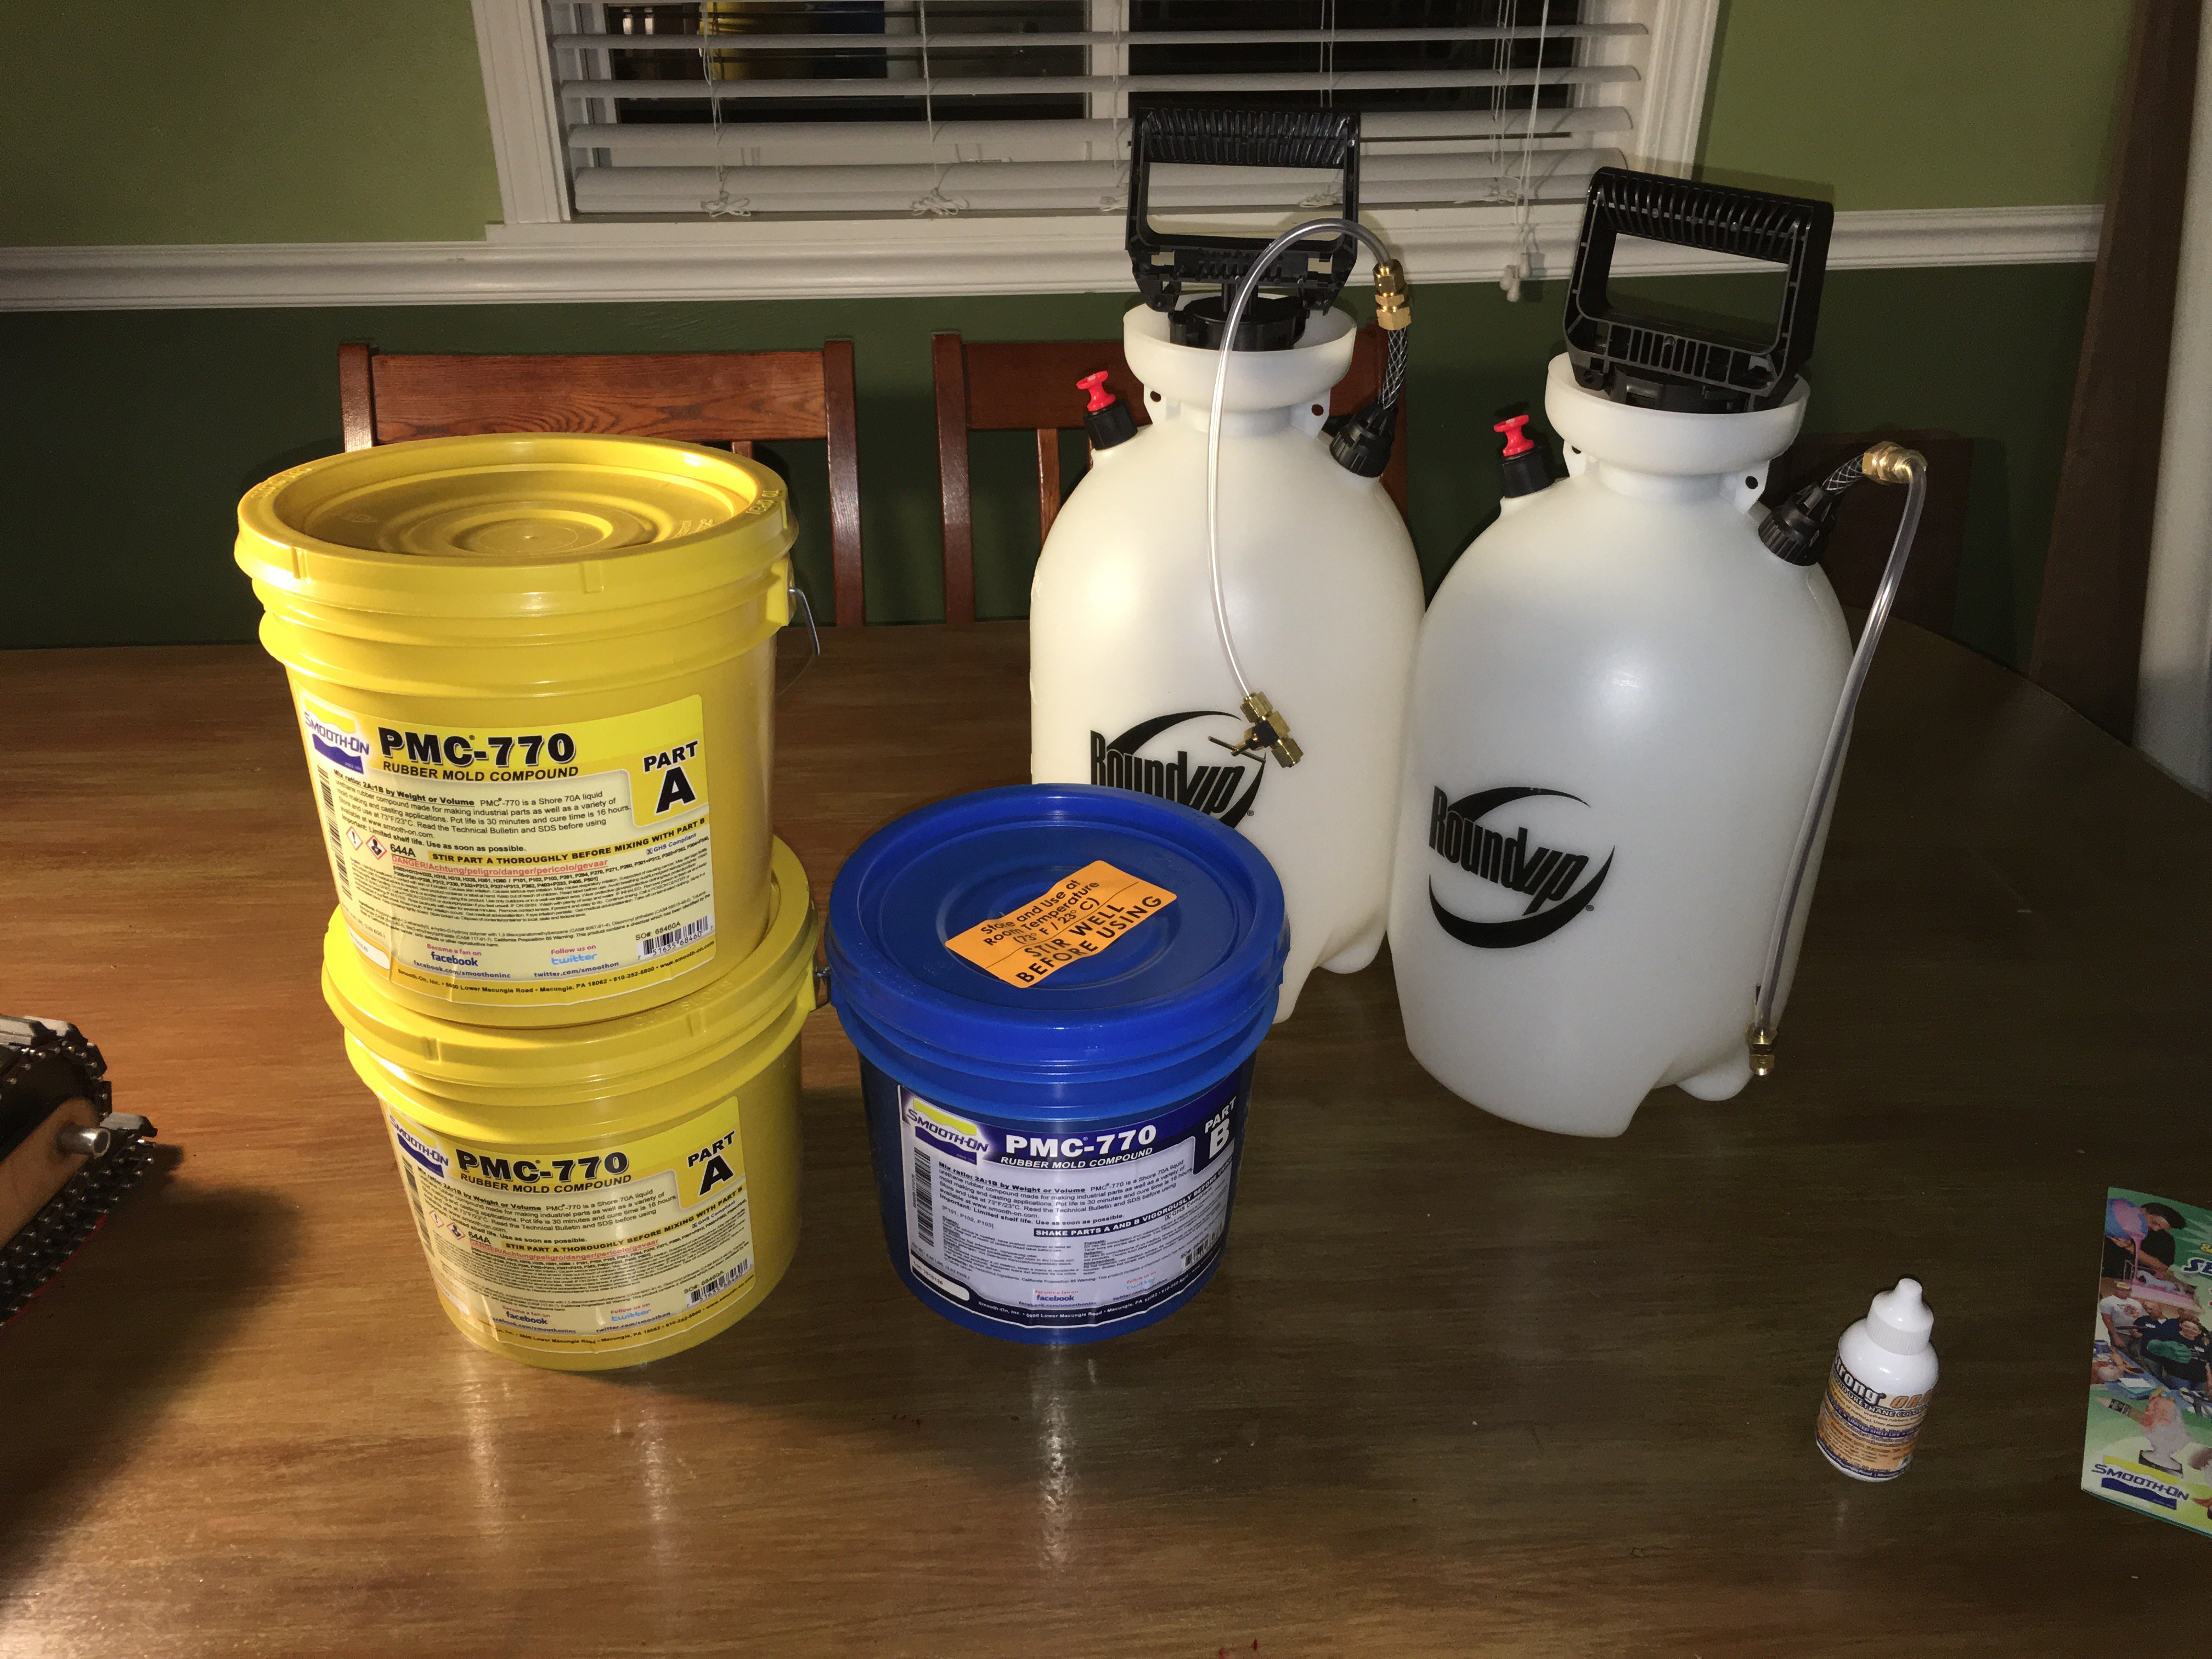
So I knew I wanted to do some kind of nice dispensing unit. I looked online at fluid dispenser or epoxy dispensers and most were almost $1000. So that was not an option. So I built my own for about $50.
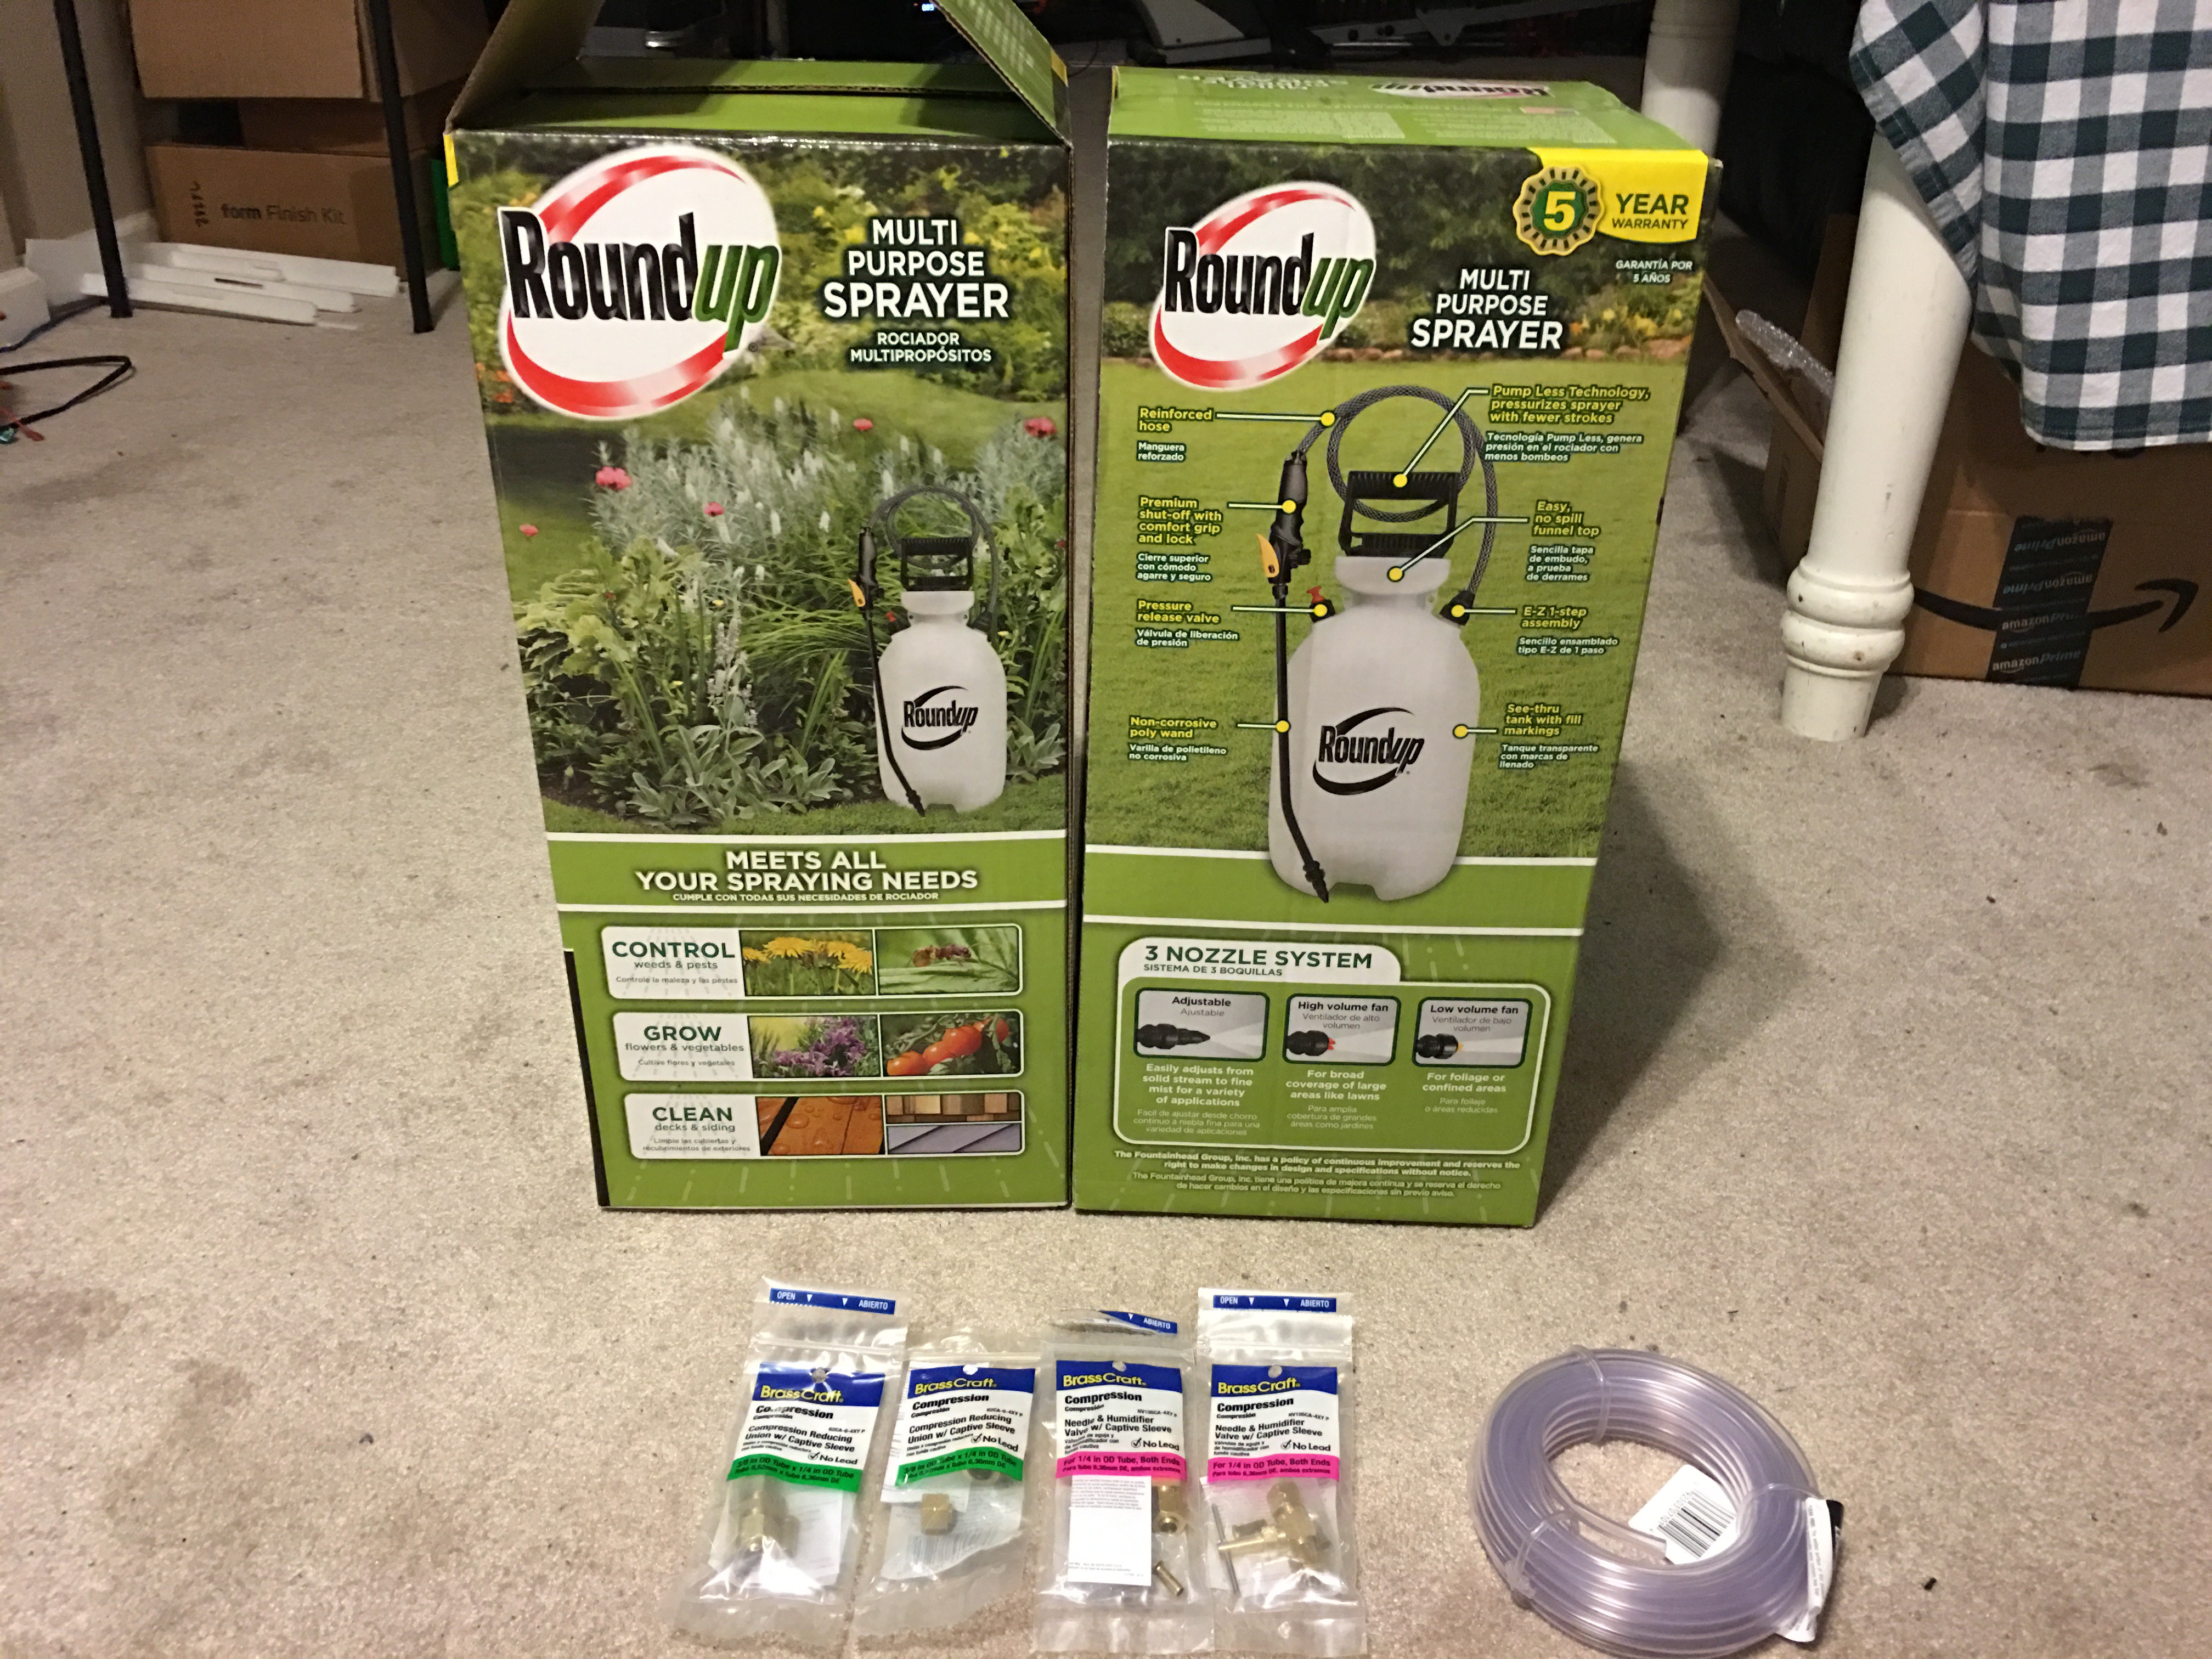
I started with two of these round up sprayers. I got them on sale since it is fall and they cost about $20 each. I also got some clear hose, and a few connectors. They are a nice pressure vessel, solid plastic, and hold two gallons each. Since I get 3 one gallon buckets at a time, it seemed like a good fit.
![]()
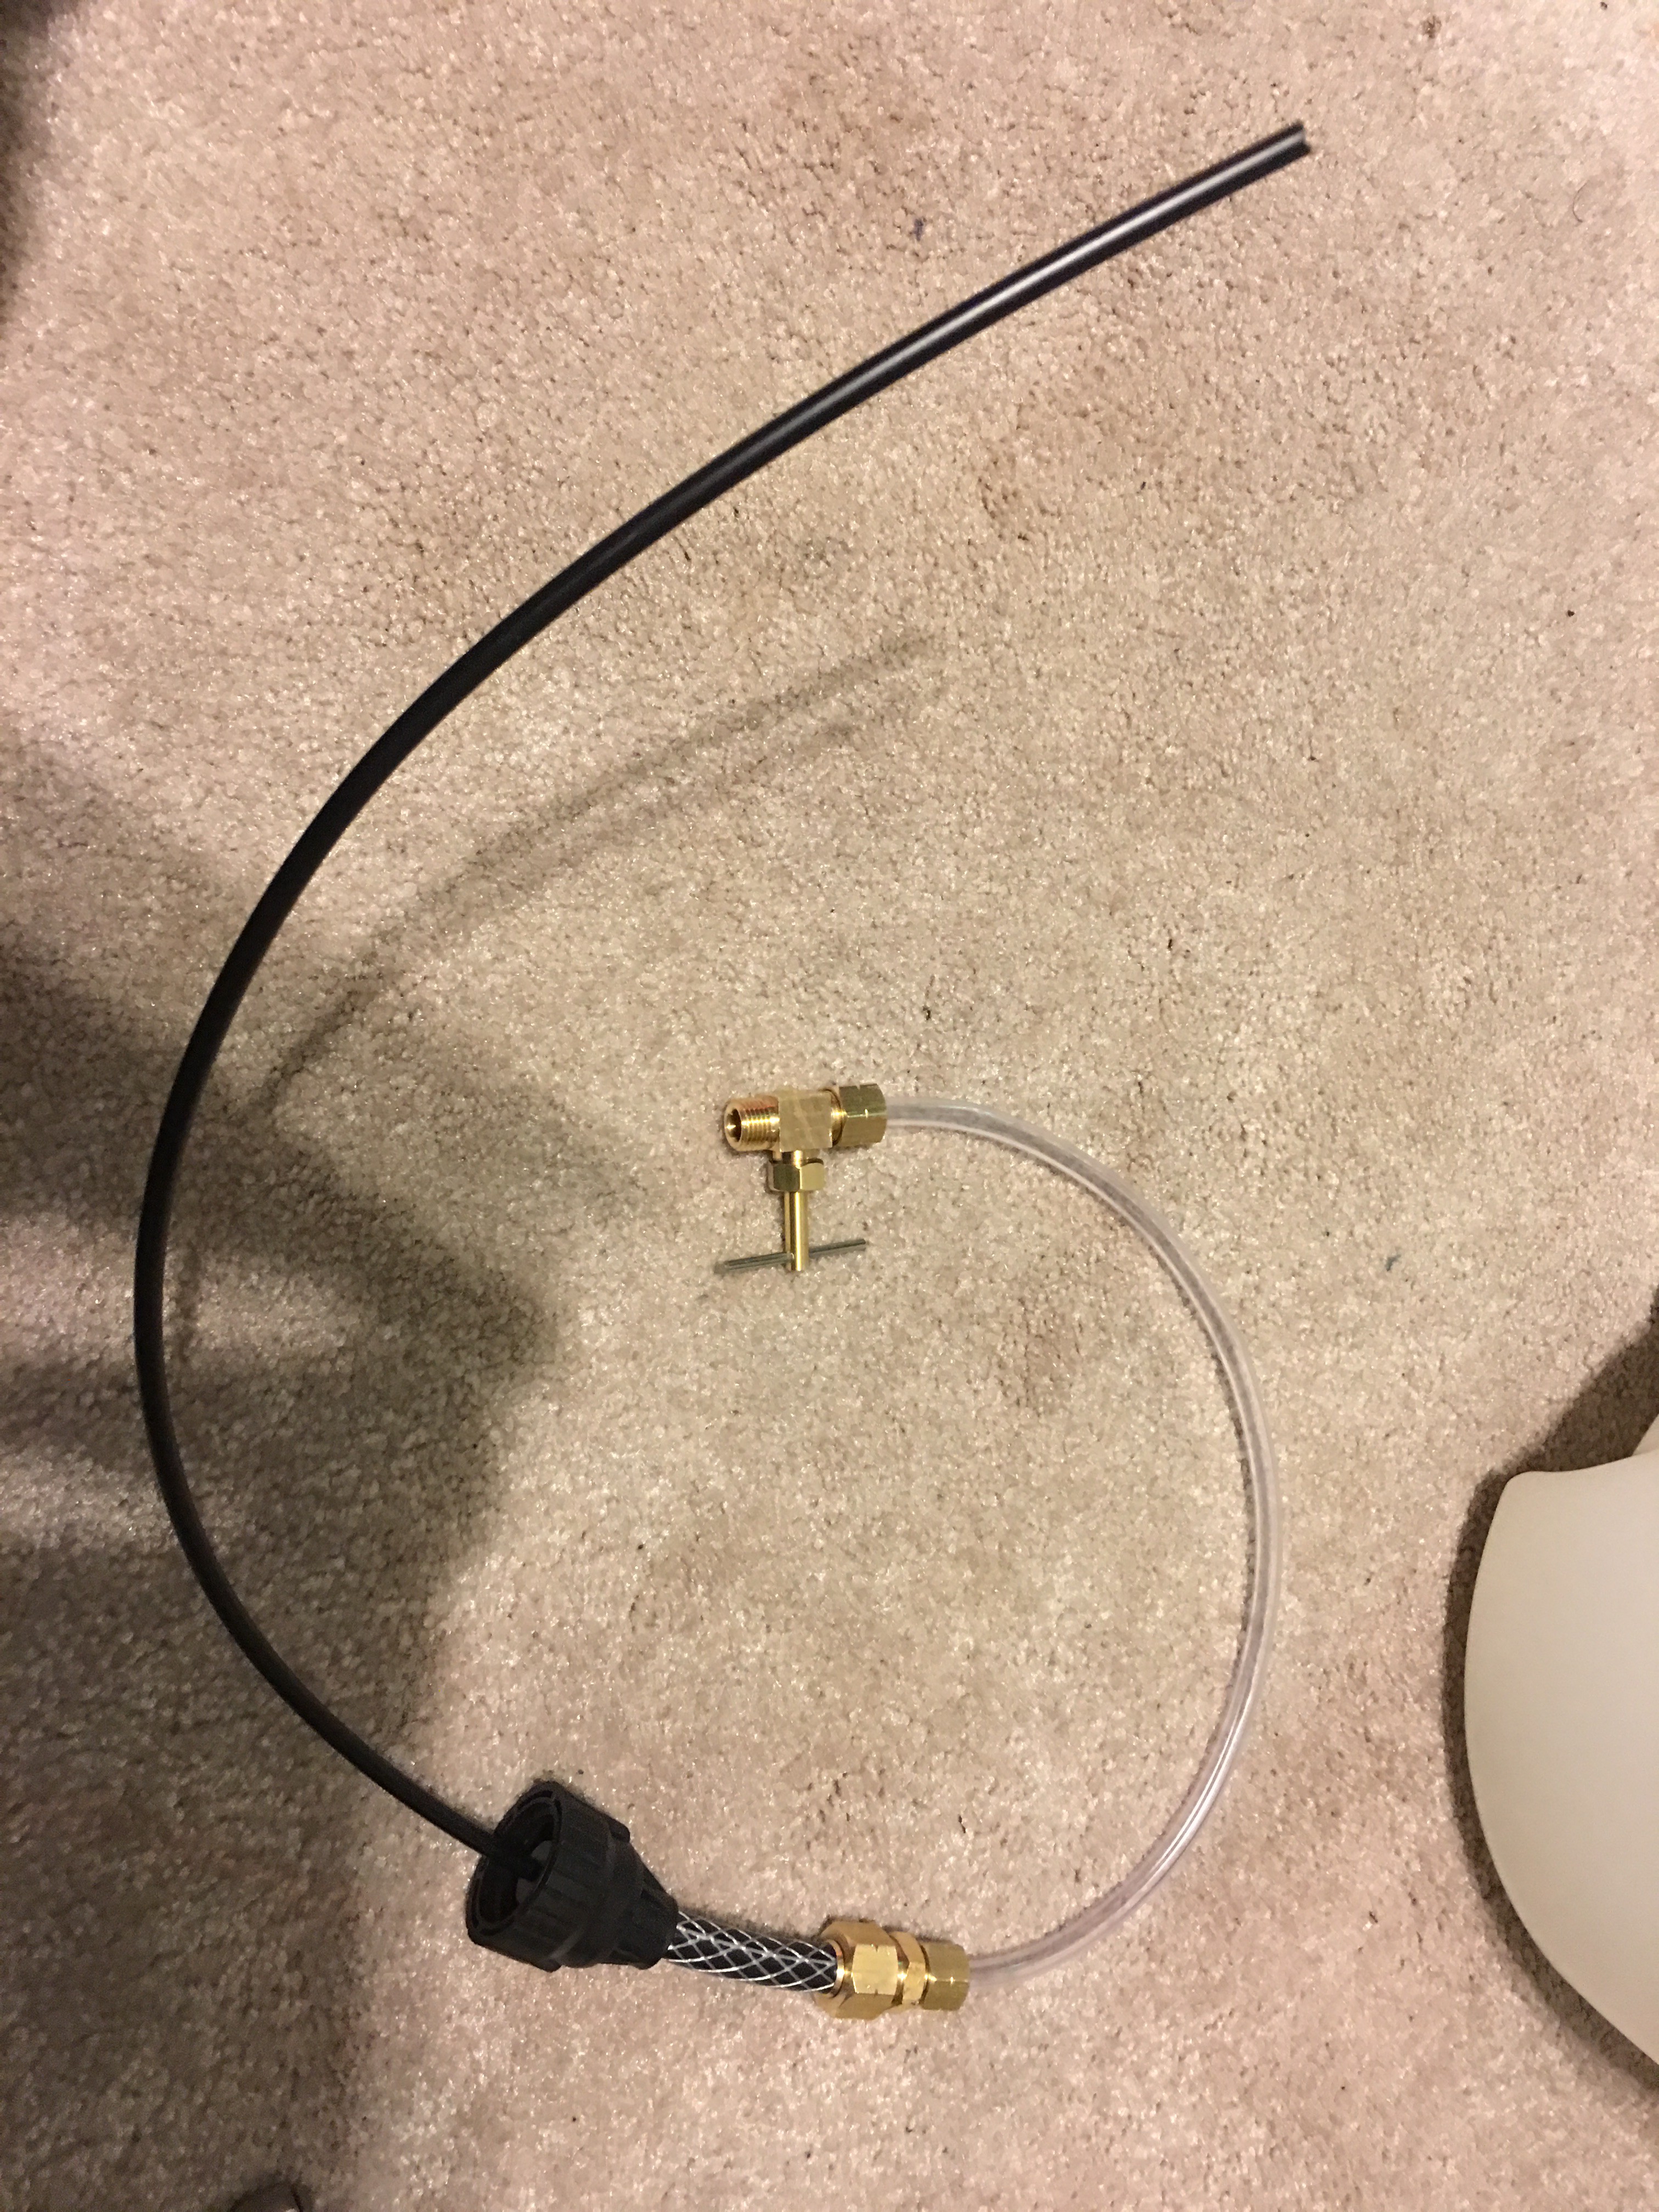
Next I cut the sprayer hose and used a compression fitting to reduce it to 1/4" clear tube. I put a 'Needle and humidifier valve" on the other end and basically converted the sprayer to an epoxy dispenser. It took me about 10 minutes and here is what it looked like.
![]()
![]()
I filled them up with resin and tested it out and there were a few problems. First the stock hose inside the chamber is very small and the resin is thick. So it was very very very slow. But it worked. So I decided to replace it with the 1/4" clear hose. This worked better, but the stupid hose would curl up and not stay at the bottom of the tank. So I took the sprayer and cut the end off, then put this around the clear hose inside the chamber to force it to stay at the bottom.
![]()
At this point it works okay. It is still slow to dispense. I think 1/4" tube is just too small for this application and the needle valve is too small. I am gonna pick up some clear 3/8" hose and some bigger ball valves to test out next. But for now it works and the fact that the resin comes out slowly is nice to weight it out accurately. I would like to be able to control the flow though. I will post more updates as I continue to play with this idea. But so far it works.
I built a little stand from some left over 8020. It isn't anything finished, but it keeps the valves in one place and I don't have to worry about them dripping or falling over.
![]()
Modular Continuous Track System
A inexpensive modular tank track system that can be used for robotic and radio controlled vehicles.