 Macrofarad
Implementation: Harvest USB Cable from broken keyboard, find power/ground on their connector to avoid needless bare wire, secure banana terminal and switch to case, hook up the power to switch/banana, Hook up LED/Resistor to internal banana to indicate power status. Very much like building a ship in a bottle.
Possible upgrades:
Because I kept the usb connector, it still has the data pinouts, these might be utilized for a future project. Possibly upgrade my gaming headphones (also built from scrap parts). Currently uses any USB port or charger, might add some kind of fault protection later.
Needed upgrades:
While I've always been careful about faults, it's been brought to my attention that this circuit needs some form of fault protection such as a fuse or a resettable breaker to be used by anyone else. The breaker idea seems most promising, so if the cost is reasonable I plan to implement that soon-ish. Then, assuming all works well, I'll make a few to keep around the electrical engineering lab. This way future students in the digital series will be able to work on circuits from home as well.
 Torbjörn Lindholm
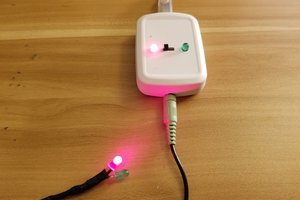
 Bob Baddeley
 rbtsco
 Patrick