Close
0%
0%

3D Printing Post-Processing

Considerations and improving on 3D print post-processing techniques

Similar projects worth following
Feel kind of bad entering another project when I've not had time to work a lot on my previous ones, much less update their status, but I'd like to keep notes on this one.

I just recently got contacted for possible order to 3D print ten prototypes of water-proof case design. Water-proof? There's this little dilemma, additive manufacturing process like the Fused Deposit Modeling in most 3D printing today, constructs the object layer by layer, and the layers may not end up water-proof if and when the fusing between them isn't perfect. In addition, most people would not like the layered look of a 3D printed finish, but would prefer smoothed and polished look much more.

This is a look at the hobbyist state of the art, and ongoing project to try to perform and improve on just that.

Now, I know the state of the art for hobbyists currently is using a crock pot or similar - basically self heating pressurized kettle - to boil and gasify acetone for post-processing the raw 3D ABS print. Acetone, of course, is highly flammable, poisonous to breathe, and potentially explosive in certain forms, so this needs to be carried out outside and with much care. There's also the issue I don't currently own a crock pot; though one is easy and affordable enough to get I suppose.

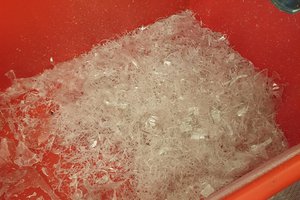
On the background of the first picture, the blue is as of yet untreated, the black plastic has simply been dipped in acetone. One major problem with this approach can be seen: the acetone pools where it flows, causing uneven effect on the bottom, and in this case after unwisely trying if it'd solidified with fingertip and discovering those pools can take a long time to dry inside out, even fingerprints.

But can we do better than any of this? Yes, yes I think we can. I was just recently cleaning out an ultrasonic misting device, from pond scum from air humidifier pool. Started thinking... hmm, what if. It appears I'm not the first one to think of that, and quick Googling even turned up one widely distributed plan for such. Is it bit overly complex, though? Does it scale? Can it be improved on, or made safer? It is worth noting that when you're misting acetone with heat, any leaking acetone vapor is likely to catch fire, but if you're misting it cold, there's a danger of explosion if it leaks, or indeed as oxygenated air is mixed in.

Actually, I was rubbing the piezo disc to get some built up dirt off it, only to notice that the gold-colored surfacing on it would rub off, seen in the front of the picture. I'm wondering a bit if it's significant to the misting effect, and might consider it damaged and suitable for experimentation. But will the acetone take that surfacing clear off? More importantly, the water-level sensor would apparently not react to acetone due to different index of refraction and require relative huge amount of acetone to even cover, but will it melt right into the acetone? To say nothing of the whole water-level sensor housing, leds and indeed the wire itself?

This would seem somewhat challenging project just mechanically, as I imagine a lot of that misting device would just come apart in acetone bath, yet there's no clear way to get into the electronics inside. Luckily eBay has a lot of similar devices for replacement. The safety considerations also can't be ignored, I hope to take time to calculate what kind of temperature, pressure and concentrations would be safest; give consideration to the safest misting chamber (Glass? Really now?) and other materials. And the first thought is that nitrogen, or even Co2 capsules, could be a safe choice for flushing the misting device free of oxygen and then pushing the mist into the misting chamber.

  • Plastics and acetone

    BadgerBadgerMushroom06/21/2015 at 13:49 0 comments

    Now that it's weekend, starting with some of the basics. I tried to read a lot on what materials acetone would affect and how, but that wasn't so easy to find, and I figured why not try it out. So in the picture on the gallery I have a line-up of some plastics to try, lined up on a 3D printing glass (with a black background).

    On the upper row there's first some shaving from a typical water canister, high-density polyethylene PE-HD (2), then a piece of electric wire outer insulation - these are made from a few different materials, I'm not sure what this is but it's very similar to the ultrasonic mister's, and finally a piece of PLA printing filament for a 3D printer. On the middle, there's a piece of ABS plastic for control, we (or at least I) pretty much already know how acetone behaves with ABS, but it's good to have it for comparison to the others.

    And on the lower row there's a piece of polyethylene PE from a water bottle cap, piece of transparent water bottle polyethylene terephthalate PET (1) and finally a cutting from small transparent plastic grocery bag, possibly some kind of polyethylene as well. The plastic bottle and transparent plastic bag have been set to the side of the glass plate for reference, in the before-pic.

    Next it would be a good idea to consult materials data sheet for Acetone, if not consulted before. This stuff is basically your basic nail polish removed, except whereas nail polish removed is usually well below 50% proof (or even acetone-free), here we're working with industrial 100% proof acetone. And instead of a small bottle, there could be quite a lot of it... Though I have what I need in a smaller, airtight glass container, and opened windows at both ends of the room to cross-ventilate.

    Even so, after the experiment and barely even smelling any acetone, I started feeling little light-headed, and not in a good way, so open goes the patio door. I guess it's a "Do as I say, not as I do" though, I would consider doing this in industrial fume hood, outside or with one plastic sample at time. And with that, commence mad scientists mode!

    The experiment involved using a polyprophylene straw, seen in the after-image, which I already knew to be acetone-proof, to move about half a milliliter of 100% acetone on each sample. Then let it evaporate, taking about 5 minutes, and add a second half milliliter to see prolonged effect. The image for after-experiment was taken at 5 minutes after second application, or 10 minutes application total. (This was 7 samples, as the amounts could have been little over half milliliter, I'd consider that evaporating one centiliter in 10 minutes, so a wide container in room temperature could easily evaporate a desiliter in hour, a full liter or quarter gallon in a day!)

    In the after-picture one can see the ABS sample melting, or dissolving as the technical term goes though one might be excused for using the more descriptive term here. The plastic wire insulation looks mostly unaffected, but on the glass plate around it looks to be an oily substance, and pressing with the polyprophylene straw it appears much softer than originally. This doesn't bode well for submerging the whole ultrasonic mister. The 3D printer PLA sample has maintained integrity, but it has the largest amount of residue (though this is white on black, so highly visible) on the glass. Using PLA to 3D-print pieces and fittings for the apparatus would then require at least care.

    The other samples, however, look mostly unaffected, with the clear thin plastic bag even showing no residue around it. I believe this shows that, contrary to what one might expect, plastic could well be used for the acetone polishing apparatus, thus simplifying construction and reducing fragmentation worry on the off-chance of explosion (It will, however, not be fire-proof!). What's more, using a plastic bag like the one shown in the before-picture could improve durability, re-usability and cleanup immensely.

View project log

Enjoy this project?

Share

Discussions

Similar Projects

Does this project spark your interest?

Become a member to follow this project and never miss any updates