Freeboard .io is a simple opensource dashboard framework that can be used to simply connect Mosquitti to dashboards and display data in real time. in a very easy way . all dashboards can be downloaded and exported and imported in JSON format witch can help a Group of disperse persons share dashboards easily with out having to to reconfigure the hole front end server.
Mosquitto MQTT V 1.14 broker with Websockets support
For that we need to make sure that cmake and uuid/uuid-dev are installed (For example: sudo apt-get install cmake uuid uuid-dev).
Also we need to download the libwesockets library, compile it and install it:
cd ~/IoTServer
git clone git://git.libwebsockets.org/libwebsockets
cd libwesockets
mkdir build
cd build
cmake ..
make
sudo make install
We then need to download and compile Mosquitto 1.4:
cd ~/IoTServer
wget http://mosquitto.org/files/source/mosquitto-1.4.tar.gz
tar xvzf mosquitto-1.4.tar.gz
cd mosquitto-1.4
We need to edit the config.mk file and change the option WITH_WEBSOCKETS:=no to WITH_WEBSOCKETS:=yes
And finally:
make
sudo make install
To activate websocket support we need to edit the mosquitto.conf file located at /etc/mosquitto or some other directory and add the following lines, for example at the end of the file:
listener 1883

listener 9001 127.0.0.1
protocol websockets
Then we run it with:
pcortex@cloudsrv:~/IoTServer$ mosquitto -c /etc/mosquitto/mosquitto.conf1424790588: mosquitto version 1.4 (build date 2015-02-24 14:38:47+0000) starting
1424790588: Config loaded from /etc/mosquitto/mosquitto.conf.
1424790588: Opening ipv4 listen socket on port 1883.
1424790588: Opening ipv6 listen socket on port 1883.
1424790588: Opening websockets listen socket on port 9001.
Step 3: Installing freeboard.io dashboard
We are almost at the end of this long post. For our infrastructure we need now to install the dashboard that will allow us to see the data in the browser.
cd ~/IoTServer
git clone https://github.com/Freeboard/freeboard.git
For now I’ll just use apache to serve the freeboard dashboards that is installed in my server. Because freeboard is not installed on the root web directory we need to make the freeboard available to Apache. The easiest way to do this, as long as Apache has the FollowSymLinks option enabled for the document root, is to create a link to the freeboard directory on the web document root:
sudo -s
cd /var/www
ln -s /home/pcortex/IoTServer/freeboard iot
And now freeboard is available at the url http://myserveraddres/iot.
We need now, and finally to add MQTT over Websockets support to freeboard… We are almost there. This posthttp://jpmens.net/2014/11/12/freeboard-a-versatile-dashboard/ shows how it’s done but I’ll repeat it here again:
1st: Download the development version of mqtt.js here: (http://git.eclipse.org/c/paho/org.eclipse.paho.mqtt.javascript.git/plain/src/mqttws31.js?h=develop) and save it:
cd ~/IoTServer/freeboard/plugins
mkdir mqtt
cd mqtt
wget --output-document mqttws31.js http://git.eclipse.org/c/paho/org.eclipse.paho.mqtt.javascript.git/plain/src/mqttws31.js?h=develop
We will now download the freeboard MQTT plugin:
cd ~/IotServer
git clone https://github.com/alsm/freeboard-mqtt
cd freeboard/plugins/mqtt
cp ~/IoTServer/freeboard-mqtt/paho.mqtt.plugin.js .
We need to edit the paho.mqtt.plugin.js file and change the line:
                "external_scripts" : [
                        "<full address of the paho mqtt javascript client>"
                ],
to
               "external_scripts" : [
                        "plugins/mqtt/mqttws31.js"
                ],
and finally we need to change the index.html file from:
   <scripttype="text/javascript">
        head.js("js/freeboard+plugins.min.js",
                // *** Load more plugins here ***
                function(){
to
   <scripttype="text/javascript">
        head.js("js/freeboard+plugins.min.js",
                "plugins/mqtt/paho.mqtt.plugin.js",
                // *** Load more plugins here ***
                function(){
That’s it. We are finally ready. All infrastructure is done. We need now just to configure it.
Final step: Testing it out with mosquitto websockets!:
Let’s start Mosquitto: nohup mosquitto -c /etc/mosquitto/mosquitto.conf &
And check if the WS protocol is active:
netstat -nap | grep 9001

tcp        0      0 0.0.0.0:9001            0.0.0.0:*               LISTEN      18973/mosquitto
Setting up Freeboard.io: It’s very important to notice that the Dashboard will run on our browser, making in fact our browser the client. This means that when we configure freeboard, we must take notice of this when filling up the MQTT broker address. It will be localhost if the browser AND the broker runs on the same machine, but for the dashboard to work anywhere we should use the public ip of the machine running the broker:
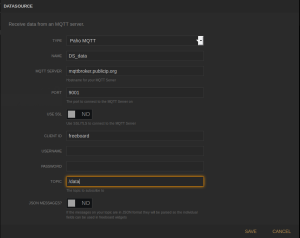
Access the freeboard.io dashboard, and select Datasources -> Add. From the dropdown box, we select the Paho MQTT provider.
We need to configure the data source as follows:
Change the MQTT server address to something that makes sense in your config.
For Mosquitto with websockets enabled, the port is 9001,
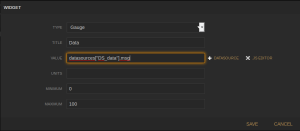
We can now add a Panel and a gauge to see data from the topic /data that we defined on the above datasource.
So, Add Pane, and on the new Pane select the + (plus) to add a widget. In our case we will select Gauge. We fill out the required info and on the Value field we press Datasource, and select the newly previous created datasource named Dataand because we are not using JSON for data, we just append .msg at the end. So something likedatasource[“data”].msg should be writen.
We press Save, and that’s it.
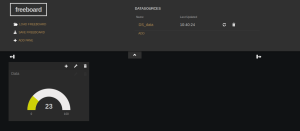
We can now publish into the topic, and the dashboard should update:
For example, in this case: mosquitto_pub -t /data -m 23
That’s it. It works fine with Mosquitto 1.4 with websockets enabled and with the Mosca MQTT broker.
Final setup:
We should make our dashboard permanent and for doing so we need to save the dashboard locally as a JSON file, and move it to the server running the dashboard to the root directory of freeboard.
 Kestler


Discussions
Become a Hackaday.io Member
Create an account to leave a comment. Already have an account? Log In.