 Alpha Charlie
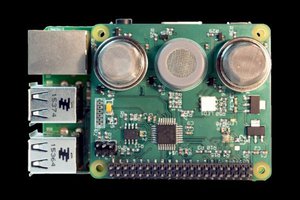
The MLX90620 and MLX 90621 are 16x4 remote temperature sensors. Both operate via I2C. The MLX sensors are very affordable and work well. The only drawback is that the sensors are designed for 'production line' so their 16x4 aspect ratio is not ideal. You can see in the picture of the thermo-data overlaying the camera image that we get a 'strip' of temperature data that runs either horizontally or vertically across the middle of the image depending on orientation.
Aside from this one drawback, they are pretty awesome little sensors. They will work from 3.3V but prefer a bit lower voltage. So it's prudent to connect a small rectifier diode in series with th positive power (a 1n4001 works nicely.) Other than that, wiring is the same as any I2C device-
MLX Raspberry Pi
- Vcc -> Pin 1 (via 1n4001 diode to drop voltage)
- SCL -> Pin 3
- SDA -> Pin 5
- Gnd -> Pin 9
You'll also need to make sure that i2c is enabled for your Raspberry Pi. (A pretty good guide on that is here- http://www.raspberrypi-spy.co.uk/2014/11/enabling-the-i2c-interface-on-the-raspberry-pi/)
Finally you'll need to enable the pi camera if you wish to run the 'mlxview' example that's included with the mlx90621 user space driver.
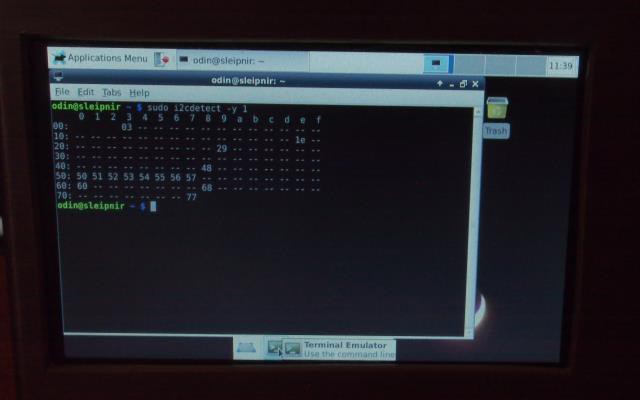
Once the device is physically installed and i2c is enabled verify that the SOC can see it by opening a terminal and running-
for Raspi - 'sudo i2cdetect -y 0'
for Raspi 2 - 'sudo i2cdetect -y 1'
(If that command is not found do 'sudo apt-get install i2c-tools'.)
Once you execute that command you'll see a grid of dashes with numbers where any i2c device is detected. The MLX has 2 i2c devices which collectively bind 9 i2c addresses - 50, 51, 52, 53, 54, 55, 56, 57 and 60
Addresses 50-57 and 60 below are the MLX90621. The other addresses are other i2c peripherals...
Once you can see the MLX90621 with 'i2cdetect' you can download and install the mlxd code from github.
- Open a terminal and do 'git clone https://github.com/alphacharlie/mlxd.git'
- run 'cd mlxd'
- run 'make'
To run the driver/daemon do- 'sudo mlxd &', if succesfull the thermopile data will now be available at - /var/run/mlx90620.sock
The mlxview.py application is an example app that grabs the thermopile data and attempts to superimpose it over the feed from the raspicam. It has a few python prerequisites. So if you want to run it first do -
'sudo apt-get install python-numpy python-scipy python-skimage'
(There may be other prerequisites I'm unaware of because I already had them installed. But those are the big ones...)
Here's a short video of the mlxview.py demo in action-


 yoyojacky
 Sumit
Sumit
Hi,
really good description.
but I have a problem. If I say "run in terminal" the terminal is open for 1 sec and then is closing. so I can't measure anything (but need it for my studies..) and don't have a mlx90620.sock
What can be the reason? any tips?
thanks