trademark
From the Latin, "Docta Vox" meaning "learned voice" or something like that according to Google Translate. It sounded cool and I'm bad at naming things anyway. So there you have it.

This project uses Processing with STT (speech to text) and TTS (text to speech) to allow verbal communication with the program. The program communicates with an Arduino with RF transmitter via serial. A simple demonstration of the project in action is found here.
"Lamp on." *click* "Lamp has been turned on." *commence feeling powerful*
I started this project a couple of months ago with the simple hopes of
controlling an outlet. Flashing an LED is great, but when you need to
make something more substantial happen, this is the thing to do. I
was almost tempted to get relays like this one. I decided against that because of this excellent tutorial called "Arduino Controlled Relay Box."
After I priced it all out at Lowe's and Sparkfun,
I found that each box would cost around $30. These boxes are large,
don't forget, and require a wired connection to the Arduino. To
control five outlets would cost $150 in components plus low-voltage
wire to run around the house to each outlet. I'm not sure my family is
going to be ok with bundles of wires running down the hall.
Time for a better solution. I scrounged around the vast caverns of Amazon to find what I thought would be the best fit for my plans. Etekcity 5LX remote outlets are just the ticket. They cost a whopping $35 and offer control of 5 outlets and negate the need to run wires. Not bad.
I bought the set of 5 outlets and two remotes, but you can also order
almost any combination by viewing the related products on the page.
My first plan was to hack the remote apart and add transistors to the
buttons. This began one of the larges failures in my hacking career: I
fried both remotes! Ah! I wound up ordering a new remote and trying a
much safer method. This new method was to sniff the RF codes of the
remote and retransmit them using the Arduino. Of course, this meant
another stop at Sparkfun for their beautifully simple RF products: RF Receiver, RF Transmitter. Both of these <$5 components proved to be quite valuable.
Once again digging up some help online, I came across the an exquisite
library made for just such a thing as what I was doing. It's called the
RCSwitch Arduino library.
After downloading and installing the library, open up the advanced
receive sketch and follow the link in the commenting to see the
tutorial. Really, you can operate it without much guidance. The code
is simple, and it literally spits out codes on screen as you press
buttons on the remote. I found that on my remote the decimal value was
the easiest to work with. It will spit out a code that looks
something like this: Decimal: 5592371 (24Bit) Binary: 010101010101010100110011 Tri-State: FFFFFFFF0101 PulseLength: 185 microseconds Protocol: 1
Raw data: 5816,220,544,592,152,224,536,596,156,220,540,588,160,220,540,592,172,204,540,596,160,212,544,592,164,208,544,592,
164,212,548,588,164,208,544,216,544,588,168,208,548,208,544,208,544,208,548,208,548,
For the practical purposes of this project, you only care about the
part that says, "Decimal: 5592371" You should press each button on the
remote in an order that you will remember and then copy all the data
from the serial monitor into something else (Notepad, or Notepad ++ would be great). Save it.
Next, open the transmit sketch and begin testing. I decided to make
the repeat value 9 (I discovered that is what the remote itself sends)
and I changed the decimal code to the one for "ON" on my first outlet.
I uploaded the sketch and watched it work! Success is great! I then
modified the code to do all 10 buttons on my remote. I added the
switch/case statement to shorten it a bit. If you are wondering why I
went with a serial interface, it is so that I can more easily interact
with Processing in the next section of this tutorial....
 Jarred
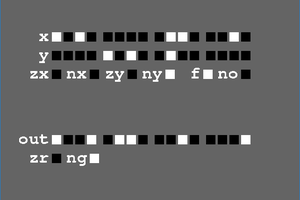

 Saul
Saul