The ESP8266 being an IoT platform it would be suitable to make it upload the power usage data to the cloud.
Uploading data to Google Spreadsheets is not the most straight forward task to however: a script (written in JavaScript) must receive, process and save the data in the right cell, under the correct date and time.
Here are the steps to get your IPM to upload hourly data to Google Spreadsheets, you can use the same method for any kind of IoT logger of course.
I chose to upload hourly data instead of minute data because the columns in Google Spreadsheet are limited to 256, the IPM would need 3 + 24 * 60 = 1443 columns if every minute was stored in a separate cell. The minute data remains accessible on the SD card.
Google Spreadsheets
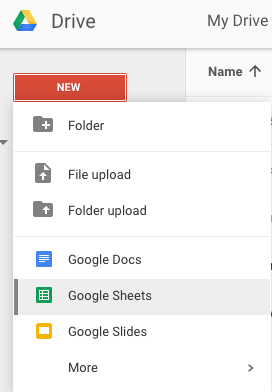
Assuming you have a Google Drive account create a new Spreadsheets document:
You will be presented with a blank spreadsheet, the sheet should be formatted as follows:
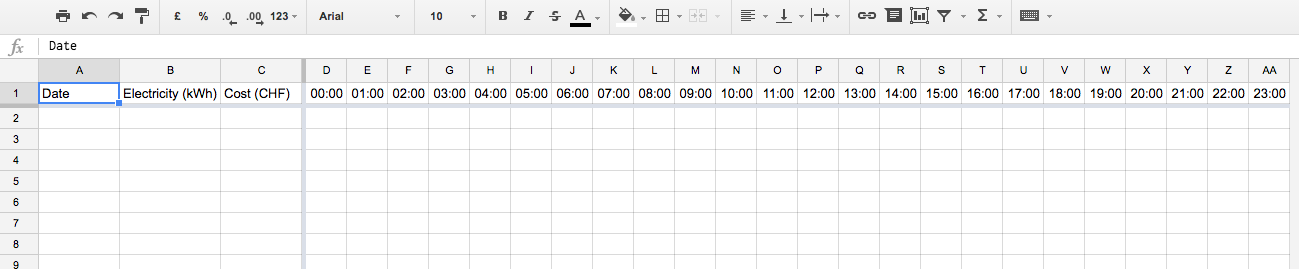
The first column is for the date, second column is a sum of columns D to AA and third column is the cost of electricity that day.
The cost formula depends on what kind of plan you're on, I happen to have a double profile tariff where off-peak kWh price is cheaper (22h-6h and weekends), so the cost formula depends on the hour of the day and what day it is.
Rename the current sheet from "Sheet1" to "Day" from the bottom of the screen. This is important for later.
 Get the spreadsheet ID from the URL bar above, this is needed by the script code to know which spreadsheet it should update. The ID is the highlighted part of the following picture (yours will be different of course):
 Finally make a script by going to Tools -> Script Editor... in the top menu:
 You should now be presented with a blank canvas where you can write your code. You can simply use my code as a base, the only thing you need to change is the variable named SPREADSHEET_ID, the very same you got from the step before.
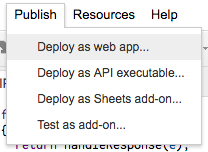
Once you have made your changes you need to publish the script as a web app so the IPM to call it, for this go to Publish -> Deploy and web app... menu:
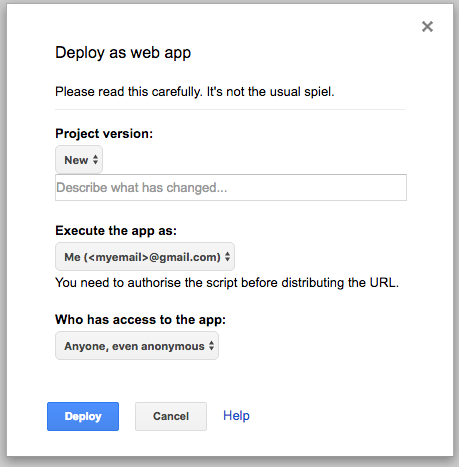
 Next choose the following configuration, otherwise it will not work:
- Execute the app as: Me (<myemail>@gmail.com)
- Who has access to the app: Anyone, even anonymous
It will ask you to authorise the code execution on your behalf, simply click Allow. You only need to do this once.
You'll be presented with the URL you can call for the script to be executed:
 Obviously you shouldn't disclose this address, however even if somebody does get their hands on this URL there's not much they can do with it.
Note: if you ever want to change anything in the code you need publish the script again as a new version (select Project version: New) or it will not have any effect, I lost so many hours figuring that one out...
To test the script you can call something like:
https://script.google.com/macros/s/SCRIPT_ID/exec?time=1464325345&power=1234This should create a new row with a date:
 Note: the timezone and daylights savings time are set in the script, you only need to modify the TIMEZONE variable to an IANA time zone value, you can find the complete list of timezones here. The region configures the daylight savings time as well.
Google Spreadsheets is a pretty powerful tool, you can draw graphs using the data you have, for example you could visualise the hours your household uses the most electricity, the average power usage every month, total power usage over the year...
IoT Power Meter
The only modification the IoT Power Meter code needs is the script ID in the config.h file:

Discussions
Become a Hackaday.io Member
Create an account to leave a comment. Already have an account? Log In.