 Michael Ratcliffe
Well I have caught up on my sleep and its back to working on the project.
This Update contains the wiring diagram and code for the temperature compensated feeder. This code is enough for you to make a unit to test if it works for you. I am pulling my time of day from another MCU running in the greenhouse, I advice wiring in a gps unit if you are making this a standalone unit.I will be doing a tutorial on this and how we use the time for regulating feeding timings in the near future.
The Wiring diagram:
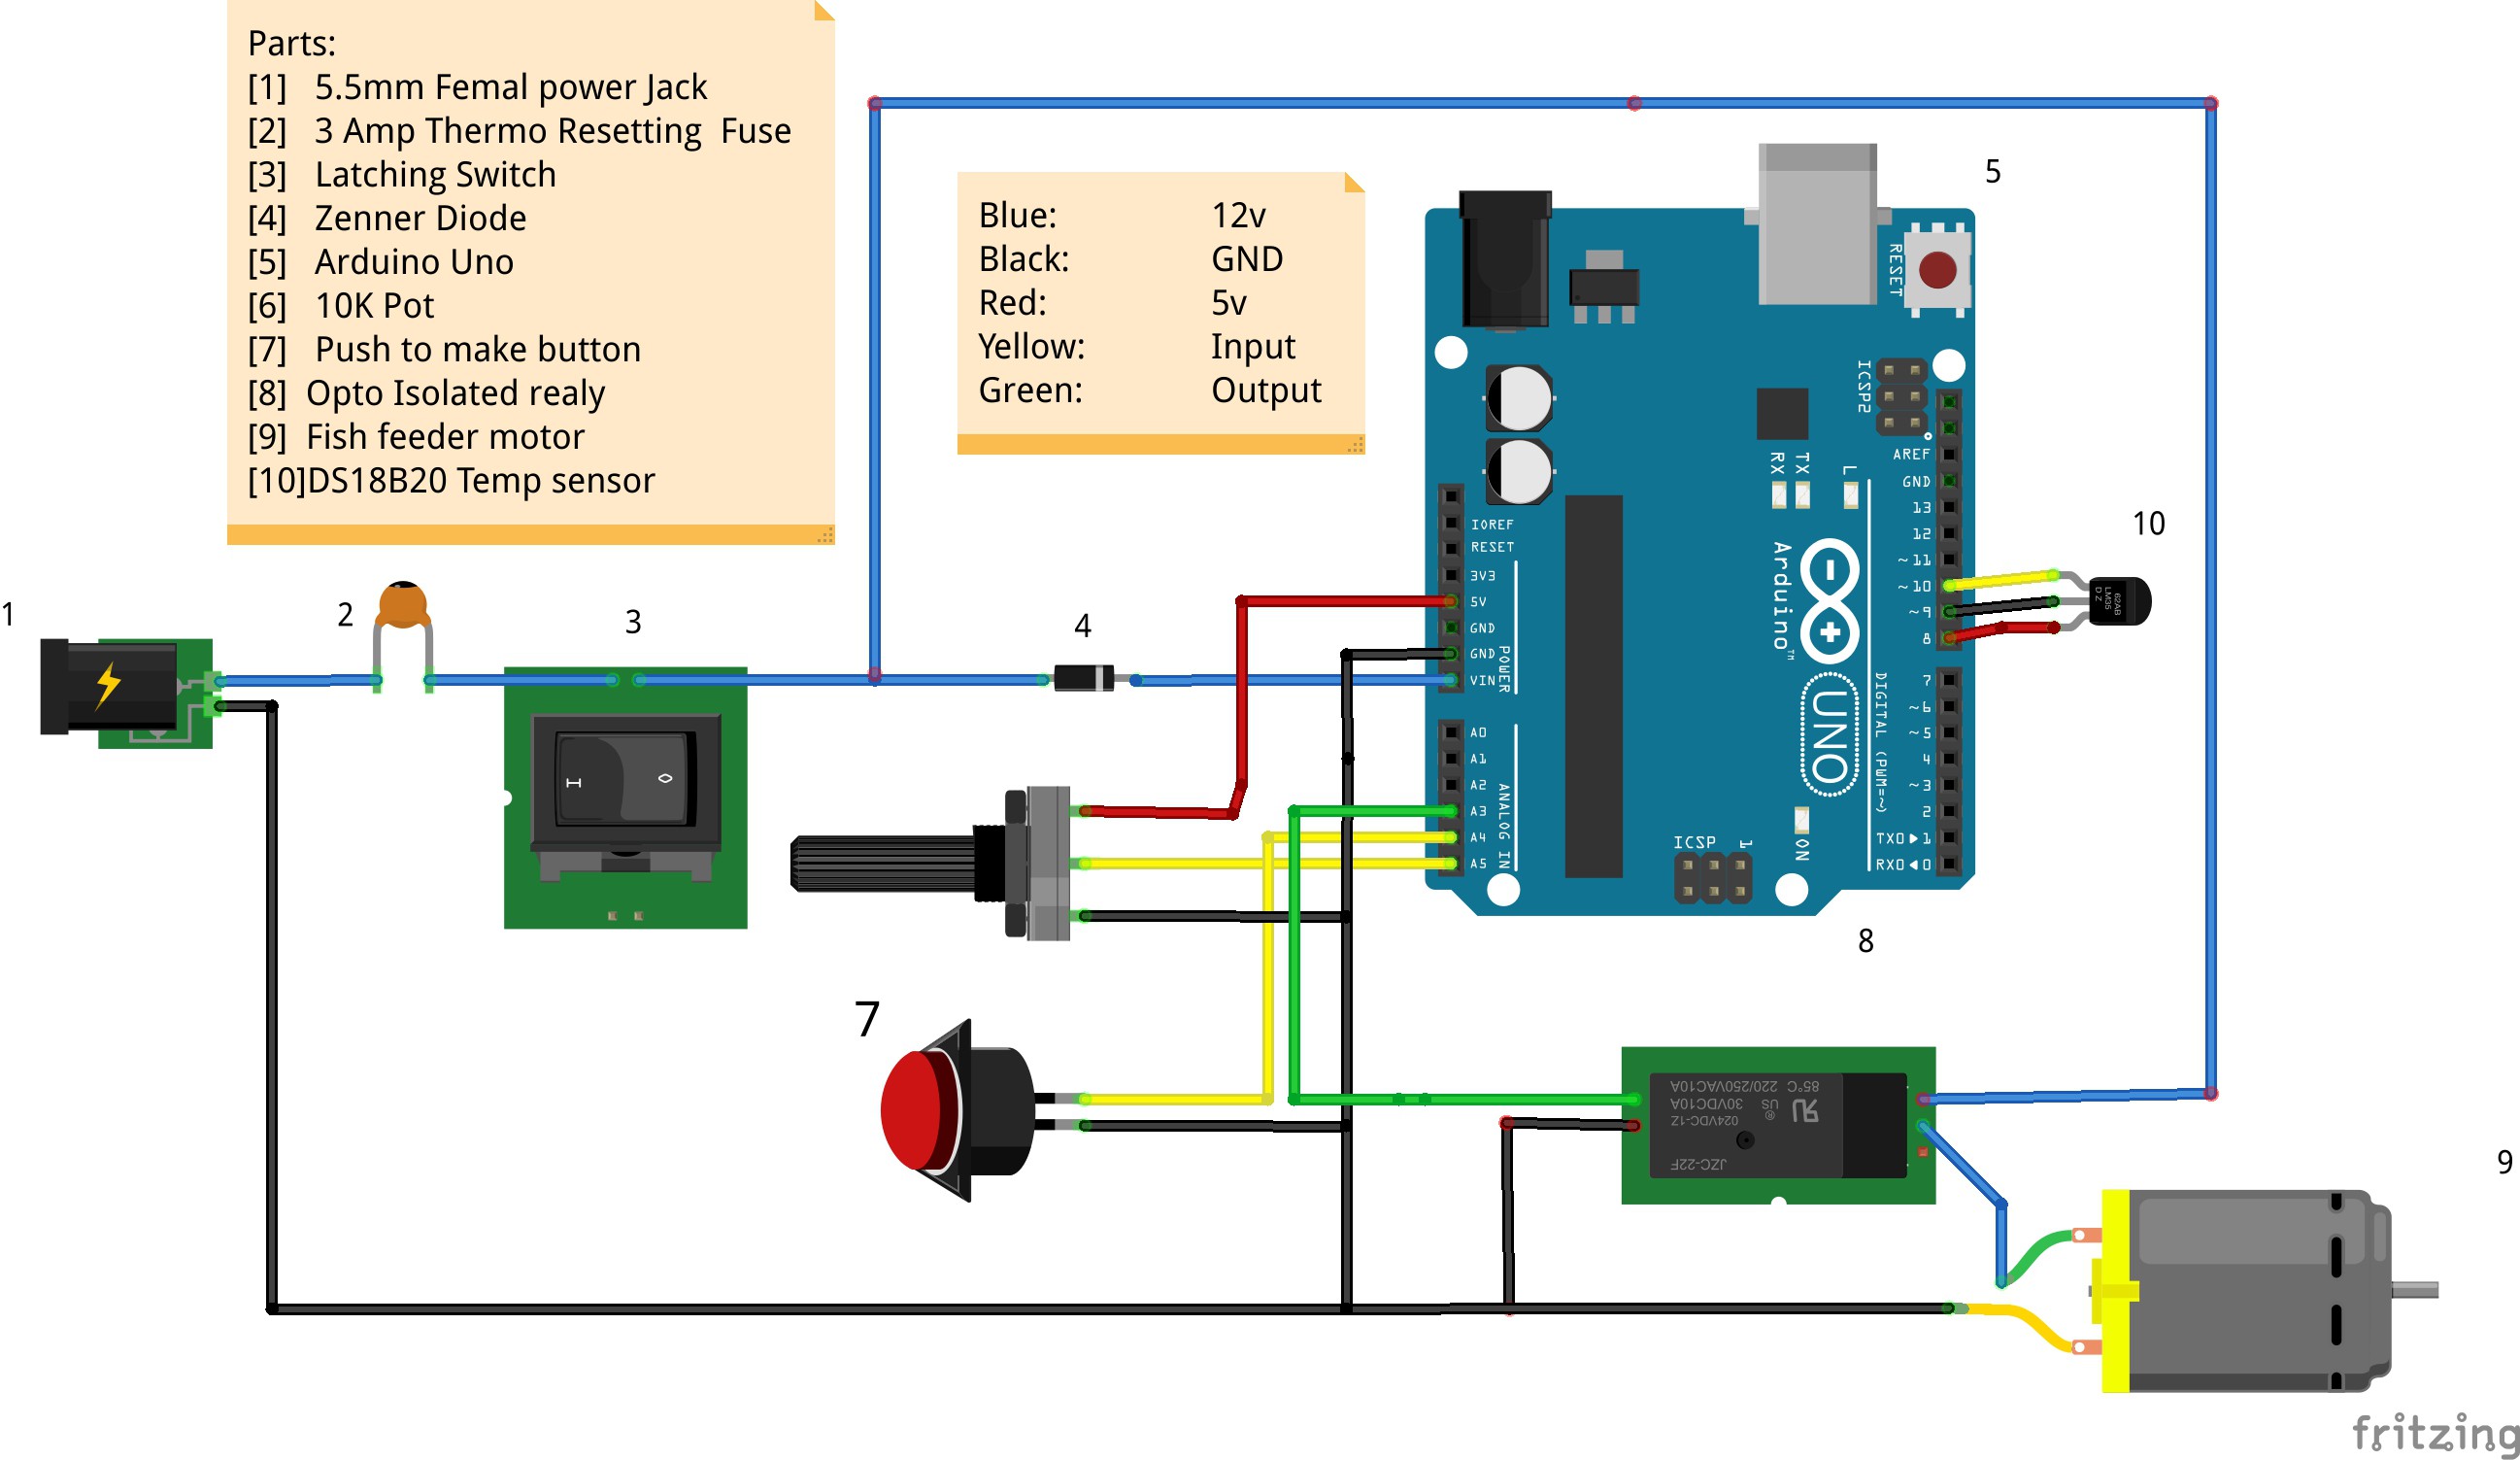
Important Notes:
>You will need a suitable 12v power supply for your feeder
-12v 1 amp for the 20mm feeder & 12v 4 amp for the 25mm feeder
>Dont forget the Diode [4] we are bypassing the reverse voltage protection by supplying power to the Vin Pin
>We dont need to use a pull down resistor on the DS18B20 because we are using a modified 1-wire library
>Flip the Wires to the Feeder Motor if yours is running in reverse
>Put this controller into a waterproof housing if you plan on using it long term
The Code
Go to www.MichaelRatcliffe.com/Projects and find the Zip containing the code for the Temperature based Feeder and open the Read ME.
/*
   Automated Fish Feeder:

   This Program will give you a temperature based feed controller. See Read me in download file for more info.
   4/8/2015  Michael   Ratcliffe


          This program is free software: you can redistribute it and/or modify
    it under the terms of the GNU General Public License as published by
    the Free Software Foundation, either version 3 of the License, or
    (at your option) any later version.

    This program is distributed in the hope that it will be useful,
    but WITHOUT ANY WARRANTY; without even the implied warranty of
    MERCHANTABILITY or FITNESS FOR A PARTICULAR PURPOSE.  See the
    GNU General Public License for more details.

    You should have received a copy of the GNU General Public License
    along with this program.  If not, see .

 */

//************************** Libraries Needed To Compile The Script [See Read me In Download] ***************//

#include <OneWire.h> // We Need This Libaray To Read The Temperature Sensor, SEE READ ME In Downloaded Zip If You Dont Know how To install This
#include <DallasTemperature.h>


//************** User Defined Variables *******************************//
/*
Alter your variables by changinf the numbers below, they only aceept whole numbers

*/

long feedSpacing =60; //the time between feeds in mnuits
const int FeedsPerDay =24;  //Change this only is you change the feeding interval or total number of feeds a day


long MinWeight =5; //Minimum Weight [Kg] Of Fish You Want The Potentiometer To Represent
long  MaxWeight =20;//Maximum Wight [Kg] Of Fish You Want The Potentiometer To Represent
const int FeedRate=8.3; // g/s How Much Feed in Grams Your Feeder Dispnces In A Second [You need to Work This out]


int PercentTenC =3;  //percent of Body weight to feed fish daily at 10*C
int PercenTwentSixC=12;//Percent of Body weight to feed fish daily at 26*C

 int  MaxFeedPercent=16;
 int MinFeedPercent=1;    //InCase The Sensor Breaks, We Will StillFeed Them a Minimum Amount

// The Ones Below Should Be ok as they are, unless your Relay uses pull Low Triggers
const int  OFF=1;
const int ON=0;


//****************** End Of User Variables ***************************//


//************ ONLY Cange These Values Below If You Have Wired To different Pins *****///


const int Potentiometer = A5;  // Analog input pin that the potentiometer is attached to
const int ButtonPin =A4;       //Button Connected to Pin A4
const int Motor = A3;         // Pin That Relay Triger wire is connected to


const int TempProbeNegative=9;    //Temp Probe Negative connected to pin 8
const int TempProbePossitive =8;  //Temp Probe power connected to pin 9
#define ONE_WIRE_BUS 10           // Data wire For Temp Probe is plugged into pin 10 on the Arduino
//************* End Of Pin Selection ********************************//


int ResistorValue = 0;        // value read from the pot
int outputValue = 0;        // value output to the PWM (analog out)
int Button =1;
float FeedLength =0;
float Temperature=10;
long FishWeight = 1;
long  feedSpacingMillis =0;
long FeedPercent =1;

// Setup a oneWire instance to communicate with any OneWire devices (not just Maxim/Dallas temperature ICs)
OneWire oneWire(ONE_WIRE_BUS);
// Pass our oneWire reference to Dallas Temperature.
DallasTemperature sensors(&oneWire);

//******************************* Setus up Things, This Loop Runs Once at Startup ***************************//
void setup() {

  Serial.begin(9600);

  pinMode(Motor, OUTPUT);
digitalWrite(Motor,OFF);

  pinMode(Potentiometer, INPUT);
  pinMode(ButtonPin, INPUT_PULLUP);

  pinMode(TempProbeNegative , OUTPUT );
  digitalWrite(TempProbeNegative , LOW );
  pinMode(TempProbePossitive , OUTPUT );
  digitalWrite(TempProbePossitive , HIGH );

  delay(100);// gives sensor time to settle
  sensors.begin();
  feedSpacing=feedSpacing*60000; //Converts from minutes to milli seconds


  //************************************* Runs a Tester If You Hold the Feed Button When You Turns Power Switch On*************//
  GetReadings();
  if(Button==0){

    digitalWrite(Motor,ON);
    delay(FeedLength*1000);
    digitalWrite(Motor,OFF);
    delay(5000);

  };

};

//*******************************Main Loop [This Once Loops indefinatly ***************************************//

void loop() {


  GetReadings();

//*************** Checks if it is Time to Start The Feeder and delays to stop entering the loop twice *************************************************//

  if( (millis()%feedSpacing<=1000  &&millis()>=1010)) {   //
                    delay(1000); //stoprs multiple eneies into the loop
                    digitalWrite(Motor,ON);
                    delay(FeedLength*1000);
                    digitalWrite(Motor,OFF);
                                                      };

 //************** Allows the Button To operate the feeder Only While Pressed ****************************//
  if (Button==0){
     digitalWrite(Motor,ON);             //Turns the Motor on

  }
  else {
    digitalWrite(Motor,OFF);
  };


//**************************** Makes The code Hang Here While The Sensors Settle ********************//

 delay(200);
 PrintResults();
};


                              //************************ Reads The Sensors and Calcalates the Feed Length ***********************************//
                              void GetReadings() {
                                  Button=digitalRead(ButtonPin);                                  //Reads The Button To Check If It Is Pressed
                                  ResistorValue = analogRead(Potentiometer);                      //Checks what possition the potentiometer is at
                                  sensors.requestTemperatures();                                  // Send the command to get temperatures
                                  Temperature=sensors.getTempCByIndex(0);
                                  Temperature=Temperature*100;                                    //easiest way to get

                              //************ Turns Those Readings Into Something Useful [Optimum Feed Length ******************************//

                                  FishWeight = map(ResistorValue,0,1023, MinWeight*1000, MaxWeight*1000);  //Turns The Potentiometer Reading Into Something Usefull);
                                  FeedPercent=map(Temperature,1000,2600,PercentTenC*100,PercenTwentSixC*100);


                                  if (FeedPercent >= (MaxFeedPercent*100)){
                                   FeedPercent= (MaxFeedPercent*100);
                                  }

                                  if (FeedPercent<= (MinFeedPercent*100)){
                                    FeedPercent=(MinFeedPercent*100);
                                  };


                                  FeedLength =((FeedPercent*FishWeight)/(FeedRate*FeedsPerDay));
                                  FeedLength = FeedLength/10000;


                              };


//*************************** Prints The Variables To The Computer ************************************//
void PrintResults(){

   Serial.print(" Water Temperature:  ");
   Serial.print(Temperature/100 );
   Serial.println("*C");

   Serial.print(" User Has Selected:  ");
   Serial.print(FishWeight/1000);
   Serial.println("  Kg of Fish");

   Serial.print(" Feed:  ");
   Serial.print(FeedLength*FeedRate);
  //Serial.print(FeedLength);
   Serial.print("  Grams of food Every:  ");
   Serial.print(feedSpacing/60000);
   Serial.println("  minute");


};
This is a relatively simple code to any arduino user, it is crude and supplied as a starting point. The map feature will only output whole numbers and that is the reason we multiply the variables before the map and divide after [It could be better].
So I set this up for Tilapia, if you are using other fish you will need to read up about how much of their body weight to feed them at 10*C and 26*C and change the variables in the code to suit:
int PercentTenC =3;  //percent of Body weight to feed fish daily at 10*C
int PercenTwentSixC=12;//Percent of Body weight to feed fish daily at 26*C
This Controller is still in its infiancy, In the coming weeks we will be implimenting control over the feeding intervals, expanding the species of fish it can feed and adding a screen to output the data.
Keep watching,
Mike
Discussions
Become a Hackaday.io Member
Create an account to leave a comment. Already have an account? Log In.