 ronald
Whilst I never really grew up playing pinball machines (arcades are a different story), I had the opportunity to play a full size, fully functioning White Water pinball at my previous job. I was hooked and wanted to keep playing after I came home. Thus my digital pinball project begun!
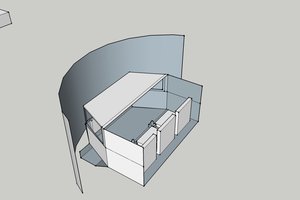
Since I had a 'spare' computer around that would be powerful enough for the project, the first thing I tried out was the various software emulators available to see how realistic and feasible of a result it would all really be. Encouraged by the community support and number of available tables, I continued with building a cabinet out of MDF.
I was lucky enough to have the main 16:9 LCD playfield monitor collecting dust in the cupboard and after telling my work friends what my new project involved, I was able to get an old but usable 4:3 LCD monitor kindly donated by one of my colleagues. This was given to me at a critical stage of the construction as I had already decided that I would be covering the entire body of the cabinet with heavy felt (giving it a unique speaker cabinet feel) and the measurements had to be precise if I was going to achieve this look successfully.
As with every build I make, I tend to take a lot of photos of the process to not only document the build but to also have the opportunity of looking back at what worked and didn't throughout the entire process. Diagrams and ongoing check lists are also essential aspects to my builds as it really helps to focus on the goal in hand and to achieve as much as possible in the smallest of time frames. See the Flickr album link on the left for an in depth pictorial history of the build.
After the basic build was complete and I had hacked in a real plunger using a linear potentiometer, the cabinet still felt a little bit 'dead' so that's when I began to pursue some kind of force feedback.
I had two accelerometers available an analog and a digital which at first I thought would be a better choice (the digital one). With a Raspberry Pi and python software I quickly started getting data out of the digital accelerometer and this seemed to be the right path to follow. Next I looked into how exactly I could interface the RPi with the Windows machine. Would USB be best here? Or perhaps some GPIO hack with some C program? Then it dawned on me, I already had an analog USB HID interface connected and working with the correct drivers recognised by Windows, the Sidewinder joystick that i'd already hacked to use the linear pot for the plunger! I had spare analog inputs since I was only using one of the three axis available. Connecting the analog accelometer was trivial with the placement of the device requiring the most thought. I ended up placing it in the front (and middle) of the cabinet right under where the apron would go on a real pinball. Connecting both plunger and accelerometer to the same device gave me the advantage that all calibration could be done in one spot using the standard Windows joystick calibration tool (see video of this in the links). After updating my emulator configuration to make it aware that it now had input from a tilt mechanism I was away. Let me just say that physically knocking the cabinet and seeing the virtual ball bounce around in response to this is the weirdest and yet best feeling. The analog accelerometer really does a great job in translating a small knock vs a large slam with the ball responding with very little latency.
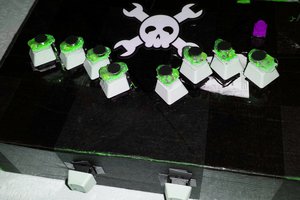
I was hooked, the feedback was just what the cabinet needed for it to feel more 'real' and now I wanted more. I seeked and ordered real replacement solenoids that would normally be used to actuate the main flippers on a pinball machine. These were simple to hook up since I had many spare ports on the 8 x relay module that was already fitted. I did find though that drawing the power to run the solenoids from the main computer PSU wasn't going to work. The computer would reboot when either solenoid was activated... Needless to say I only did this once...
Read more »


 Paul_Beaudet
 Mike
Mike
 Stephen Holdaway