 Retroplayer
I believe I mentioned that I am completely new to embedded Linux development. Well, I'm also fairly new to linux, period. I've wanted to learn it for a long time, but never really had a need to. As an electrical engineer, my tools have been all windows based.
I mean, I know linux as a user. I can install a pre-made distro and navigate my way around it. But really understanding how it works? No.
I believe that I also mentioned that the community for the Cubieboard is not very large. In many cases, I am going to need to start almost from scratch in building this. There has been talk about gaming on it, but I have been unable to find any real serious efforts. Now, of course, being an ARM system, there is tons of code out there already. But it needs to be compiled for our particular kernel and using the board support packages for our particular hardware. Not much of what I am trying to do here has already had this done.
So, for what I am wanting to accomplish, I have a very large and steep learning curve ahead of me. One of the barriers to entry I have found whenever I have tried to wrap my mind around embedded linux is that examples and tutorials seem to go one of two ways. Either they just flat out tell you what commands to enter without really explaining why, or they make a lot of assumptions about what you already know. I am going to assume that I know nothing. Because what I know already could barely fit in a lunch box.
So, one advantage to following along with me, is that if you are also a novice, you can get a chance to learn with me nearly from the ground up.
Let's start with the basics with a small recap of what I am hoping to accomplish. I would like a multiboot system running Android and Linux. I would like to choose which OS I am running using a GPIO input on the processor. Here is a diagram I threw together to show a typical boot sequence, a typical multi-boot sequence, and a modified version to support what I am looking to do:
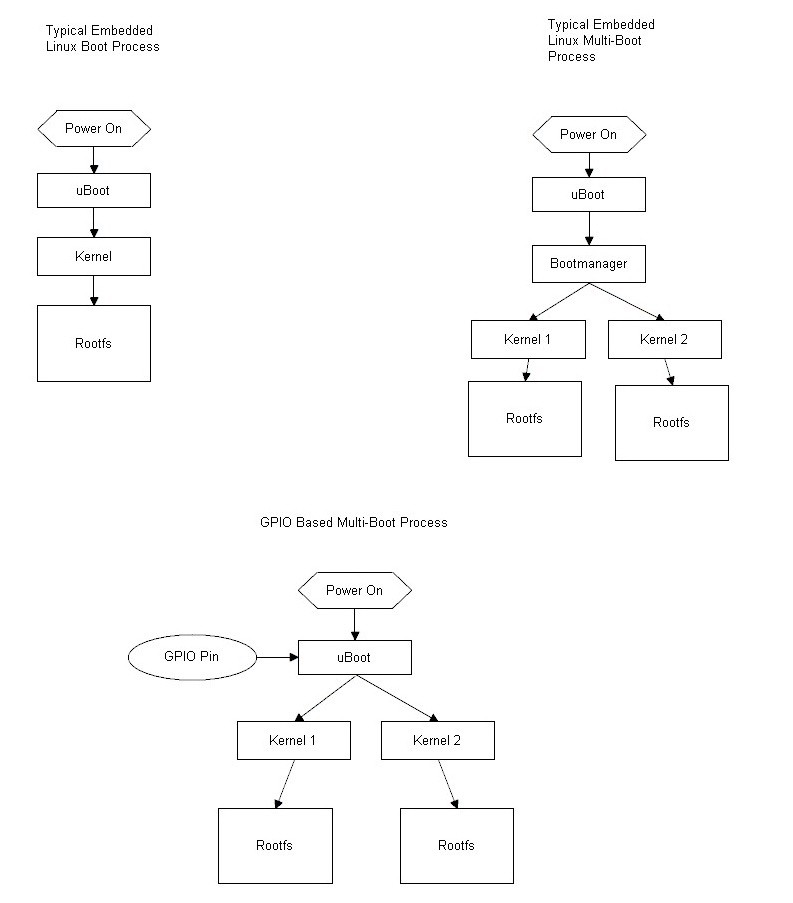
The very first piece of (user) code run on the embedded linux system will be a bootloader. The most popular and widely supported is uBoot. At this level, it is assembly level bare-metal code intended to set up the hardware to the point of being able to load the kernel from some storage device. In a computer, the bootloader would be your BIOS. It has the basic drivers for the hard drive, keyboard, monitor, etc... At the completion of the BIOS, it looks for a boot sector on the storage device (HDD in that case) the boot sector on the hard drive begins the process of loading the OS. The embedded linux system is very similar to this.
uBoot has already been compiled for the Cubieboard. So, in most cases you could just download it, flash it over to the board and not think much about it (actually, it is already installed.)
In order to support checking a GPIO pin at power up, we actually have two options. We can modify uBoot to include drivers for the GPIO pins and incoporate a check to determine which kernel to load, or we could modify a boot manager (which normally throws up a menu which the user then selects the OS using a keyboard or mouse) to accept input from the GPIO pins. When I drew up the above diagram, I initially felt it made sense to insert my code at the point of uBoot. But as you will see in the upcoming posts, it would be much more flexible to do this at a boot manager level. One reason being that uBoot is not easily modified by the system itself. With a higher level boot manager, you can have a nice config file to make changes whenever you like. Also, moving to this level means you could boot from other storage with a different set of multi-boot partitions.
I am planning to attempt both. For one, to learn and understand uBoot at that level of detail, and also to determine which provides the fastest boot time.
When I build something, I want to fully understand it from the ground up. So, in that sense, I am happy that there isn't an easy way out for me here. I had originally planned to use the Raspberry Pi and RetroPie, but there were several things I wanted to be different, and I found that just simply installing it didn't provide me with enough understanding to modify it the way I wanted.
Anyway, as you will see in the following posts, the diagram above is really a bird's eye view of the boot process and each piece has much more to it than that. We'll be digging into more and more detail, but first... we need to put together a toolchain on our development system for the Cubieboard in order to start compiling the kernel modules, drivers, uBoot, etc...
Discussions
Become a Hackaday.io Member
Create an account to leave a comment. Already have an account? Log In.