 Bill Gertz
Notes on the Instructable Guide:
Step 1: We found that we couldn't reach 110° C or even maintain 95° C with any sort of stability with our cardboard and aluminized mylar backed foam homemade thermal isolation. Without any thermal isolation (as built) the print bed could only reach 70° C so the first hack was a big improvement. But we were looking for even higher temperatures, so we went looking for a better light weight insulator. We found a reference to SpaceLoft and went from there.
Step 2: We were in the US when I ordered the material and guesstimated the clearance. I was a bit off, since there was less clearance under the bed cantilever.
Step 3: We had ordered special high heat tolerant tape (3M) and getting the old isolation off was tough. Cleaned the adhesive residue with a little acetone. That worked well as the heated bed heater was based on Kapton tape.
Step 4: We used the old isolation as a template for the new SpaceLoft + Kapton Film isolation layer. Luckily we had a pair of decent heavy duty scissors and brand new X-acto blade. The Aerogel Blanket clogged the permanent ink marker dry, so we ended up using a whiteboard marker instead. We noticed that gloves were a must when handling the insulation.
Step 5: Oops the material was too thick for the cantilever. Go back one space...
Step 4: After marking the Kapton film, we cut out it's silhouette in the plastic and excavated about 3mm of the insulation to make room. The sharp X-acto knife did the trick.
Step 5: Rinse and repeat, now the wiring was binding between the insulation and the cantilever.
Step 4: A bit more Kapton cutting and material excavated.
Step 5: Success!
Step 6: The dust is fairly nasty as it immediately drys out your skin when touched. We guessed it's going to play hob with extruded plastic sticking to the bed. So we decided to seal the ends with Kapton tape.
Step 7: Tested again using the same enclosure and we got our target temperature. I'll post our first (successful) ABS prints in the near future.


 nfk
nfk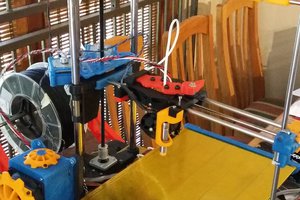
 RenierM
 mmiscool
Hey SUF,
It took a bit of work as there are no schematics for the Felix Printer Controlboard (their name). After a little reverse engineering, they've implemented a straight RAMPS style direct drive (MCU ATMEGA2560 Output/PWM Pin connected biased to ground on the MOSFET gate - take a look at the RAMPS 1.4 Schematic Heaters & Fans below).
Nonetheless this printer is set for dead time rather than PID. This means the switching rate is far lower than for PWM. (1/5 Hz and more like 1/10 -see https://www.flickr.com/photos/136258253@N06/shares/gTGV87 holding 105° C) Recent bed output graphs bear this out. Am I wrong in saying that I shouldn't be looking at much power loss due to switching that you've outlined above?
Rather given the large surface area of 30 x 27 cm (.081 m^2) and the anemic bed heater at 144W (1 Ohm at 12 V), the heater seems underpowered for stable 110° C. Working through the specific heat calculations and heat loss (convection and radiative) 144W looks low.
-Bill